JVC GY-HM700UXT JVC ProHD Clip Manager Owner's Manual (47 pg.) - Page 9
Procedures for Operating Clips Using Clip Manager - problems
 |
View all JVC GY-HM700UXT manuals
Add to My Manuals
Save this manual to your list of manuals |
Page 9 highlights
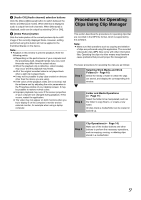
E [Audio CH] (Audio channel) selection buttons Click the [Stereo]/[Monaural] button to switch between the Stereo and Monaural modes. When [Stereo] is displayed, audio is output from both channels. When [Monaural] is displayed, audio can be output by selecting CH1 or CH2. F [Index Picture] button Sets the index picture of the current preview clip to a still image of the currently displayed frame. However, setting performed using this button will not be applied to the thumbnail display on the device. Note: ● Playback in this window is preview playback. Note the following points: ● Depending on the performance of your computer and the processing load, dropped frames may occur and timecode may differ from the actual values. ● When the playback clip is defective, video breakup may occur and the playback may freeze. ● All of the original recorded video is not played back when a split clip is played back. ● It may not be possible to play clips created on devices other than the device you are using. ● If the colors of the playback video are not normal, exit the software and try adjusting the color parameters in the Properties window of your desktop screen. It may be possible to restore normal colors. ● Improper playback may occur if the screen properties of your computer are changed during playback. If this occurs, restart the application. ● The video may not appear on both monitors when you try to display it on the computer's monitor and an external monitor, for example when using a laptop computer. Procedures for Operating Clips Using Clip Manager This section describes the procedures for operating clips that are recorded in the MP4 file format, which is supported by this software. Note: ● Make sure that operations such as copying and deletion of clips are performed using this application. The recorded video/audio clips (MP4 files) come with other information files. Operating the clips via other means may therefore cause problems that prevent proper file management. The basic procedures for operating the clips are as follows: Step 1 K Selecting Work Media and Work Folders (A Page 10) Select the media or folder in which the clips are stored, and display the corresponding Info window. Step 2 K Folder and Media Operations (A Page 11) Select the folder to be manipulated, such as the folder to copy files to, or create a new folder. All clips inside a media/folder can be copied or backed up. Step 3 Clip Operations (A Page 14) Make use of the toolbar buttons and other buttons to perform the necessary operations, such as copying, moving, or deleting clips stored in a media/folder. 9
-
 1
1 -
2
-
3
-
 4
4 -
 5
5 -
 6
6 -
 7
7 -
 8
8 -
 9
9 -
 10
10 -
 11
11 -
 12
12 -
 13
13 -
 14
14 -
15
-
16
-
17
-
18
-
19
-
20
-
21
-
22
-
23
-
24
-
25
-
26
-
27
-
28
-
29
-
30
-
31
-
32
-
33
-
34
-
35
-
36
-
37
-
38
-
39
-
40
-
41
-
42
-
43
-
44
-
45
-
46
-
47
 |
 |
