JVC RMP-2580U RM-P2580 Dome Controller Instructions (1148KB) - Page 14
JVC RMP-2580U - Remote Controller For Color Domes Manual
 |
View all JVC RMP-2580U manuals
Add to My Manuals
Save this manual to your list of manuals |
Page 14 highlights
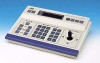
2. BASIC OPERATIONS AUTO PAN OPERATION The AUTO PAN operation consists of low-speed horizontal movement of a camera between preset positions at a constant time interval. Automatic panning is set between 2 points. This function can be set on individual cameras. SET button POSITION display 1. REMOTE CONTROL UNIT RM-P2580 CAMERA POWER POWER SET ALARM KEY LOCK AUTO F-1 F-2 F-3 POSITION Press the AUTO PAN button. The LED indicator lights up and the AUTO PAN operation starts. The POSITION display shows "A" at this time. NOTE During the AUTO PAN operation, the PAN/TILT control lever can be operated only in the TILT direction ( ). SETUP MENU LENS SPEED CAMERA/POSITION PAN/TILT POSITION 1 OPEN 2 5 8 0 /HOME 3 6 9 ENTER 2. CAMERA To stop the AUTO PAN operation, press the AUTO PAN button again. NOTES ● The AUTO PAN operation also stops when a preset position is selected or the AUTO PATROL operation is started. REF. : "POSITION SELECTION" on Page 11 and "AUTO PATROL OPERATION" on page 15. ● The AUTO PAN operation is set on the CAMERA SCREEN ( REF. : Page 28). Open the camera menu screen to perform the setting. As the rest of the setting procedure is variable depending on the camera models, please refer to the Instruction manual of the connected camera. CLOSE IRIS 4 7 CLEAR OPTION 1 OPTION 2 NEAR FOCUS AF FAR AUTO PAN AUTO PATROL WIDE ZOOM TELE AUTO PAN button PAN/TILT control lever 14
-
 1
1 -
2
-
3
-
4
-
5
-
6
-
7
-
8
-
 9
9 -
 10
10 -
 11
11 -
 12
12 -
 13
13 -
 14
14 -
 15
15 -
 16
16 -
 17
17 -
 18
18 -
 19
19 -
20
-
21
-
22
-
23
-
24
-
25
-
26
-
27
-
28
-
29
-
30
-
31
-
32
 |
 |
