JVC RMP-2580U RM-P2580 Dome Controller Instructions (1148KB) - Page 26
JVC RMP-2580U - Remote Controller For Color Domes Manual
 |
View all JVC RMP-2580U manuals
Add to My Manuals
Save this manual to your list of manuals |
Page 26 highlights
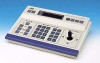
5. MENU SCREEN SETUPS MENU OPERATION SET button MENU button PAN/TILT control lever 1. 2. Set the POWER switch on the rear panel to "ON". Press and hold the MENU button for about 3 seconds. The LED indicator lights up and the MONITOR OUTPUT 1 connector on the rear panel outputs the SETUP screen signal. Select a menu item by moving the cursor (>) using the PAN/TILT control lever. • Tilt the lever upwards (8) to move the cursor upwards. • Tilt the lever downwards (9) to move the cursor downwards. Press the SET button to display the sub-menu of the menu item selected. REMOTE CONTROL UNIT RM-P2580 CAMERA POWER POWER SET ALARM KEY LOCK AUTO F-1 F-2 F-3 POSITION SETUP MENU 3. LENS SPEED CAMERA/POSITION PAN/TILT POSITION 1 OPEN 2 5 8 0 /HOME 3 6 9 ENTER CAMERA CLOSE IRIS 4 7 CLEAR OPTION 1 OPTION 2 NEAR FOCUS AF 4. FAR AUTO PAN AUTO PATROL WIDE ZOOM TELE NOTE The items which have ".." at the end have the sub-menus under them. Cursor Item Sub-menu available SETUP POSITION SETUP.. CAMERA.. CONTROL UNIT.. 5. 6. As in step 3, select the desired item in the sub-menu. Change the value of the selected item using the PAN/TILT control lever. • Tilt the lever towards the left (;) to decrease the value. • Tilt the lever toward the right (:) to increase the value. When the value of an item is changed, the marking (V) appears as shown on the left. SETUP screen (Main menu) NOTE For details off the sub-menu setting procedure, see subsequent pages. OPTION P/T SPEED 8STEP CAMERA SELECTION.. FACTORY SETTING.. 7. After changing the items as required, press te MENU button to return to the normal video display screen. Example of sub-menu screen (Displayed at A Mode Only) Change marking OPTION P/T SPEED 8STEP CAMERA SELECTION.. FACTORY SETTING.. NOTES : While the menu screen is being displayed : ● The functions of AUTO SEQUENCE, AUTO PAN and AUTO PAN cease to operate. ● The alarm functions are disabled. ● The CAMERA SW is disabled. ● Remaining in operation are camera select, preset (home) position select, data output and manual control. Example of sub-menu screen after change (Displayed at A Mode Only) 26
-
 1
1 -
2
-
3
-
4
-
5
-
6
-
7
-
8
-
9
-
10
-
11
-
12
-
13
-
14
-
15
-
16
-
17
-
18
-
19
-
20
-
 21
21 -
 22
22 -
 23
23 -
 24
24 -
 25
25 -
 26
26 -
 27
27 -
 28
28 -
 29
29 -
 30
30 -
 31
31 -
32
 |
 |
