JVC RMP-2580U RM-P2580 Dome Controller Instructions (1148KB) - Page 27
JVC RMP-2580U - Remote Controller For Color Domes Manual
 |
View all JVC RMP-2580U manuals
Add to My Manuals
Save this manual to your list of manuals |
Page 27 highlights
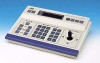
5. MENU SCREEN SETUPS POSITION SETUP SCREEN This screen is used to preset, correct or delete the camera positions. No position can be selected unless it has been preset. Up to 64 positions including the home position can be preset. Presetting and Correcting Camera Positions MENU button CAMERA button POSITION button REMOTE CONTROL UNIT RM-P2580 CAMERA POWER SET ALARM KEY LOCK AUTO F-1 F-2 F-3 POSITION SET button SETUP 1. 2. Press and hold the MENU button for about 3 seconds to display the SETUP screen. Select POSITION SETUP and press the SET button. "- POSITION SETUP MODE -" with the currently selected Camera No. and the Position No. are displayed. ("C01 P05" shows the Camera 1, Position 5.) Select a camera number. CAMERA button ¨ Numeric keys ¨ ENTER button Select the position number to be preset. POSITION button ¨ Numeric keys ¨ ENTER button In this case, the camera screen shifts to the pre-registered POSITION. Set the image angle. Set it using the PAN/TILT control lever and the IRIS, ZOOM and FOCUS control buttons. Press the SET button for about 1 second. A short beep indicates that the position has been memorised. "Invalid operation" is displayed when using the camera which the position can not be preset, such as fixed camera. To preset other positions, repeat steps 4 to 6. 64 positions including the home position can be preset. MENU LENS SPEED CAMERA/POSITION PAN/TILT POSITION 1 OPEN 2 5 8 0 /HOME 3 6 9 ENTER CAMERA CLOSE IRIS 4 7 CLEAR OPTION 1 OPTION 2 NEAR FOCUS AF FAR AUTO PAN AUTO PATROL 3. 4. WIDE ZOOM TELE Lens operation buttons ENTER button Numeric keypad PAN/TILT control lever SETUP POSITION SETUP.. CAMERA.. CONTROL UNIT.. 5. 6. - POSITION SETUP MODE - CO1-PO5 7. Clearing a Camera Position POSITION display REMOTE CONTROL UNIT RM-P2580 CAMERA POWER SET ALARM KEY LOCK AUTO F-1 F-2 F-3 POSITION SETUP MENU Select the camera ID number and the position number in the same way as presetting or correcting a position. (Steps 1 to 4 of "Presetting and Correcting Camera Positions") 1. LENS SPEED CAMERA/POSITION PAN/TILT POSITION 1 OPEN 2 5 8 0 /HOME 3 6 9 ENTER CAMERA Press and hold the CLEAR button for about 1 second. A short beep is generated and the position is cleared. NOTE: Home position is not clearable. CLOSE IRIS 4 7 CLEAR OPTION 1 OPTION 2 NEAR FOCUS AF FAR AUTO PAN AUTO PATROL WIDE ZOOM TELE CLEAR button 27
-
 1
1 -
2
-
3
-
4
-
5
-
6
-
7
-
8
-
9
-
10
-
11
-
12
-
13
-
14
-
15
-
16
-
17
-
18
-
19
-
20
-
21
-
 22
22 -
 23
23 -
 24
24 -
 25
25 -
 26
26 -
 27
27 -
 28
28 -
 29
29 -
 30
30 -
 31
31 -
 32
32
 |
 |
