JVC TH-A25 Instruction Manual - Page 104
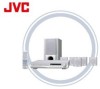
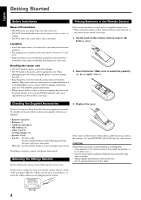
On the back of the remote control, remove the, battery cover.
 |
UPC - 046838260377
View all JVC TH-A25 manuals
Add to My Manuals
Save this manual to your list of manuals |
Page 104 highlights
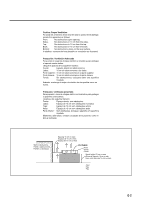
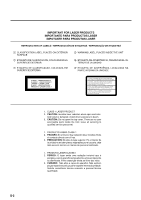
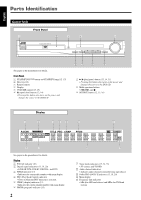
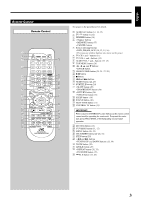
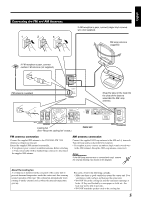
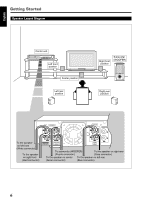
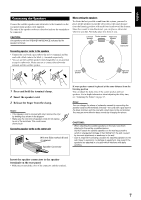
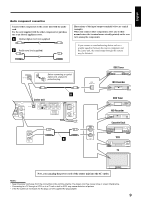
Getting Started English Before Installation Putting Batteries in the Remote Control General Precautions • DO NOT insert any metal object into the center unit. • DO NOT disassemble the center unit or remove screws, covers, or cabinet. • DO NOT expose the center unit to rain or moisture. Locations • Install the center unit in a location that is level and protected from moisture. • The temperature around the center unit must be between 5˚C and 35˚C. • Make sure there is good ventilation around the center unit. Poor ventilation could cause overheating and damage the center unit. Before using the remote control, put two supplied batteries first. • When using the remote control, aim the remote control directly at the remote sensor on the center unit. 1. On the back of the remote control, remove the battery cover. Handling the center unit • DO NOT touch the power cord with wet hands. • DO NOT pull on the power cord to unplug the cord. When unplugging the cord, always grasp the plug so as not to damage the cord. • Keep the power cord away from the connecting cords and the antenna. The power cord may cause noise or screen interference. It is recommended to use a coaxial cable for antenna connection, since it is well-shielded against interference. • When a power failure occurs, or when you unplug the power cord, the preset settings such as preset FM/AM channels and sound adjustments may be erased in a few days. 2. Insert batteries. Make sure to match the polarity: (+) to (+) and (-) to (-). Checking the Supplied Accessories 3. Replace the cover. Check to be sure you have all of the following supplied accessories. The number in the parentheses indicates the quantity of the pieces supplied. • Remote Control (1) • Batteries (2) • AM Loop Antenna (1) • FM Antenna (1) • Video Cord (1) • AC Plug Adapter (1) • Speaker Cords 6 m (4): For subwoofer For the satellite speakers on the following positions: left front, right front, and center 10 m (2): For the satellite speakers on left and right rear positions If anything is missing, contact your dealer immediately. Adjusting the Voltage Selector Before connections, always do the following first if necessary. If the range or effectiveness of the remote control decreases, replace the batteries. Use two R6P(SUM-3)/AA(15F) type dry-cell batteries. CAUTION: Follow these precautions to avoid leaking or cracking cells: • Place batteries in the remote control so they match the polarity: (+) to (+) and (-) to (-). • Use the correct type of batteries. Batteries that look similar may differ in voltage. • Always replace both batteries at the same time. • Do not expose batteries to heat or flame. Set the correct voltage for your area with the voltage selector switch on the rear panel. Slide the voltage selector using a screw driver, to select the voltage where you are plugging in the system. 110- 220- 127V 240V 4
-
 1
1 -
2
-
3
-
4
-
5
-
6
-
7
-
8
-
9
-
10
-
11
-
12
-
13
-
14
-
15
-
16
-
17
-
18
-
19
-
20
-
21
-
22
-
23
-
24
-
25
-
26
-
27
-
28
-
29
-
30
-
31
-
32
-
33
-
34
-
35
-
36
-
37
-
38
-
39
-
40
-
41
-
42
-
43
-
44
-
45
-
46
-
47
-
48
-
49
-
50
-
51
-
52
-
53
-
54
-
55
-
56
-
57
-
58
-
59
-
60
-
61
-
62
-
63
-
64
-
65
-
66
-
67
-
68
-
69
-
70
-
71
-
72
-
73
-
74
-
75
-
76
-
77
-
78
-
79
-
80
-
81
-
82
-
83
-
84
-
85
-
86
-
87
-
88
-
89
-
90
-
91
-
92
-
93
-
94
-
95
-
96
-
97
-
98
-
 99
99 -
 100
100 -
 101
101 -
 102
102 -
 103
103 -
 104
104 -
 105
105 -
 106
106 -
 107
107 -
 108
108 -
 109
109 -
110
-
111
-
112
-
113
-
114
-
115
-
116
-
117
-
118
-
119
-
120
-
121
-
122
-
123
-
124
-
125
-
126
-
127
-
128
-
129
-
130
-
131
-
132
-
133
-
134
-
135
-
136
-
137
-
138
-
139
-
140
-
141
-
142
-
143
-
144
 |
 |