JVC VN-X235VPU Instruction Manual
JVC VN-X235VPU - Network Camera - Pan Manual
 |
View all JVC VN-X235VPU manuals
Add to My Manuals
Save this manual to your list of manuals |
JVC VN-X235VPU manual content summary:
- JVC VN-X235VPU | Instruction Manual - Page 1
IP CAMERA VN-V25U VN-V26U VN-X35U VN-V225U series VN-X235U series INSTRUCTIONS (Setting) Thank you for purchasing this JVC product. Before operating this unit, please read the instructions carefully to ensure the best possible performance. LST0886-001A - JVC VN-X235VPU | Instruction Manual - Page 2
camera, please refer to the attached [READ ME FIRST] and the [INSTRUCTIONS (Installation)] (pdf) in the bundled CD-ROM. ● The model name and series name are stated for functions or setting values that are unique to the model. ● This manual corresponds to firmware V2.00 or later. (VN-V25U, VN-V26U - JVC VN-X235VPU | Instruction Manual - Page 3
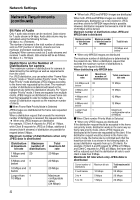
multicast stream, control of this camera via the network may fail. ● Data volume to be sent by camera varies with the settings and 100 KB 3 KB to 33 KB Ⅵ VFS(Variable File Size) (TX) is applicable to VN-X series only. Distribution File Size (typical sizes) Quad (TX) VGA QVGA Setting 1 (High - JVC VN-X235VPU | Instruction Manual - Page 4
number of streams is the total number of streams sent via TCP (number of clients), streams sent via multicast, and stream received by camera (Example) When camera sends out 2 audio streams and receives 1 audio stream, data volume will be as follows. 64 kbps x 3 = 192 kbps Restrictions on the Number - JVC VN-X235VPU | Instruction Manual - Page 5
Port Numbers Used by camera camera uses the protocols and port numbers listed below. Ensure that these ports are allowed through the firewall when a firewall is to be installed. Protocol/Port No. /25 Mail delivery TCP/110 POP (Mail Delivery) TCP/User Setting No. Sending alarm UDP/123 SNTP UDP - JVC VN-X235VPU | Instruction Manual - Page 6
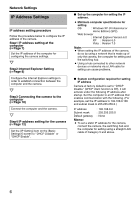
switching hub. ● Using a hub connected to other network devices or networks via a LAN cable for setting can cause problems. ⅷ System configuration required for setting IP address Camera at factory default is set to ADHCP DisableB (DHCP client function is Off), it will activate under the following - JVC VN-X235VPU | Instruction Manual - Page 7
address setting at the computer Set the computer to an IP address that enables communication with the camera. Procedures described in this item are intended for Windows XP users. 1. Click [Start] ● Select in the sequence of [Control Panel]-[Network Connection]-[Local Area]. Windows Vista : ● Select - JVC VN-X235VPU | Instruction Manual - Page 8
Network Settings IP Address Settings (continued) Internet Explorer Setting 1. Launch the Internet Explorer on the computer 2. When proxy settings are enabled in the Internet Explorer, follow the steps - JVC VN-X235VPU | Instruction Manual - Page 9
-up Blocker]-[Pop-up Blocker Settings] that becomes active to open the [Pop-up Blocker Settings] window. In the opened window, add the address of camera as a permitted web site address. 6. When plug-in tools such as the Yahoo or Google toolbar are included in the Internet Explorer, disable the pop - JVC VN-X235VPU | Instruction Manual - Page 10
following method to identify the IP address. ● Search for the camera in the LAN using [Search tool] inside [Tool_E] folder of the supplied CD- ROM. T For details on [Search tool], please refer to the AReadmeB file in the CD-ROM supplied with this product. 2. Enter the user name and password (login - JVC VN-X235VPU | Instruction Manual - Page 11
AoperatorB authority. B Click [OK]. Memo: ● The operator password entry screen does not appear if the password is stored on the computer. Proceed to configure the IP address setting for the camera. (A Page 12) 11 - JVC VN-X235VPU | Instruction Manual - Page 12
ADHCP EnableB, and click the [OK] button. For details on IP addresses assigned to the camera, consult your network administrator. Note: ● Set the DHCP server such that the same IP address is always assigned to the MAC address of the camera by the DHCP server. Connection may fail if the above setting - JVC VN-X235VPU | Instruction Manual - Page 13
to reboot. Memo: ● Access from the connected computer may fail when the IP address of the camera is changed. To enable access to camera from the same computer, alter the IP address at the computer accordingly. When the display or configuration of the opened screen appears strange, check using the - JVC VN-X235VPU | Instruction Manual - Page 14
levels to camera. The factory settings are as follows. User Name admin operator user Default Password jvc jvc jvc Authorization levels the user. ● admin (TX) is applicable to VN-X series only. Basic Settings1 Basic Settings2 Details [Network] [Time] [Camera] [Encoding] [JPEG] [MPEG4] [Camera] - JVC VN-X235VPU | Instruction Manual - Page 15
● operator (TX) is applicable to VN-X series only. Basic Settings2 [Camera] [Encoding] [JPEG] [MPEG4] Details ● user [Camera] [Encoding] [Audio] (This feature is not available in VN-V25U) [Alarm] [Alarm Environment] [PTZ] (TX) [Auto Patrol] (TX) [Privacy Mask] [Motion detection] [Streaming] [LED - JVC VN-X235VPU | Instruction Manual - Page 16
Explorer Setting How to open the setting page 1. Enter IP address of camera in the address bar of Internet Explorer (A Page 10) A unified viewer is opened. Click 2. Click [Details]. ● [Basic Settings1] page will be opened if accessed by user name AadminB. (A Page 17) ● [Basic Settings2] page will be - JVC VN-X235VPU | Instruction Manual - Page 17
to a network environment with a DHCP server when DHCP is to be enabled. If the DHCP server does not exist when [IP Setting] is set to ADHCP EnableB, camera will start running with the 192.168.0.2 IP address and 255.255.255.0 subnet mask in about 2 minutes after startup. (A Page 6) For setting the - JVC VN-X235VPU | Instruction Manual - Page 18
Setting Using Internet Explorer Setting (continued) Basic Settings2 Page for setting fundamental parameters of ACameraB, AJPEGB and AMPEG4B. This page can be used during access using AadminB or AoperatorB. ● Click [Basic Settings2]. ● Press the [OK] button to enable the new settings. ● If the [OK] - JVC VN-X235VPU | Instruction Manual - Page 19
VN-X series only. A Camera ID B Monitor Type C Encoding Character strings entered here will be written to the JPEG comment segment (item name: camera). Refer to the API Guide according to the user's preference. Detailed settings are configured on the detailed settings page of the camera. (A Page 21 - JVC VN-X235VPU | Instruction Manual - Page 20
Setting Using Internet Explorer Setting (continued) Basic Settings2 (continued) (TV) is applicable to VN-V series only. (TX) is applicable to VN-X series only. DJPEG Frame Size EMPEG4 Bitrate Bitrate Control FPS I Frame Interval Priority For specifying the JPEG picture quality (rate control mode) - JVC VN-X235VPU | Instruction Manual - Page 21
's parameters. This page can be used during access using AadminB or AoperatorB. ● Click [Advanced Settings] to display setting menu. ● Click [Camera]. ● Press the [OK] button to enable the new settings. ● If the [OK] button is pressed upon entering an invalid value, a warning message will appear - JVC VN-X235VPU | Instruction Manual - Page 22
VN-V series only. (TX) is applicable to VN-X series only. A Camera ID B Monitor Type Character strings entered here will be written to the JPEG comment segment (item name: camera). Refer to the API Guide are available for selection according to the user's preference. CRT : Picture quality setting - JVC VN-X235VPU | Instruction Manual - Page 23
) is applicable to VN-X series only. G Super] Memo: ● This feature cannot be configured when the L Easy Day/Night feature is set to ABlack and WhiteB or AAutoB. ● The AGC cannot fluorescent or mercury lamps. This is not a malfunction of the camera, but is due to principles related to Sense Up. ● - JVC VN-X235VPU | Instruction Manual - Page 24
: ● AAutoB is only recommended when using a manual iris lens. ● Flickers may occur when this is L Easy Day and Night VN-V25U VN-X35U only For setting the Easy Day and Night feature. camera will be muted. (VN-V26U only) ● When AAuto LowB, AAuto MidB or AAuto HighB has been selected, the camera - JVC VN-X235VPU | Instruction Manual - Page 25
(TV) is applicable to VN-V series only. (TX) is applicable to VN-X series only. M EV Compensation N White Balance ATW AWC One Push AWC For setting EV (Exposure Value) correction. Enables setting between -9(-3EV) to 6(+2EV). You can - JVC VN-X235VPU | Instruction Manual - Page 26
on this page are altered during playback using the built-in viewer, reboot the viewer. ● There is upper limit to transmission bit rate from the camera. If a bit rate that exceeds upper limit is specified, this new setting will not be applied. For details on the maximum transmission limit, refer to - JVC VN-X235VPU | Instruction Manual - Page 27
(TV) is applicable to VN-V series only. (TX) is applicable to VN-X series only. A Frame Size JPEG B Quality/Size For selecting the frame size of each JPEG or MPEG4 screen to Quad VGA (1280 ן960) (TX), VGA ( - JVC VN-X235VPU | Instruction Manual - Page 28
Setting Using Internet Explorer Setting (continued) Audio Page (This feature is not available in VN-V25U) This page is for setting the audio parameters. This page can be used during access using AadminB or AoperatorB ● Click [Advanced Settings] to display - JVC VN-X235VPU | Instruction Manual - Page 29
camera. [Set values: 0 dB, 20 dB, 26 dB, 32 dB, AGC] For setting the gain value for the camera's built-in microphone. (VN-V26U the camera. Audio camera. Press the [Delete] button to delete an audio file registered on the camera camera, and send output to the Audio signal output terminal of the camera - JVC VN-X235VPU | Instruction Manual - Page 30
Setting Using Internet Explorer Setting (continued) Alarm Page This page is for setting actions when there is an alarm. Up to 5 actions (No. 01 to No. 05) may be set. This page can be used during access using AadminB or AoperatorB. ● Click [Advanced Settings] to display setting menu. ● Click < - JVC VN-X235VPU | Instruction Manual - Page 31
entered in the [TCP/UDP Data] field to the destinations specified in [TCP/UDP IP Address] and [TCP/UDP Port Number] via TCP. UDP : Sends out the available in VN-V25U) : Play back an Audio File registered on the camera. (A Page 29) (The following setting values are for VN-V26U, VN-V225U series - JVC VN-X235VPU | Instruction Manual - Page 32
Input 1 Make, Input 2 Make, Input 1 Break, Input 2 Break, Motion detection, Position (TX), BlackWhite B Color (VN-V26U, VN-V225U series and VN-X235U series only), Color B BlackWhite (VN-V26U, VN-V225U series and VN-X235U series only)] Memo: ● When the second trigger is turned off, the action will be - JVC VN-X235VPU | Instruction Manual - Page 33
to the mail. TCP/UDP IP Address : For entering the address when alarm action notification is to be sent via TCP or UDP. (IP or FQDN) TCP/UDP Port the alarm action with respect to each day of the week and setting the corresponding time of the day. Applicable day of week : Sunday, Monday, Tuesday, - JVC VN-X235VPU | Instruction Manual - Page 34
Setting Using Internet Explorer Setting (continued) Alarm Environment Page This page is for setting alarm-related environments. This page can be used during access using AadminB or AoperatorB. ● Click [Advanced Settings] to display setting menu. ● Click [Alarm Environment]. ● Press the [OK] button - JVC VN-X235VPU | Instruction Manual - Page 35
[SMTP] settings under usual circumstances. Enter the camera's mail address as the recipient's mail address. or domain name on the TCP/IP network without abbreviating. For example, User-defined- name] Example: Camera1.jpg ● File name with the year, month, day, hour, minute, and second added to [User - JVC VN-X235VPU | Instruction Manual - Page 36
Setting Using Internet Explorer Setting (continued) Alarm Environment Page (continued) B C 36 - JVC VN-X235VPU | Instruction Manual - Page 37
only. (TX) is applicable to VN-X series only. B FTP (continued) C Alarm Output Duration Manual Output Time Filter: For specifying the periodic FTP transfer action with respect to each day of the week and setting the corresponding time of the day. Applicable day of week : Sunday, Monday, Tuesday - JVC VN-X235VPU | Instruction Manual - Page 38
Setting Using Internet Explorer Setting (continued) PTZ Page (VN-X series only) Set the movement for AAuto ReturnB, to the state specified under [Mode] when action is not performed on the manually operated camera over the interval specified in [Return Time]. For setting the action after Auto - JVC VN-X235VPU | Instruction Manual - Page 39
Auto Patrol Page (VN-X series only) Perform Auto Patrol setting to switch image display between multiple positions according to the interval that has been set. Set when viewing registered - JVC VN-X235VPU | Instruction Manual - Page 40
Page (continued) (VN-X series only) Click ABC D E A No. B Title C Position D Stay Time E Moving speed Switches the camera images in sequence title of the position. For setting the sequence of position numbers in which the camera moves. [Set values : 0 to 19] For setting the time interval for - JVC VN-X235VPU | Instruction Manual - Page 41
Privacy Mask Page Privacy Mask is a feature that enables masking of a portion of the image. The camera enables unlimited privacy masks to be specified in different shapes at your favorite locations. The Privacy Mask masks area by uploading a BMP file painted in - JVC VN-X235VPU | Instruction Manual - Page 42
Page (continued) (TV) is applicable to VN-V series only. (TX) is applicable to VN-X series only. A Mode B Masking Data to upload the selected BMP file to the camera. C Masking Color D Masking Color Setting Creating the BMP file 1. Upon installing the camera, use JPEG Viewer to save the JPEG file - JVC VN-X235VPU | Instruction Manual - Page 43
Detection Page This page is for setting motion detection. This page can be used during access using AadminB or AoperatorB. Memo: ● When images on the camera are currently acquired by the built-in viewer or another client, video images may not appear on the [Motion detection] page if it is beyond - JVC VN-X235VPU | Instruction Manual - Page 44
Setting Using Internet Explorer Setting (continued) Motion Detection Page (continued) A Display Screen The screen is divided into blocks of 10 (horizontal) x 8 (vertical). You can specify whether to enable motion detection in each block. Clicked block turns blue. Click again to return to the - JVC VN-X235VPU | Instruction Manual - Page 45
of the [Network Basic] page is changed, all services that are currently running will end immediately. For exist when DHCP is set to AEnableB, Camera will start running with the 192.168.0.2 IP address and 255.255.255.0 subnet mask support IPv6, "Disabled" appears in the "global" address field. 45 - JVC VN-X235VPU | Instruction Manual - Page 46
feature is not available in VN-V25U) D TTL( Unicast) E TTL( Multicast) F MTU G Negotiation For setting the TOS value of IP packets in which JPEG is stored and the value becomes "248". TOS values are used in networks that support QoS. By setting QoS for the network switch, routing can be camera. 46 - JVC VN-X235VPU | Instruction Manual - Page 47
protocols. You can change the port number for the built-in web server of the camera. (1 to 65535: The default port number setting is 80.) The JPEG and MPEG4 Discovery Protocol to On or Off. Set to AOnB when you are using the camera on AMX's systems. [Set values : On, Off] JPEG Streaming E Priority - JVC VN-X235VPU | Instruction Manual - Page 48
Setting Using Internet Explorer Setting (continued) Streaming Page This page is for setting manual multicast transmission. This page can be used during access using AadminB or AoperatorB. ● Click [Advanced Settings] to display setting menu. ● Click . ● Press the [OK] - JVC VN-X235VPU | Instruction Manual - Page 49
(This feature is not available in VN-V25U.) H Control For starting or stopping camera is rebooted. ● When the setting on the Encoding page is set to a pattern where MPEG4 is not available, MPEG4 multicast transmission cannot start. ACombination of distribution sizes and available features of VN - JVC VN-X235VPU | Instruction Manual - Page 50
Setting Using Internet Explorer Setting (continued) Access Restrictions Page (VN-V25U does not have audio.) This page is for setting client restrictions. This page can be used during access using AadminB. ● Click [Advanced Settings] to - JVC VN-X235VPU | Instruction Manual - Page 51
to the Web Settings page. Additionally, Camera will also deny access when instructions for transmission to the specified IP address are sent via API. Memo: ● To specify a specific IP address range, enter a combination of the IP address and subnet mask in the [IP Address] field. ● Define the subnet - JVC VN-X235VPU | Instruction Manual - Page 52
immediately before and after acquiring time from the NTP server. For setting the IP address of the NTP server. For setting the time interval for access to the NTP server. Displays the time on the clock of the camera. The clock time can be changed by entering an appropriate value. (Second value - JVC VN-X235VPU | Instruction Manual - Page 53
shall be at least 1 characters and not longer than 8 characters. Camera is case sensitive. Enter again to confirm the new password. Note: ● Be sure to handle the password carefully in case you forget it. ● In the event that you forget the password, please consult JVC's servicing center. 53 - JVC VN-X235VPU | Instruction Manual - Page 54
also be initialized. The built-in clock of the camera will not be affected. JPEG/MPEG4 transmission and all others services that are running will be discontinued. Upgrades the firmware version of the camera and reboots the unit. The settings of the camera will be saved. Copy the new firmware file to - JVC VN-X235VPU | Instruction Manual - Page 55
Press the [OK] button to enable the new settings. A B Click A LED State B Identify Unit For selecting whether to light up the [STATUS] indicator on this camera when it is running. Enable : Lights up when unit is running. Disable : Turns off the indicator after startup is complete. If you want the - JVC VN-X235VPU | Instruction Manual - Page 56
is applicable to VN-V series only. (TX) is applicable to VN-X series only. Ⅵ Camera Page (A Page 21) Item Factory Settings Camera ID model (1/15 - 1/100)(TX) Easy Day and Night Color VN-V25U,VN-X35U only B/W Mode Color VN-V26U, VN-V225U series, VN-X235U series only EV Compensation 0 - JVC VN-X235VPU | Instruction Manual - Page 57
VN-X series only) Audio File - (This feature is not available in VN-V25U) Trigger Position No. - (VN-X series only) Mail Address - Mail Text - Attach Image Off TCP/UDP IP After Trigger Duration Output 1 Duration Output 2 Manual Output 1 Manual Output 2 Unmask All 15 fps(TV) 5 - JVC VN-X235VPU | Instruction Manual - Page 58
to VN-V series only. (TX) is applicable to VN-X series only. Ⅵ Network Basic Page (A Page 45) Item Factory Settings IP Setting DHCP Disable IP AadminB New Password Blank Default passwords are: AadminB : jvc AoperatorB : jvc AuserB : jvc Ⅵ LED Settings Page (A Page 55) Item Factory - JVC VN-X235VPU | Instruction Manual - Page 59
information. This page can be used during access using AadminB, AoperatorB and AuserB. ● Click [Advanced Settings] to display setting menu. ● Click . A Click A Open Source Software Press the [Show] button to display information of the software used by the camera. 59 - JVC VN-X235VPU | Instruction Manual - Page 60
A Total Sending Bitrate B Destination C System Log Displays the total TCP/UDP bit rate sent by the camera as well as the individual bit rates. Displays the destination that the camera is sending data to. Displays the following information. ● Number of seconds after startup ● Alarm information 60 - JVC VN-X235VPU | Instruction Manual - Page 61
Settings Page Display the version information and current settings of the camera. This page can be used during access using AadminB or AoperatorB. ● Click [Advanced Settings] to display setting menu. ● Click . Click 61 - JVC VN-X235VPU | Instruction Manual - Page 62
Setting Using Internet Explorer Setting (continued) Settings Page (continued) 62 - JVC VN-X235VPU | Instruction Manual - Page 63
63 - JVC VN-X235VPU | Instruction Manual - Page 64
Setting Using Internet Explorer Setting (continued) Position List (VN-X series only) The Position List displays information on the preset positions. This page can be used during access using AadminB or AoperatorB. ● Click [Advanced Settings] - JVC VN-X235VPU | Instruction Manual - Page 65
Patrol Settings (VN-X series only) Patrol Settings displays the Auto Patrol information and settings. This page can be used during access using AadminB or AoperatorB. ● Click [Advanced Settings] to display setting menu. ● Click . Click 65 - JVC VN-X235VPU | Instruction Manual - Page 66
Built-in Viewer This product comes equipped with built-in viewer. (TV) is applicable to VN-V series only. (TX) is applicable to VN-X series only. You can start up Built-in Viewer by entering the IP address in the Internet Explorer. Built-in Viewer enables you to performing monitoring using JPEG or - JVC VN-X235VPU | Instruction Manual - Page 67
name is made up of the year, month, day, hour, minute, second, and millisecond. Memo VN-V25U) Starts sending audio sound to the camera from the client PC. Only one stream of audio sound can be sent for one unit of the camera software on the computer, and does not apply to settings of the camera unit - JVC VN-X235VPU | Instruction Manual - Page 68
the Auto-White Balance Control mode. In the AWC mode, values entered for the [AWC R-Gain] and [AWC B-Gain] items under White Balance of the Camera page are applied to white balance. Executes AWC (automatic white balance control).Execute by placing a white object around the center of the screen in - JVC VN-X235VPU | Instruction Manual - Page 69
Set values: Off, Area1, Area2, Area3, Area4] B Easy Day and Night For specifying Easy Day and Night. VN-V25U, VN-X35U only Mode Color : Sets to the color mode at all from the camera will be muted. (VN-V26U only) ● When AAuto LowB, AAuto MidB or AAuto HighB has been selected the camera will change - JVC VN-X235VPU | Instruction Manual - Page 70
Operation Operation of Built-in Viewer (continued) PTZ Settings (VN-X series only) This page describes procedures for setting the preset positions. ● This page can be used during access using AadminB or AoperatorB. To access this - JVC VN-X235VPU | Instruction Manual - Page 71
A Preset Position Position Title B Pan /Tilt /Zoom C Speed For setting the preset positions. For selecting a APositionB. [Set values :HOME , 1 to 19] Displays the current title. Enter accordingly if you want to register or change a title. (You can enter up to 32 alphanumeric or 16 Japanese - JVC VN-X235VPU | Instruction Manual - Page 72
Operation Operation of Built-in Viewer (continued) PTZ Control (VN-X series only) Use this item to operate the PTZ feature. Settings can be configured on the PTZ Settings . (A Page 70) ● This page can be used - JVC VN-X235VPU | Instruction Manual - Page 73
A AUTO FUNCTION B Preset Position C Pan/Tilt/ Zoom D Speed Start : Starts the Auto Patrol operation. Stop : Stops the Auto Patrol operation that is currently running. For selecting a Preset Position, or move to the selected Position if that Position has already been registered. [Set values : HOME , - JVC VN-X235VPU | Instruction Manual - Page 74
) JPEG Viewer Settings (TV) is applicable to VN-V series only. (TX) is applicable to VN-X series only. Using the compressed JPEG format enables display of a series of still images as well as one-shot recording of still images. When the JPEG Viewer is first installed, it is set to play back at 15 - JVC VN-X235VPU | Instruction Manual - Page 75
computer may not function properly. D Multicast IP Address You can change the multicast IP address. The default address is 225.0.1.1. E camera. (A Page 48) Ⅵ Other A Folder Name For specifying the name of the folder in which the captured files are stored. (Default name when viewer is installed - JVC VN-X235VPU | Instruction Manual - Page 76
the settings in the Viewer. The settings will be saved on the computer. Memo: ● To make use of the built-in MPEG4 Viewer of the camera, you will need to install the ffdshow open source codec. You can obtain ffdshow through the Internet. Ⅵ Title Bar Click Ⅵ Stream Click A A B B C C D D 76 - JVC VN-X235VPU | Instruction Manual - Page 77
Camera] page of the camera. (A Page 21) Selecting AOnB displays the Position Title. Select AOnB to display the time. Select the format for displaying time. YYYY, MM, and DD denote year, month and day page of the camera. (A Page 47) C Multicast IP Address You can change the multicast IP address. The - JVC VN-X235VPU | Instruction Manual - Page 78
Operation Operation of Built-in Viewer (continued) Audio Monitor Settings (This feature is not available in VN-V25U) This page describes procedures for configuring the settings to send/receive audio sound using the JPEG and MPEG4 Viewers. ● This page can be used - JVC VN-X235VPU | Instruction Manual - Page 79
multicast IP address. The default address is 225.0.3.1. Specify the same value as the parameter that is set on the [Streaming] page of the camera. (A settings A HTTP Port For changing the port number during access to the camera from the client PC via HTTP. The default port number is 80. Specify - JVC VN-X235VPU | Instruction Manual - Page 80
Password Ⅵ Follow the procedures below to configure the operator password required for sending/receiving audio sound (This feature is not available in VN-V25U) or PTZ operation (TX). Operator Password Enter the password of "operator" authority. Enter the password that is set on the Password - JVC VN-X235VPU | Instruction Manual - Page 81
the built-in viewer, launch the Internet Explorer and enter the URL of the built-in viewer in the address field. For example, if the IP address of the camera is 192.168.0.2, enter as follows: http://192.168.0.2/ ● After the [Security Settings] screen appears, press the [OK] button to proceed. 81 - JVC VN-X235VPU | Instruction Manual - Page 82
Others Troubleshooting Symptom Causes and Countermeasures IP address of the camera is unknown The web page of the camera cannot be displayed The built-in viewer cannot be installed Authentication by Verisign appears during installation of the built-in viewer A warning message appears upon - JVC VN-X235VPU | Instruction Manual - Page 83
and Countermeasures ● Start multicast transmission manually from the [Streaming] page of the camera. ● In the case of those on the [Streaming] page of the camera. Make use of a network that supports IGMPv2 for multicast transmission. ● Multicast may 75 A Page 47 - - INSTRUCTIONS (Installation) 83 - JVC VN-X235VPU | Instruction Manual - Page 84
Troubleshooting (continued) Symptom Causes and Countermeasures The MPEG4 Viewer screen appears in black When DirectX 9.x or Windows Media Player 9.x is installed MPEG4 Viewer of the camera, install "ffdshow" that is INSTRUCTIONS (Installation) A Page 41 A Page 41 INSTRUCTIONS (Installation) 84 - JVC VN-X235VPU | Instruction Manual - Page 85
© 2009 Victor Company of Japan, Limited LST0886-001A IP CAMERA
-
 1
1 -
 2
2 -
 3
3 -
 4
4 -
 5
5 -
 6
6 -
 7
7 -
8
-
9
-
10
-
11
-
12
-
13
-
14
-
15
-
16
-
17
-
18
-
19
-
20
-
21
-
22
-
23
-
24
-
25
-
26
-
27
-
28
-
29
-
30
-
31
-
32
-
33
-
34
-
35
-
36
-
37
-
38
-
39
-
40
-
41
-
42
-
43
-
44
-
45
-
46
-
47
-
48
-
49
-
50
-
51
-
52
-
53
-
54
-
55
-
56
-
57
-
58
-
59
-
60
-
61
-
62
-
63
-
64
-
65
-
66
-
67
-
68
-
69
-
70
-
71
-
72
-
73
-
74
-
75
-
76
-
77
-
78
-
79
-
80
-
81
-
82
-
83
-
84
-
85
 |
 |
IP CAMERA
VN-V25U
VN-V26U
VN-X35U
VN-V225U series
VN-X235U series
INSTRUCTIONS
(Setting)
LST0886-001A
Thank you for purchasing this JVC product.
Before operating this unit, please read the
instructions carefully to ensure the best
possible performance.