JVC VN-X235VPU Instruction Manual - Page 6
IP Address Settings, IP address setting procedure
 |
View all JVC VN-X235VPU manuals
Add to My Manuals
Save this manual to your list of manuals |
Page 6 highlights
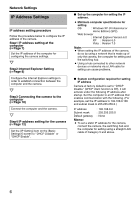
Network Settings IP Address Settings IP address setting procedure Follow the procedure below to configure the IP address of the camera. Step1 IP address setting at the computer (APage 7) Set the IP address of the computer for configuring the camera settings. G Step2 Internet Explorer Setting (APage 8) Configure the Internet Explorer settings in order to establish connection between the computer and the camera. G Step3 Connecting the camera to the computer (APage 10) Connect the computer and the camera. G Step4 IP address setting for the camera (APage 12) Set the [IP Setting] item on the [Basic Settings1] screen to ADHCP DisableB or ADHCP EnableB. ⅷ Set up the computer for setting the IP address. ● Minimum computer specifications for setting OS : Windows XP (Professional or Home Edition) (SP2) Web browser : Internet Explorer Version 6.0 XP : Version 6.0 Vista : Version 7.0 Note: ● When setting the IP address of the camera, do so by using a network that is made up of only the camera, the computer for setting and the switching hub. ● Using a hub connected to other network devices or networks via a LAN cable for setting can cause problems. ⅷ System configuration required for setting IP address Camera at factory default is set to ADHCP DisableB (DHCP client function is Off), it will activate under the following IP address after startup. Set the computer to an IP address that enables communication with the following. (For example, set the IP address to 192.168.0.100 and subnet mask to 255.255.255.0.) IP address : 192.168.0.2 Subnet mask : 255.255.255.0 Default gateway : None Memo: ● To set a static IP address for the camera, connect the camera, the switching hub and the computer for setting using a straight LAN cable of Category 5 and above. 6
-
 1
1 -
 2
2 -
 3
3 -
 4
4 -
 5
5 -
 6
6 -
 7
7 -
 8
8 -
 9
9 -
 10
10 -
 11
11 -
 12
12 -
13
-
14
-
15
-
16
-
17
-
18
-
19
-
20
-
21
-
22
-
23
-
24
-
25
-
26
-
27
-
28
-
29
-
30
-
31
-
32
-
33
-
34
-
35
-
36
-
37
-
38
-
39
-
40
-
41
-
42
-
43
-
44
-
45
-
46
-
47
-
48
-
49
-
50
-
51
-
52
-
53
-
54
-
55
-
56
-
57
-
58
-
59
-
60
-
61
-
62
-
63
-
64
-
65
-
66
-
67
-
68
-
69
-
70
-
71
-
72
-
73
-
74
-
75
-
76
-
77
-
78
-
79
-
80
-
81
-
82
-
83
-
84
-
85
 |
 |
