Kenwood DNX6180 dnx7180 (pdf) - Page 8
Basic Operations, Number, Motion - for sale
 |
UPC - 019048192714
View all Kenwood DNX6180 manuals
Add to My Manuals
Save this manual to your list of manuals |
Page 8 highlights
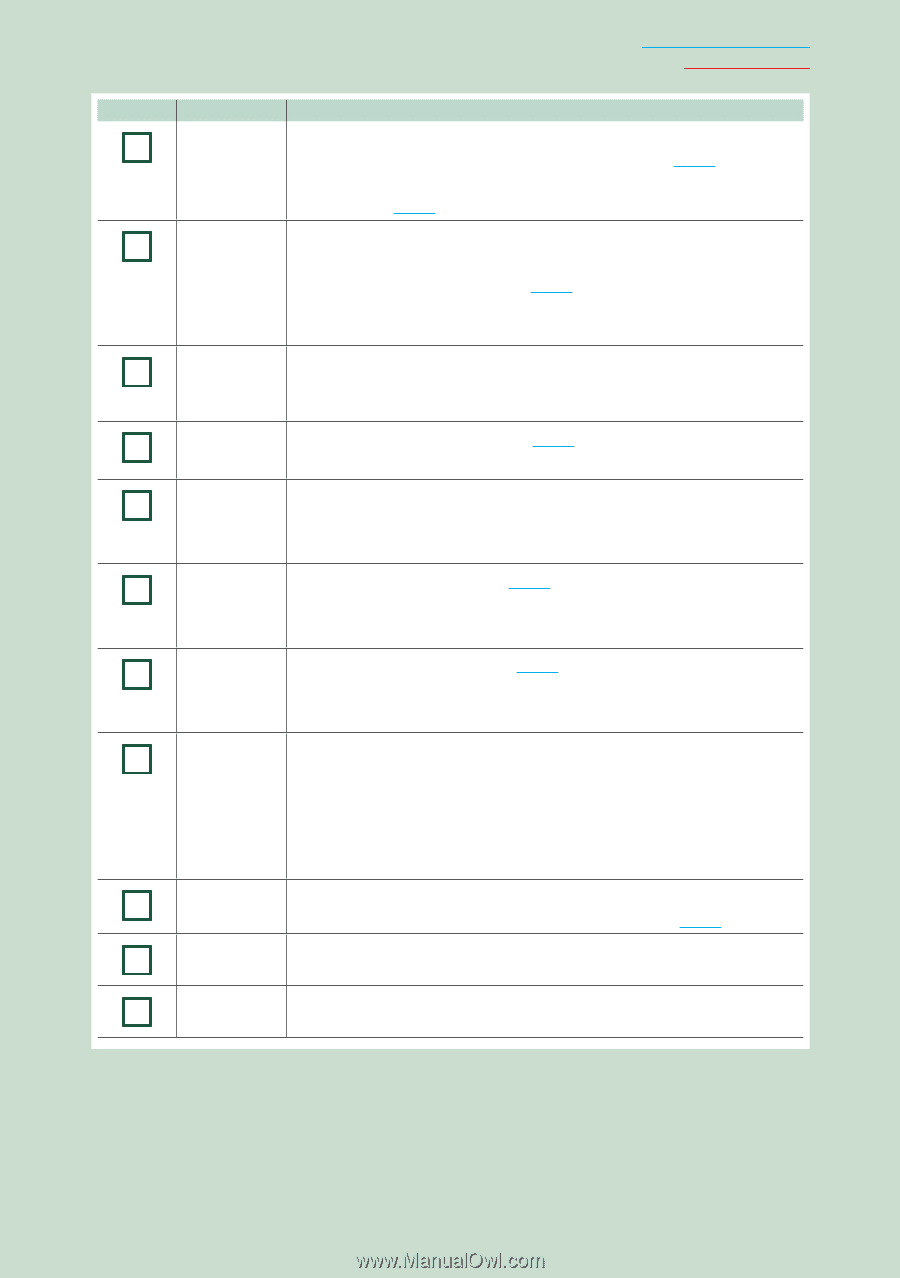
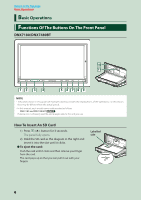
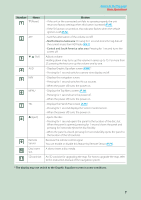
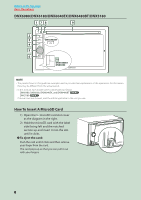
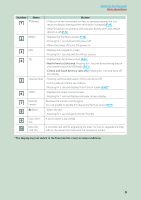
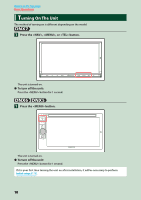
Return to the Top page Basic Operations Number Name 1 fi (Reset) 2 ATT 3 ∞, 5 (Vol) 4 AUD 5 NAV 6 MENU 7 TEL 8 0 (Eject) 9 Remote Sensor 10 Disc insert slot 11 SD card slot Motion • If the unit or the connected unit fails to operate properly, the unit returns to factory settings when this button is pressed (P.97). • If the SI function is turned on, this indicator flashes when the vehicle ignition is off (P.72). • Switches attenuation of the volume on/off. • North America Sales area: Pressing for 1 second stores the tag data of the current music from HD Radio (P.51). • Central and South America sales area: Pressing for 1 second turns the screen off. Adjusts volume. Holding down a key turns up the volume in series up to 25. For more than 25, pressing the key turns up the volume one by one. • Displays Graphic Equalizer screen (P.86).* • Pressing for 1 second switches camera view display on/off. • Displays the navigation screen. • Pressing for 1 second switches AV out sources. • When the power off, turns the power on. • Displays the Top Menu screen (P.14). • Pressing for 1 second turns the power off. • When the power off, turns the power on. • Displays the Hands Free screen (P.55). • Pressing for 1 second displays the Screen Control screen. • When the power off, turns the power on. • Ejects the disc. • Pressing for 1 second opens the panel to the location of the disc slot. When the panel is opened, pressing for 1 second closes the panel and pressing for 3 seconds ejects the disc forcibly. • When the panel is closed, pressing for 3 seconds fully opens the panel to the location of the SD card slot. Receives the remote control signal. You can enable or disable this feature by Remote Sensor (P.71). A slot to insert a disc media. An SD card slot for upgrading the map. For how to upgrade the map, refer to the instruction manual of the navigation system. * The display may not switch to the Graphic Equalizer screen in some conditions. 7
-
 1
1 -
2
-
 3
3 -
 4
4 -
 5
5 -
 6
6 -
 7
7 -
 8
8 -
 9
9 -
 10
10 -
 11
11 -
 12
12 -
 13
13 -
14
-
15
-
16
-
17
-
18
-
19
-
20
-
21
-
22
-
23
-
24
-
25
-
26
-
27
-
28
-
29
-
30
-
31
-
32
-
33
-
34
-
35
-
36
-
37
-
38
-
39
-
40
-
41
-
42
-
43
-
44
-
45
-
46
-
47
-
48
-
49
-
50
-
51
-
52
-
53
-
54
-
55
-
56
-
57
-
58
-
59
-
60
-
61
-
62
-
63
-
64
-
65
-
66
-
67
-
68
-
69
-
70
-
71
-
72
-
73
-
74
-
75
-
76
-
77
-
78
-
79
-
80
-
81
-
82
-
83
-
84
-
85
-
86
-
87
-
88
-
89
-
90
-
91
-
92
-
93
-
94
-
95
-
96
-
97
-
98
-
99
-
100
-
101
-
102
-
103
-
104
-
105
-
106
-
107
-
108
-
109
-
110
-
111
 |
 |