Konica Minolta bizhub 181 bizhub 181Copy/Fax/Print/Scan Operation User Manual - Page 10
Control panel, the names of control panel keys and power switches are indicated within - parts manual
 |
View all Konica Minolta bizhub 181 manuals
Add to My Manuals
Save this manual to your list of manuals |
Page 10 highlights
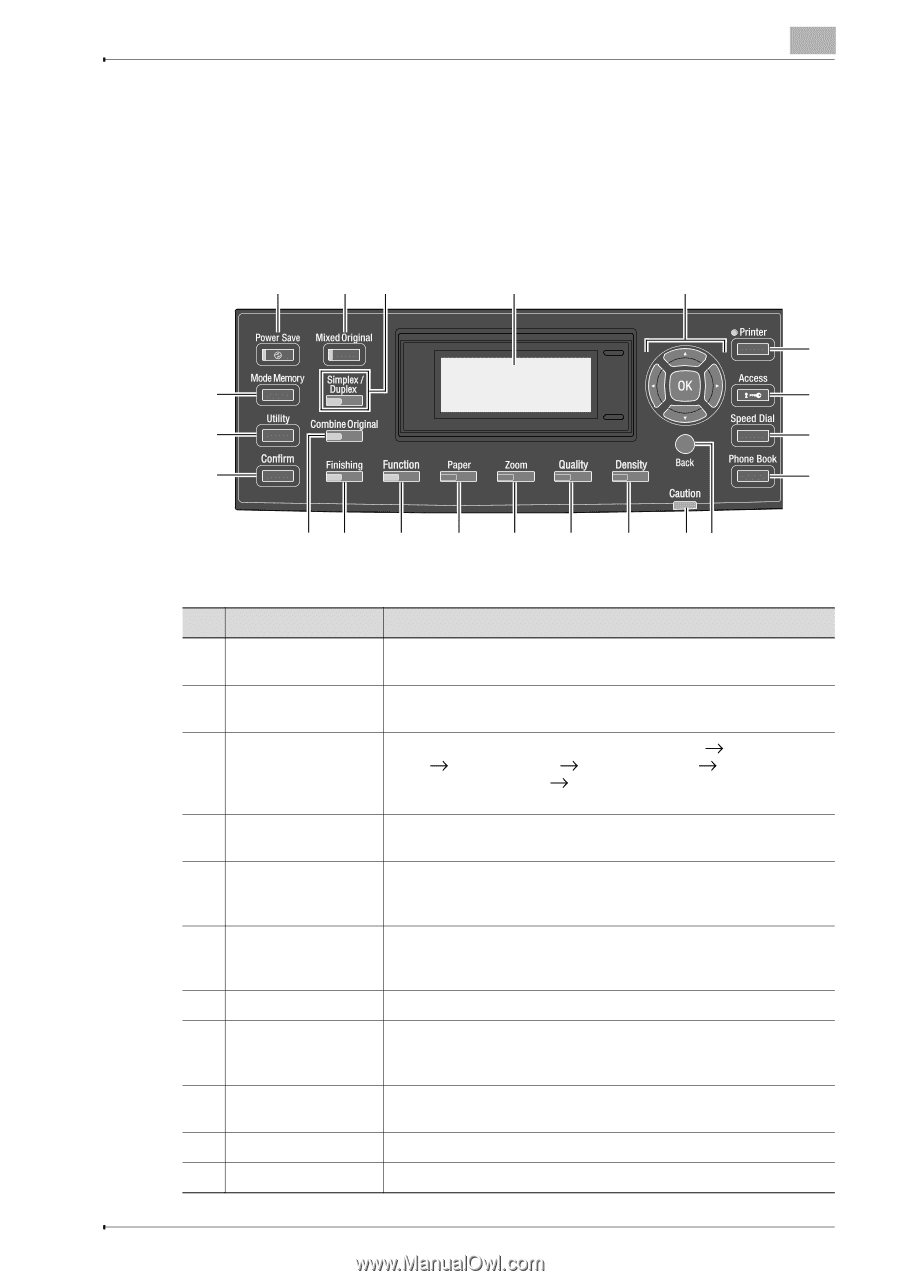
Control panel The control panel consists of the screen, which displays messages, and various keys, such as the [Start] key and the [Clear/Stop] key. The operations that can be performed with these keys are described below. In this manual, the names of control panel keys and power switches are indicated within [ ]. 1 23 4 5 6 21 7 20 8 19 9 18 17 16 15 14 13 12 11 10 No. Part name Description 1 [Power Save] key/in- Press to enter Power Save mode. dicator 2 [Mixed Original] key/ Press to select the "Mixed Original" setting. indicator 3 Simplex/Duplex key/ Selects double-sided copying. Select "1-SIDE‘1-SIDE", "1- indicator SIDE‘2-SIDE","2-SIDE‘1-SIDE"or"2-SIDE‘2-SIDE".Ifanyset- ting other than "1-SIDE‘1-SIDE" is selected, the indicator lights up. 4 Display Displays the number of copies, zoom ratio, setting menus and error messages. 5 and [)] Press the and [)] keys to select menu items in the dis- keys play and change their settings. [OK] key Press the [OK] key to apply the setting. 6 [Printer] key/indicator This indicator lights up while data is being printed from the computer and flashes while data is being sent. For details, refer to the User's Guide for the printer driver. 7 [Access] key Press when account track settings have been applied. 8 [Speed Dial] key Press to register frequently used addresses, and to recall them during transmissions. (Available only if image controller IC-206 or network interface card NC-503 is installed.) 9 [Phone Book] key Press to display the information programmed for one-touch dialing, group dialing and speed dialing. 10 [Back] key Press to return to the previous screen. 11 "Caution" indicator This indicator lights up or flashes if an error has occurred. bizhub 181 x-9
-
 1
1 -
2
-
3
-
4
-
 5
5 -
 6
6 -
 7
7 -
 8
8 -
 9
9 -
 10
10 -
 11
11 -
 12
12 -
 13
13 -
 14
14 -
 15
15 -
16
-
17
-
18
-
19
-
20
-
21
-
22
-
23
-
24
-
25
-
26
-
27
-
28
-
29
-
30
-
31
-
32
-
33
-
34
-
35
-
36
-
37
-
38
-
39
-
40
-
41
-
42
-
43
-
44
-
45
-
46
-
47
-
48
-
49
-
50
-
51
-
52
-
53
-
54
-
55
-
56
-
57
-
58
-
59
-
60
-
61
-
62
-
63
-
64
-
65
-
66
-
67
-
68
-
69
-
70
-
71
-
72
-
73
-
74
-
75
-
76
-
77
-
78
-
79
-
80
-
81
-
82
-
83
-
84
-
85
-
86
-
87
-
88
-
89
-
90
-
91
-
92
-
93
-
94
-
95
-
96
-
97
-
98
-
99
-
100
-
101
-
102
-
103
-
104
-
105
-
106
-
107
-
108
-
109
-
110
-
111
-
112
-
113
-
114
-
115
-
116
-
117
-
118
-
119
-
120
-
121
-
122
-
123
-
124
-
125
-
126
-
127
-
128
-
129
-
130
-
131
-
132
-
133
-
134
-
135
-
136
-
137
-
138
-
139
-
140
-
141
-
142
-
143
-
144
 |
 |