Konica Minolta bizhub C650 HDD Backup Utility User Guide - Page 49
Auto protect settings dialog box, specified. When auto protect settings are applied
 |
View all Konica Minolta bizhub C650 manuals
Add to My Manuals
Save this manual to your list of manuals |
Page 49 highlights
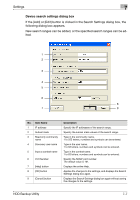
Settings 7 7.2 Auto protect settings dialog box From the Auto protect settings dialog box, auto protect settings can be specified. When auto protect settings are applied, a password can be specified to limit access to HDD Backup Utility. 1 2 3 4 5 6 7 No. Item Name Description 1 Once the timeout set- When the check box is selected, auto protect settings are ap- tings has passed, the plied and a dialog box appears, allowing the password and password input dialog is timeout settings to be specified. For details, refer to "Appli- displayed. cation protect settings dialog box" on page 7-11. 2 Timeout Displays the specified length of time until a timeout occurs. 3 [Change] button Allows the setting for the length of time until a timeout occurs to be changed. If the auto protect settings are canceled, the setting cannot be changed. 4 Password Normally appears. 5 [Change password] but- Allows the password to be changed. If the auto protect set- ton tings are canceled, the password cannot be changed. 6 [Help] button Displays the online Help. 7 [Close] button Closes the Auto protect settings dialog box, and displays the main window again. HDD Backup Utility 7-10
-
 1
1 -
2
-
3
-
4
-
5
-
6
-
7
-
8
-
9
-
10
-
11
-
12
-
13
-
14
-
15
-
16
-
17
-
18
-
19
-
20
-
21
-
22
-
23
-
24
-
25
-
26
-
27
-
28
-
29
-
30
-
31
-
32
-
33
-
34
-
35
-
36
-
37
-
38
-
39
-
40
-
41
-
42
-
43
-
 44
44 -
 45
45 -
 46
46 -
 47
47 -
 48
48 -
 49
49 -
 50
50 -
 51
51 -
 52
52 -
 53
53 -
 54
54 -
55
-
56
 |
 |
