Kyocera KM-1650 1650/2050/2550 Operation Guide Rev-4 (Basic)
Kyocera KM-1650 Manual
 |
View all Kyocera KM-1650 manuals
Add to My Manuals
Save this manual to your list of manuals |
Kyocera KM-1650 manual content summary:
- Kyocera KM-1650 | 1650/2050/2550 Operation Guide Rev-4 (Basic) - Page 1
- Kyocera KM-1650 | 1650/2050/2550 Operation Guide Rev-4 (Basic) - Page 2
) model, 2050 is a 20 ppm (prints per minute) model, and 2550 is a 25 ppm (prints per minute) model. This Operation Guide contains information that corresponds to using both the inch and metric versions of this machine. This Operation Guide shows messages of the inch version. When using the metric - Kyocera KM-1650 | 1650/2050/2550 Operation Guide Rev-4 (Basic) - Page 3
...4-2 Names of Parts ...4-2 Setting Originals in the Document Processor 4-2 Setting Originals on the Platen 4-4 Paper Feeder ...4-5 Duplex Unit ...4-5 Finisher ...4-6 Names of Parts ...4-6 Adding Staples ...4-7 Clearing Staple Jam ...4-8 Job Separator ...4-9 Key Counter ...4-10 Fax Kit ...4-10 i - Kyocera KM-1650 | 1650/2050/2550 Operation Guide Rev-4 (Basic) - Page 4
Network Scanner Kit ...4-10 Memory Card (CompactFlash 4-11 Hard Disk ...4-11 Additional Memory ...4-11 Optional Equipment ...4-12 5 Maintenance 5-1 Cleaning the Machine ...5-1 Replacing the Toner Container and the Waste Toner Box 5-5 6 Troubleshooting 6-1 If Trouble Occurs ...6-1 Displayed - Kyocera KM-1650 | 1650/2050/2550 Operation Guide Rev-4 (Basic) - Page 5
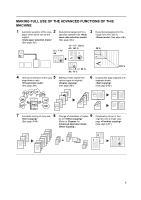
129 % A3: 141 % 25 % 5 1/2 × 8 1/2": 64 % A5: 70 % 4 5 One-touch selection of the copy various types of originals (See page 3-8.) (See page 3-9.) in page Advanced Operation Guide, (See page 3-17.) Offset Copying.) ! ! - Kyocera KM-1650 | 1650/2050/2550 Operation Guide Rev-4 (Basic) - Page 6
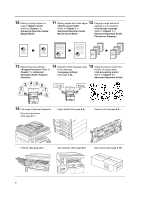
(See page 2-23.) 15 Using ID-codes to control the number of copies made (Refer to Chapter 4 in Advanced Operation Guide.) English 16 Full range of optional equipment Document processor (See page 4-1.) Paper feeder (See page 4-5.) Duplex unit (See page 4-5.) Finisher (See - Kyocera KM-1650 | 1650/2050/2550 Operation Guide Rev-4 (Basic) - Page 7
Fax kit (See page 4-10.) Network scanner kit (See page 4-10.) Memory card (CompactFlash) (See page 4-11.) Hard Disk (See page 4-11.) Additional memory (See page 4-11.) v - Kyocera KM-1650 | 1650/2050/2550 Operation Guide Rev-4 (Basic) - Page 8
user is following the instructions in this guide. No responsibility is assumed for defects in the printer's firmware (contents of its read-only memory). This guide, any copyrightable subject matter sold or provided with or in connection computer, Inc. Microsoft, Windows, and Windows Kyocera product - Kyocera KM-1650 | 1650/2050/2550 Operation Guide Rev-4 (Basic) - Page 9
time of no activity that must pass before Low Power Mode is activated may be lengthened. See Low Power Mode on page 3-23 for more information. Sleep Mode which reduces the load on the environment. Your sales or service representative can provide information about adding 2-sided copying capabilities - Kyocera KM-1650 | 1650/2050/2550 Operation Guide Rev-4 (Basic) - Page 10
before using this machine. Keep it close to the machine for easy reference. The sections of this guide and parts of the machine marked with symbols are safety warnings meant to protect the user, other individuals and surrounding objects, and ensure correct and safe usage of the machine. The symbols - Kyocera KM-1650 | 1650/2050/2550 Operation Guide Rev-4 (Basic) - Page 11
required action] .... [Remove the power plug from the outlet] .... [Always connect the machine to an outlet with a ground connection] Please contact your service representative to order a replacement if the safety warnings in this Operation Guide are illegible or if the guide itself is missing. (fee - Kyocera KM-1650 | 1650/2050/2550 Operation Guide Rev-4 (Basic) - Page 12
at the following locations for safety purposes. Be sufficiently careful to avoid fire or electric shock when removing a paper jam or when replacing toner. Label 2 High temperature inside. Do not touch parts in this area, because there is a danger of getting burned. Label 3 High voltage inside - Kyocera KM-1650 | 1650/2050/2550 Operation Guide Rev-4 (Basic) - Page 13
and dirt. If dust or dirt become attached to the power plug, clean the plug to avoid the danger of fire cm Front: 39 3/8" 100 cm Rear: 3 15/16" 10 cm Right: 11 13/16" 30 cm Other precautions Adverse the machine. • Avoid locations near a window or with exposure to direct sunlight. • Avoid - Kyocera KM-1650 | 1650/2050/2550 Operation Guide Rev-4 (Basic) - Page 14
or electrical shock in case of an electric short. If an earth connection is not possible, contact your service representative. Other precautions Connect the power plug to the closest outlet possible to the machine. The power supply cord is used as the main disconnect device. Ensure that the socket - Kyocera KM-1650 | 1650/2050/2550 Operation Guide Rev-4 (Basic) - Page 15
. Do not remove or connect the power plug with wet hands, as there is a danger of electrical shock. Always contact your service representative for maintenance or repair of internal parts. Caution Do not pull the power cord when removing it from the outlet. If the power cord is pulled, the wires - Kyocera KM-1650 | 1650/2050/2550 Operation Guide Rev-4 (Basic) - Page 16
in hazardous radiation exposure. Do not look directly at the light from the scanning lamp as it may cause your eyes to feel tired or painful. Other precautions (for users in California, the United States) This product contains a CR Coin Lithium Battery which contains Perchlorate Material - special - Kyocera KM-1650 | 1650/2050/2550 Operation Guide Rev-4 (Basic) - Page 17
label located on the cover of the optical unit. 16 ppm model/20 ppm model 25 ppm model 4. Maintenance For safety of the service personnel, follow the maintenance instructions in the other section of this manual. 5. Safety switch The power to the laser unit is cut off when the upper front cover - Kyocera KM-1650 | 1650/2050/2550 Operation Guide Rev-4 (Basic) - Page 18
power source connected. • Consult the dealer or an experienced radio/TV technician for help. CAUTION - The changes or modifications not expressly approved by the party responsible for compliance could void the user's authority to operate the equipment. * The above warning is valid only in the United - Kyocera KM-1650 | 1650/2050/2550 Operation Guide Rev-4 (Basic) - Page 19
been serviced by a technician not employed by Kyocera or an Authorized Kyocera Dealer, or (d) which have had the serial number modified, altered, or removed. 5. This warranty does not cover Maintenance Kits or the components of Maintenance Kits, which consist of the drum unit, the fixing unit, and - Kyocera KM-1650 | 1650/2050/2550 Operation Guide Rev-4 (Basic) - Page 20
to this Operation Guide This operation guide has the following chapters. The content of these chapters is toner container and the waste toner box and maintenance of this product. 6 Troubleshooting This chapter contains explanations on handling problems that may occur, for example, when an error - Kyocera KM-1650 | 1650/2050/2550 Operation Guide Rev-4 (Basic) - Page 21
copying and printing, and troubleshooting. Advanced Operation Guide The Advanced Operation Guide contains explanations on copier and printer functions as well as default settings that can be adjusted on this machine. KX Printer Driver Installation Guide This guide describes the procedure to install - Kyocera KM-1650 | 1650/2050/2550 Operation Guide Rev-4 (Basic) - Page 22
Conventions This guide uses the following conventions: 3 4 1 2 1 Bold indicates key names. 2 Courier indicates content of the message display. 3 Note contain important information aside from the text. 4 Italic refers to another page or other guide. xx - Kyocera KM-1650 | 1650/2050/2550 Operation Guide Rev-4 (Basic) - Page 23
above exclusion may not apply to you. SUPPLEMENT TO AGREEMENT FOR SOFTWARE BUNDLING AND DISTRIBUTION FOR ALDC 3. Limitation of Remedies IBM's entire years after the cause of action arose. If you acquired the Program in the United States, this license is governed by the laws of the State of New York - Kyocera KM-1650 | 1650/2050/2550 Operation Guide Rev-4 (Basic) - Page 24
. If you need to have access to the fonts on more than three printers, you need to acquire a multi-user license agreement which can be obtained from Agfa Japan. Agfa Japan retains all rights, title and interest to the Software and Typefaces and no rights are granted to you other than a License to - Kyocera KM-1650 | 1650/2050/2550 Operation Guide Rev-4 (Basic) - Page 25
g/m²). 6 Paper width adjusting tab - Use this tab to adjust the paper width guides to fit to the width of the paper to be loaded in the cassette. 7 bypass tray - When using small paper or special paper, set the paper here. 10 Bypass tray extension - Pull this to use when setting A4R paper or larger - Kyocera KM-1650 | 1650/2050/2550 Operation Guide Rev-4 (Basic) - Page 26
the platen. 14 Left cover - Open this cover if a paper jam occurs inside the machine. 15 Waste toner box 16 Toner container release lever - Operate this lever when replacing the toner container. 17 Toner container 18 Charger cleaner rod - Pull this rod and then push it back again after replacing the - Kyocera KM-1650 | 1650/2050/2550 Operation Guide Rev-4 (Basic) - Page 27
connector. 24 USB interface connector - When connecting this machine to a computer through USB, connect a USB cable to this connector. 25 Parallel interface connector - When connecting this machine to a computer through parallel interface, connect a bi-directional parallel cable to this connector - Kyocera KM-1650 | 1650/2050/2550 Operation Guide Rev-4 (Basic) - Page 28
Auto 1 54 8 9 10 15 16 14 17 18 19 20 22 23 24 33 34 36 35 1 System Menu/Counter key and indicator - Press this key to set the job accounting function, adjust the default settings or set the machine. (For details, refer to Chapter 3 and Chapter 4 in Advanced Operation Guide.) 2 Copier key and - Kyocera KM-1650 | 1650/2050/2550 Operation Guide Rev-4 (Basic) - Page 29
) Lit - An error has occurred. Clear the error referring to Displayed Messages on page 6-4. 29 Job Accounting key - In the job accounting mode, press this key after copying is complete. The ID-code entry screen will appear. (For details, refer to Chapter 4 in Advanced Operation Guide.) 30 Interrupt - Kyocera KM-1650 | 1650/2050/2550 Operation Guide Rev-4 (Basic) - Page 30
key when the indicator is lit green. 37 Main power indicator - Lights up when the main power switch is turned on ( | ). † Initial mode (the state that the machine enters at the end of warm-up or when the Reset key is pressed) In the factory default setting, paper of the same size as the original - Kyocera KM-1650 | 1650/2050/2550 Operation Guide Rev-4 (Basic) - Page 31
screen is displayed when the Printer key is pressed. Reference number 1 2 3 4 Meaning Indicates the current status of the machine and displays the message for required operation. Select to switch between online and offline, to print/resume printing, to clear a specific error, and to begin a new - Kyocera KM-1650 | 1650/2050/2550 Operation Guide Rev-4 (Basic) - Page 32
Parts Note The following procedure can also be used for changing the default settings of the printer functions. 1 Press the System Menu/Counter key. 2 Press the S key or the T key to select Printer default. System Menu / Counter: Copy default 3 Press the Enter key. The same screen as Machine - Kyocera KM-1650 | 1650/2050/2550 Operation Guide Rev-4 (Basic) - Page 33
on paper that can be used, refer to Appendix in Advanced Operation Guide, Paper. Note for Adding Paper After taking new paper out of its its package under high temperature and high humidity conditions may lead to problems caused by ambient moisture. After loading paper into the cassette, store - Kyocera KM-1650 | 1650/2050/2550 Operation Guide Rev-4 (Basic) - Page 34
! Specify the type of paper that is loaded into the cassette (standard, recycled, etc.). For the method of setting, refer to Chapter 3 in Advanced Operation Guide, Paper Type (cassettes 1 to 4). 1 Pull the cassette out toward you as far as it will go. Note Do not pull more than one cassette out - Kyocera KM-1650 | 1650/2050/2550 Operation Guide Rev-4 (Basic) - Page 35
inserting it into the cassette. Creases in the paper A may lead to paper jams. • The maximum paper limit indicator A is provided on a paper width guide. Make sure that the paper loaded is below the maximum paper limit indicator. • When loading paper into the cassette, set it with the side which - Kyocera KM-1650 | 1650/2050/2550 Operation Guide Rev-4 (Basic) - Page 36
number of sheets that can be loaded are shown below. • Color paper: 50 sheets • Postcard: 10 sheets • Thin paper/thick paper (45 to 160 g/m²): 50 sheets to 5 sheets (the number , refer to Chapter 3 in Advanced Operation Guide, Multi-Bypass Tray Confirmation Display. 1 Open the multi-bypass tray. 2-4 - Kyocera KM-1650 | 1650/2050/2550 Operation Guide Rev-4 (Basic) - Page 37
Note When setting paper greater than A4R/8 1/2 × 11" (Letter), pull out the bypass tray extension to match the paper size. Preparations 2 Adjust the sliders to the width of the paper to be set. 3 Set the paper along the sliders and put it in until it stops. Important! • Always straighten out - Kyocera KM-1650 | 1650/2050/2550 Operation Guide Rev-4 (Basic) - Page 38
Preparations Multi-Bypass Tray Settings Set the following items for feeding paper from the multi-bypass tray. Paper Size Set the size of paper to be used from the multi-bypass tray. You can use irregular size paper by inputting the size. Note If the paper size is unknown or no particular paper size - Kyocera KM-1650 | 1650/2050/2550 Operation Guide Rev-4 (Basic) - Page 39
Specification - A3, B4, B5R, B5, A5R, B6R, A6R, HAGAKI, Folio, Executive, ISO B5, Envelope DL, Envelope C5, Envelope C4, Comm. #10, Comm. #9, Comm. #6-3/4, Monarch, OufukuHagaki, YOUKEI 2, YOUKEI 4, 8K, 16KR, 16K Metric Specification - 11 × 17" (Ledger), 8 1/2 × 14" (Legal), 8 1/2 × 13" (Oficio II - Kyocera KM-1650 | 1650/2050/2550 Operation Guide Rev-4 (Basic) - Page 40
Preparations 5 Press the Enter key. 6 Press the S key or the T key to select the paper size. Other Regular Size: 7 Press the Enter key. The Bypass Paper type screen is displayed. Proceed to Paper Type described below. Inputting a Paper Size 1 Press the System Menu/Counter key. 2 Press the S key or - Kyocera KM-1650 | 1650/2050/2550 Operation Guide Rev-4 (Basic) - Page 41
Preparations 4 Press the S key or the T key to select Input Size. Bypass Paper size: * Universal Size Input Size 5 Press the Enter key. 6 Press the < key or the > key to set the vertical size. You can set the vertical size to 3 7/8" to 11 5/8" in 1/8" Input size increments [98 to 297 mm in 1 mm - Kyocera KM-1650 | 1650/2050/2550 Operation Guide Rev-4 (Basic) - Page 42
S key or the T key to select the paper type. Bypass Paper type : * Plain Transparency Preprinted 2 Press the Enter key. The message display returns to the copier basic screen. 2-10 - Kyocera KM-1650 | 1650/2050/2550 Operation Guide Rev-4 (Basic) - Page 43
! Be sure to turn the main power switch of this machine off before connecting the printer cable. 1 Open the main power switch cover located on the right side of the machine, turn the main power switch off ({), and remove the power cord from the outlet. Turn the power of your computer off. 2-11 - Kyocera KM-1650 | 1650/2050/2550 Operation Guide Rev-4 (Basic) - Page 44
Preparations 2 Connect the printer cable to the parallel interface connector or the USB interface plug). • The USB cable should be shielded and not be longer than 5 meters (16 feet). 3 Connect the other end of the printer cable to the parallel interface connector or a USB interface connector on your - Kyocera KM-1650 | 1650/2050/2550 Operation Guide Rev-4 (Basic) - Page 45
Connecting the Power Cord Connect the power cord to this machine. 1 Connect the power cord to the power cord connector located at the right side of the machine. Preparations 2 Connect the other end of the power cord to a power outlet. 2-13 - Kyocera KM-1650 | 1650/2050/2550 Operation Guide Rev-4 (Basic) - Page 46
Preparations Turning the Power On Turn the power of this machine on. 1 Open the main power switch cover located on the right side of the machine and turn the main power switch on ( | ). The machine starts to warm up. 2 Once warm-up is completed, the Start indicator lights up green. 2-14 - Kyocera KM-1650 | 1650/2050/2550 Operation Guide Rev-4 (Basic) - Page 47
this setting. • If you use the following procedure to manually register the IP address, be sure to turn the DHCP setting Off and the TCP/IP setting On. (For details, refer to Chapter 2 in Advanced Operation Guide, Network Setting.) 1 Press the Printer key. 2 Press the S key or the T key to select - Kyocera KM-1650 | 1650/2050/2550 Operation Guide Rev-4 (Basic) - Page 48
Preparations 7 Press the Enter key. 8 Press the S key or the T key to select TCP/IP. 9 Press the Enter key. Network setting: Back NetWare TCP/IP 10 Press the S key or the T key to select Change #. 11 Press the Enter key. TCP/IP On Off Change # 12 Press the S key or the T - Kyocera KM-1650 | 1650/2050/2550 Operation Guide Rev-4 (Basic) - Page 49
area. 0. 0. 0. 0 15 Press the # key. 16 Enter the next block of 3 digits of the address in the highlighted area. IP Address 10 . 0 . 0 . 0 17 Continue the same procedure for the other 2 blocks. 18 Press the Enter key. Next, set the subnet mask. Registering the Subnet Mask To register - Kyocera KM-1650 | 1650/2050/2550 Operation Guide Rev-4 (Basic) - Page 50
Gateway 2 Press the Enter key. 3 Use the same procedure as steps 14 to 17 of IP address setting to input the address. 4 Press the Enter key. Gateway 0. 0. 0. 0 5 When you finish making all of the network setting, press the Reset key. The message display returns to the printer basic screen. 2-18 - Kyocera KM-1650 | 1650/2050/2550 Operation Guide Rev-4 (Basic) - Page 51
or the T key to select Machine default. 3 Press the Enter key. System Menu / Counter: Job Accounting Copy default Machine default 4 Use the numeric keys to input the four-digit management code. The management code at the Enter pin code using # key. factory default setting is 1600 for the 16 ppm - Kyocera KM-1650 | 1650/2050/2550 Operation Guide Rev-4 (Basic) - Page 52
DST : Off Time Zone : GMT+00:00 9 Press the < key or the > key to set the time difference. Next, set the time. Setting the Time 10 Press the S key or the T key to select Time. 11 Press the < key or the > key to set the current time. Next, set the summer - Kyocera KM-1650 | 1650/2050/2550 Operation Guide Rev-4 (Basic) - Page 53
13 Press the < key or the > key to select On or Off. Next, set the date. Preparations Setting the Date 14 Press the S key or the T key to select Year. 15 Press the < key or the > key to set the current year. Date/Time: DST : Off Time Zone : GMT+00:00 Year :7 16 Press the S key or the T key - Kyocera KM-1650 | 1650/2050/2550 Operation Guide Rev-4 (Basic) - Page 54
, press the S key or the T key to select End. Date/Time: End Time DST 21 Press the Enter key. : 06:33 : Off 22 Press the Reset key. The message display returns to the copier basic screen. 2-22 - Kyocera KM-1650 | 1650/2050/2550 Operation Guide Rev-4 (Basic) - Page 55
German (Deutsch), French (Français), Spanish (Español), and Italian (Italiano) For details, refer to Chapter 3 in Advanced Operation Guide, Language Setting. Other Settings Various default settings can be adjusted to your preference in this machine. For details on the setting items and the setting - Kyocera KM-1650 | 1650/2050/2550 Operation Guide Rev-4 (Basic) - Page 56
Preparations 2-24 - Kyocera KM-1650 | 1650/2050/2550 Operation Guide Rev-4 (Basic) - Page 57
the following operations. For other functions, refer to the Advanced Operation Guide. • Basic Copying Procedure • Zoom Copying • Duplex Copying • Split Copying • Sort Copying • Combine Copying • Interrupt Mode • Low Power Mode • Sleep Mode • Basic Printing Procedure Basic Copying Procedure 1 Open - Kyocera KM-1650 | 1650/2050/2550 Operation Guide Rev-4 (Basic) - Page 58
Basic Operation 3 Select the desired copier's functions to use. 4 Select the copy paper. If Auto is .) • It is also possible to change the default image quality mode to be selected in the initial mode. (For details, refer to Chapter 3 in Advanced Operation Guide, Original Image Quality.) 3-2 - Kyocera KM-1650 | 1650/2050/2550 Operation Guide Rev-4 (Basic) - Page 59
Adjust the exposure. You can adjust the exposure either manually (manual exposure mode) or automatically (auto exposure mode) with automatic detection of the contrast of the original. (For details, refer to Chapter 1 in Advanced Operation Guide, Copy Exposure Adjustment.) 7 Press the numeric keys to - Kyocera KM-1650 | 1650/2050/2550 Operation Guide Rev-4 (Basic) - Page 60
time (vacations, etc.), remove the power plug from the outlet for safety purposes during the time the machine is not in use. If the optional fax kit is installed: When the main power switch is turned off or the power plug is removed from the outlet, fax transmission and reception cannot be performed - Kyocera KM-1650 | 1650/2050/2550 Operation Guide Rev-4 (Basic) - Page 61
121 % (8.5 × 14 Æ 11 × 17), 78 % (8.5 × 14 Æ 8.5 × 11), 77 % (11 × 17 Æ 8.5 × 14), 64 % (11 × 17 Æ 8.5 × 11), 50 % (11 × 17 Æ 5.5 × 8.5) Metric Specification 200 % (A5 Æ A3), 141 % ( : 141 % 5 1/2 × 8 1/2": 64 % A5: 70 % Note 1 You can set a default setting so that the auto zoom ratio selection - Kyocera KM-1650 | 1650/2050/2550 Operation Guide Rev-4 (Basic) - Page 62
Basic Operation 2 Press the Auto%/100% key. Auto % is displayed on the message display. 3 Press the Paper Select key to select the copy paper. The zoom ratio is displayed on the message display. 4 Press the Start key. Copying starts. Zoom Mode With this mode, the zoom ratio can be set between 25 % - Kyocera KM-1650 | 1650/2050/2550 Operation Guide Rev-4 (Basic) - Page 63
2 Press the Zoom key. Basic Operation 3 Use the numeric keys to input the zoom ratio. The zoom ratio is displayed on the message display. Zoom: (The display example shows a screen displayed when an operator enters 1, 1, and 8.) 118% 4 Press the Enter key. 121%:8.5x14 11x17 100%: 78%:8.5x14 8. - Kyocera KM-1650 | 1650/2050/2550 Operation Guide Rev-4 (Basic) - Page 64
Basic Operation Preset Zoom Mode With this mode, the zoom ratio can be set to one of the preset ratios. 1 Set the original. 2 Press the Zoom key. 3 Press the S key or the T key to select the desired zoom ratio. 4 Press the Enter key. The zoom ratio is displayed on the message display. 5 Press the - Kyocera KM-1650 | 1650/2050/2550 Operation Guide Rev-4 (Basic) - Page 65
originals including double-page spread or two-sided originals. Basic Operation Original Copy Note The optional duplex unit must be installed. The following modes are available for duplex copying. Mode Description 1 sided->2 sided One-sided originals are copied onto the front and back sides - Kyocera KM-1650 | 1650/2050/2550 Operation Guide Rev-4 (Basic) - Page 66
(2-sided copying from 2-sided originals) Book->2-sided (2-sided copying from double-page Duplex/Split Page key. 3-10 3 Press the S key or the T key to select the desired duplex copy mode from 1 sided->2 sided [1-sided->2-sided], 2 sided->2 sided [2-sided->2-sided], and Book->2-sided. Duplex - Kyocera KM-1650 | 1650/2050/2550 Operation Guide Rev-4 (Basic) - Page 67
to the next step. If you have selected 2 sided->2 sided [2-sided->2-sided] or Book->2-sided, proceed to step 7. Basic Operation 5 Press the S key or the T side Top side 6 Press the Enter key. 7 Press the Start key. Scanning of the original starts. If the originals have been set in the optional - Kyocera KM-1650 | 1650/2050/2550 Operation Guide Rev-4 (Basic) - Page 68
-page spread originals) Each page of 2-sided originals is copied separately. 1 1 2 Original Copy Book->1-sided (Split Each page of double-page spread originals of magazines, books, copying from 2-sided originals) etc. is copied separately. 1 2 1 2 1 Set the original. Original Copy - Kyocera KM-1650 | 1650/2050/2550 Operation Guide Rev-4 (Basic) - Page 69
copy mode from 2 sided->1 sided Duplex/Split Page: [2-sided->1-sided] and Book->1-sided. Book 2-sided 2 sided 1 sided Book 1-sided 4 Press the Enter key. Top side 6 Press the Enter key. 7 Press the Start key. Scanning of the original starts. If the originals have been set in the optional - Kyocera KM-1650 | 1650/2050/2550 Operation Guide Rev-4 (Basic) - Page 70
Basic Operation 9 If no original remains, press the Enter key. Copying starts. 3-14 - Kyocera KM-1650 | 1650/2050/2550 Operation Guide Rev-4 (Basic) - Page 71
Since copying in this mode is performed after multiple originals are scanned and memorized, a required number of collated copy sets can be or not to turn on the sort mode at a default setting. (Refer to Chapter 3 in Advanced Operation Guide, Sort Copying.) Set the original. 2 Press the Sort - Kyocera KM-1650 | 1650/2050/2550 Operation Guide Rev-4 (Basic) - Page 72
Basic Operation 5 If no original remains, press the Enter key. Copying starts. 3-16 - Kyocera KM-1650 | 1650/2050/2550 Operation Guide Rev-4 (Basic) - Page 73
. Mode 2 in 1 [2-UP] Description Use this mode to copy two originals onto one sheet. This mode can also be used in conjunction with the duplex copying in order to copy four originals onto both sides of one sheet. 2 1 12 4 in 1 [4-UP] (horizontal arrangement) 4 in 1 [4-UP] (vertical arrangement - Kyocera KM-1650 | 1650/2050/2550 Operation Guide Rev-4 (Basic) - Page 74
are set in the document processor: Original Copy Original Copy Note For the method of setting the 2 in 1 function, refer to Chapter 1 in Advanced Operation Guide, Combine Copying. 3-18 - Kyocera KM-1650 | 1650/2050/2550 Operation Guide Rev-4 (Basic) - Page 75
in the document processor: Original Copy Original Copy Note For the method of setting the 4 in 1 (horizontal arrangement) function, refer to Chapter 1 in Advanced Operation Guide, Combine Copying. 3-19 - Kyocera KM-1650 | 1650/2050/2550 Operation Guide Rev-4 (Basic) - Page 76
in the document processor: Original Copy Original Copy Note For the method of setting the 4 in 1 (vertical arrangement) function, refer to Chapter 1 in Advanced Operation Guide, Combine Copying. 3-20 - Kyocera KM-1650 | 1650/2050/2550 Operation Guide Rev-4 (Basic) - Page 77
data with priority. After priority output is complete, the interrupted job is resumed. Note To use the fax functions, the optional fax kit must be installed. During a Copy Job 1 Press the Interrupt key. Interrupt mode OK [Interrupt mode] is displayed. 2 Store the originals for the current copying - Kyocera KM-1650 | 1650/2050/2550 Operation Guide Rev-4 (Basic) - Page 78
If you have selected Interrupt copy, Interrupt mode OK [Interrupt mode] is displayed. Proceed to the next step. If you have selected Priority:Printer or Priority:Fax, output of data starts. Proceed to step 5. 4 Set the original for interrupt copying and perform copying. 5 After the interrupt job is - Kyocera KM-1650 | 1650/2050/2550 Operation Guide Rev-4 (Basic) - Page 79
made is 10 seconds. Basic Operation Note If the machine detects print data or received fax data in the low power mode, the power function that automatically puts this machine into the lower power mode if no operation has been performed on the machine for a preset period of time. The factory default - Kyocera KM-1650 | 1650/2050/2550 Operation Guide Rev-4 (Basic) - Page 80
The factory default setting time is 19 minutes. Time that can be set: Inch Specification - 1 to 240 minutes (in 1 minute increments) Metric Specification - 1 to 120 minutes (in 1 minute increments) Copiers and printers are generally in a standby mode more than they are in actual operation, so power - Kyocera KM-1650 | 1650/2050/2550 Operation Guide Rev-4 (Basic) - Page 81
or network cable and the power cord are properly connected before using this machine as a printer. Installing the Printer Driver For information on how to install the printer driver software, refer to the KX Printer Driver Operation Guide. Printing from Application Software The steps required to - Kyocera KM-1650 | 1650/2050/2550 Operation Guide Rev-4 (Basic) - Page 82
Basic Operation 3-26 - Kyocera KM-1650 | 1650/2050/2550 Operation Guide Rev-4 (Basic) - Page 83
• Paper Feeder • Duplex Unit • Finisher • Job Separator • Key Counter • Fax Kit • Network Scanner Kit • Memory Card (CompactFlash ) • Hard Disk • Additional Memory Document Processor This equipment automatically feeds and scans multiple - Kyocera KM-1650 | 1650/2050/2550 Operation Guide Rev-4 (Basic) - Page 84
be sure to close the document processor. Names of Parts 1 Original table - Set originals to be copied on this table. 2 Original insert guides - Adjust these guides to the width of the originals to be copied. 3 2 1 24 5 3 Left cover - Open this cover if an original jam occurs. 4 Original eject - Kyocera KM-1650 | 1650/2050/2550 Operation Guide Rev-4 (Basic) - Page 85
, 11 × 17" (Ledger) and 11 × 8 1/2" or A4 and A3 at the same time in the auto selection mode. (Refer to Chapter 1 in Advanced Operation Guide, Auto Selection Mode.) Arrange the originals in order and set them face up (front side up for 2-sided originals) on the original table. Optional Equipment - Kyocera KM-1650 | 1650/2050/2550 Operation Guide Rev-4 (Basic) - Page 86
are originals left in either place, they may fall off the machine when the document processor is opened. • When double-page spread originals such as books are copied, shadows may appear along the edges and at the middle of copies. • Do not put undue pressure on the platen when closing the - Kyocera KM-1650 | 1650/2050/2550 Operation Guide Rev-4 (Basic) - Page 87
can be used. • The number of sheets that can be accommodated: 300 sheets (standard paper, 64 to 105 g/m²). • Paper sizes that can be set are: A3, B4, A4, A4R, 20 ppm model and the 25 ppm model. Duplex Unit Two-sided copies can be made if the duplex unit is installed. Two-sided copies of sizes from - Kyocera KM-1650 | 1650/2050/2550 Operation Guide Rev-4 (Basic) - Page 88
Legal), 8 1/2 × 13" (Oficio II)) Names of Parts 1 Finisher tray 2 Process tray 3 Process tray extension 4 Finisher tray extension 5 Paper output guide 1 6 Paper output guide 2 54 1 23 6 Notes • Sorted copies are output onto the finisher tray. • According to the paper size, adjust the finisher - Kyocera KM-1650 | 1650/2050/2550 Operation Guide Rev-4 (Basic) - Page 89
• The paper sizes are marked on the finisher tray extension. Open paper output guide 1 or 2 according to the paper size. Optional Equipment • When stapling large paper such as A3, B4, 11 your side. 2 Pull out the staple holder. 3 Remove the empty staple cartridge from the staple holder. 4-7 - Kyocera KM-1650 | 1650/2050/2550 Operation Guide Rev-4 (Basic) - Page 90
the holder with care about the direction. Note The arrow on the staple cartridge indicates the insertion direction. 5 Push the staple cartridge all the way into the holder and remove the paper tape around the staple cartridge by pulling it. 6 Insert the staple holder into the insertion slot as it - Kyocera KM-1650 | 1650/2050/2550 Operation Guide Rev-4 (Basic) - Page 91
onto the job separator, change the setting in the machine default settings (copier) or the paper settings (printer). (For details, refer to Chapter 2 in Advanced Operation Guide, Output Destination or Chapter 3 in Advanced Operation Guide, Copy Output Destination.) • When removing paper from the job - Kyocera KM-1650 | 1650/2050/2550 Operation Guide Rev-4 (Basic) - Page 92
and received through a computer. For details, refer to the Operation Guide for the fax kit. Network Scanner Kit If the network scanner kit is installed in this machine, you can use this machine as a network scanner. For details, refer to the Operation Guide for the network scanner kit. 4-10 - Kyocera KM-1650 | 1650/2050/2550 Operation Guide Rev-4 (Basic) - Page 93
MB is effective for originals containing photos with a low compression ratio. Notes • Available memory For copier: 16 MB, 32 MB, 64 MB, 128 MB For printer: 32 MB, 64 MB, 128 MB, 256 MB • Number of originals that can be scanned (A4 originals with of 6 % coverage, Text + Photo mode) 16 MB 32 MB - Kyocera KM-1650 | 1650/2050/2550 Operation Guide Rev-4 (Basic) - Page 94
The locations for attaching options are shown below. Available Options The following options are available for this machine. Document Processor Additional Memory Hard Disk Duplex Unit Finisher Job Separator 4-12 Key Counter Fax Kit Paper Feeder Network Scanner Kit Memory Card (CompactFlash) - Kyocera KM-1650 | 1650/2050/2550 Operation Guide Rev-4 (Basic) - Page 95
this machine as a facsimile machine. Also if the optional network scanner kit is used together, this machine can be used as a network fax with which data can be transmitted and received through a computer. Network Scanner Kit If the network scanner kit is installed in this machine, you can use this - Kyocera KM-1650 | 1650/2050/2550 Operation Guide Rev-4 (Basic) - Page 96
Optional Equipment 4-14 - Kyocera KM-1650 | 1650/2050/2550 Operation Guide Rev-4 (Basic) - Page 97
5 Maintenance Cleaning the Machine Caution For safety purposes, always remove the power plug from the outlet when performing cleaning operations. Cleaning the Original Cover Open the original cover and wipe the back side of the cover with a - Kyocera KM-1650 | 1650/2050/2550 Operation Guide Rev-4 (Basic) - Page 98
A Important! Never use water, thinner, organic solvents or alcohol. Note For cleaning the inside of the main body, see Replacing the Toner Container and the Waste Toner Box on page 5-5. Cleaning the Separation Needle 1 Open the front cover. 2 Remove the cleaning brush. 3 Pull the left cover handle - Kyocera KM-1650 | 1650/2050/2550 Operation Guide Rev-4 (Basic) - Page 99
4 Move the brush from the left side to the right side along the separation needle as shown in the illustration to remove any dirt or dust. 5 Close the left cover. Cleaning the Transfer Roller 1 Open the front cover. 2 Remove the cleaning brush. 3 Pull the left cover handle up to open the cover. - Kyocera KM-1650 | 1650/2050/2550 Operation Guide Rev-4 (Basic) - Page 100
Maintenance 4 While turning the left transfer roller gear to turn the roller as shown in the illustration, move the brush from the left side to the right side along the roller to remove any dirt or dust. 5 Close the left cover. 5-4 - Kyocera KM-1650 | 1650/2050/2550 Operation Guide Rev-4 (Basic) - Page 101
message display and the machine stops, add toner. Replace the toner container together with the waste toner box. Unable to copy. Please Add Toner Auto 100% 10 Notes Add toner only when Add Toner is displayed on the message display. Whenever the toner container is changed, be sure to carry out - Kyocera KM-1650 | 1650/2050/2550 Operation Guide Rev-4 (Basic) - Page 102
cap attached to the center of the old waste toner box to cover the opening. 4 Turn the toner container release lever A to the left to pull out the toner container. A Caution Do not attempt to incinerate the toner container or the waste toner box. Dangerous sparks may cause burns. Caution Do not - Kyocera KM-1650 | 1650/2050/2550 Operation Guide Rev-4 (Basic) - Page 103
6 Place the old toner container in the plastic bag provided for disposal. Maintenance 7 While holding the charger cleaner 5 cm (2 inches). 9 Remove the accompanying grid cleaner from its package and remove its cap. 10 Fit the grid cleaner to the notch and install it into the main body. 5-7 - Kyocera KM-1650 | 1650/2050/2550 Operation Guide Rev-4 (Basic) - Page 104
do not push it all the way into the main body. Copying trouble may occur. When the electrical charge section is pulled out approximately 5 minutes have elapsed. Hold the new toner container vertically and tap the upper part five times or more. Turn the toner container upside down and tap the upper - Kyocera KM-1650 | 1650/2050/2550 Operation Guide Rev-4 (Basic) - Page 105
or more. Maintenance 16 Insert the knob, which comes with the toner container, into the middle white gear of the drive section located at arrow, since it may cause a problem. When the toner is shifted to one side, it will be impossible to turn the knob manually. In this case, repeat procedures 13 - Kyocera KM-1650 | 1650/2050/2550 Operation Guide Rev-4 (Basic) - Page 106
the waste toner box in accordance with Federal, State and Local rules and regulations. Note In order to ensure the best copying quality, in addition to the cleaning done when changing the toner container, regularly (about once per month) carry out step 7 on page 5-7 and step 4 on page 5-4. 5-10 - Kyocera KM-1650 | 1650/2050/2550 Operation Guide Rev-4 (Basic) - Page 107
indicated below. If the trouble persists, contact your service representative. Symptom Items to check Corrective procedure Reference page Nothing is displayed on the Is the power plug connected to an AC operation panel when the outlet? main power switch is turned on. Connect the plug to an AC - Kyocera KM-1650 | 1650/2050/2550 Operation Guide Rev-4 (Basic) - Page 108
adjustment mode set? To adjust the overall exposure level, perform the auto exposure adjustment procedure. Refer to Chapter 3 in Advanced Operation Guide. Is the manual exposure mode set? Use the Lighter key or the Darker key 3-3 to adjust the exposure level properly. To adjust the overall - Kyocera KM-1650 | 1650/2050/2550 Operation Guide Rev-4 (Basic) - Page 109
drum refresh. Refer to Chapter 3 in Advanced Operation Guide. Printing cannot be performed. Is the power plug connected to an AC Connect the plug to an AC outlet. outlet? 2-13 Is the main power switch turned on? Turn the main power switch on ( | ). - Is a proper printer cable connected - Kyocera KM-1650 | 1650/2050/2550 Operation Guide Rev-4 (Basic) - Page 110
Troubleshooting • If you press the Printer key, the following messages code. Advanced Use the department management mode to clear the copy count. Operation Guide Set toner container. The toner container is not set properly. 5-5 Set the toner container properly. Ready to copy. Add toner Toner - Kyocera KM-1650 | 1650/2050/2550 Operation Guide Rev-4 (Basic) - Page 111
error occurs frequently, addition of the printer memory is recommended. For the addition of the printer memory, contact your service representative or authorized service center. For details, refer to Chapter 2 in Advanced Operation Guide document processor. 6-10 Leave the main power switch on ( - Kyocera KM-1650 | 1650/2050/2550 Operation Guide Rev-4 (Basic) - Page 112
Troubleshooting Message Procedure Reference page Remove paper from Top tray. The output sheets of paper stored in the output tray when the optional finisher is installed. Remove the paper. Press the Printer key. Press the S key or the T key to select GO and press the Enter key. Printing will - Kyocera KM-1650 | 1650/2050/2550 Operation Guide Rev-4 (Basic) - Page 113
a malfunction due to noise or the - like or a communication error during printer processing has occurred. Follow the procedure below. 1 Turn the main power switch off ({). If printer output is being performed, cancel printing on the computer. 2 Wait more than five seconds and then turn the main - Kyocera KM-1650 | 1650/2050/2550 Operation Guide Rev-4 (Basic) - Page 114
Troubleshooting Paper Jams If a paper jam occurs, copying or printing stops. At this time, jam location indicators are displayed as well as an error message indicating a paper jam. Leave the Paper misfeed in cassette 1. main power JAM12, JAM13, JAM14, JAM15, 6-10 JAM16, JAM22, JAM23, JAM24 C - Kyocera KM-1650 | 1650/2050/2550 Operation Guide Rev-4 (Basic) - Page 115
Troubleshooting Warning High voltage is present in the charger section. Take sufficient care when working in this area, as there is a danger of electrical shock. Caution The fixing unit paper has been removed, warm-up will begin. The error message will disappear and the machine will return to the - Kyocera KM-1650 | 1650/2050/2550 Operation Guide Rev-4 (Basic) - Page 116
Troubleshooting 3 Push the cassette back in firmly. Notes • Check to see if paper is out of position in the cassette. If the paper is out of being used. 2 Remove any jammed paper without tearing it. Note If the paper does happen to tear, remove any loose scraps from inside the machine. 6-10 - Kyocera KM-1650 | 1650/2050/2550 Operation Guide Rev-4 (Basic) - Page 117
3 Close the left cover of the cassette. Troubleshooting 4 Pull out the cassette. 5 Remove any jammed paper without tearing it. Note If the paper does happen to tear, remove any loose scraps from inside - Kyocera KM-1650 | 1650/2050/2550 Operation Guide Rev-4 (Basic) - Page 118
Troubleshooting 2 Reset the paper in the multi-bypass tray. The error message disappears. Paper Jam in the Multi-Bypass Tray ( left cover handle up to open the left cover. Caution The fixing unit is extremely hot. Take sufficient care when working in this area, as there is a danger of getting - Kyocera KM-1650 | 1650/2050/2550 Operation Guide Rev-4 (Basic) - Page 119
. Troubleshooting (25 ppm model only) If paper is left between the drum cover A and the drum A drum cover A, the drum cover A may be damaged. Note If the paper does happen to tear, remove any loose scraps from inside the machine. 3 If the optional duplex unit is installed, raise the duplex unit - Kyocera KM-1650 | 1650/2050/2550 Operation Guide Rev-4 (Basic) - Page 120
Troubleshooting 1 If jammed paper is seen through the paper output slot, pull it out to remove it. Note If the paper does happen to tear, remove - Kyocera KM-1650 | 1650/2050/2550 Operation Guide Rev-4 (Basic) - Page 121
remaining in the original table. 2 Open the left cover. Troubleshooting 3 Remove any jammed original without tearing it. Note 4 If . Failure to do so may cause another paper jam later. Raise the paper feed unit A. A 5 Remove any jammed originals without tearing them. Note If the original does - Kyocera KM-1650 | 1650/2050/2550 Operation Guide Rev-4 (Basic) - Page 122
Troubleshooting 6 Turn the dial as shown in the illustration to remove the jammed original. 7 Close the left cover to its original position. Reset in Finisher,lower Process Tray and remove paper. JAM80 Important! The drum section inside the main body is sensitive to scratches and contaminants. When - Kyocera KM-1650 | 1650/2050/2550 Operation Guide Rev-4 (Basic) - Page 123
4 Remove the finisher tray. Troubleshooting 5 Pull the left cover handle up to open the left cover. 6 Remove any jammed paper. Note If the machine. 7 Close the left cover. 8 Reattach the finisher tray. 9 Lower the process tray temporarily and return it. The error message disappears. 6-17 - Kyocera KM-1650 | 1650/2050/2550 Operation Guide Rev-4 (Basic) - Page 124
Troubleshooting Paper Jam in the Optional Job Separator If Paper misfeed at procedure to remove the jammed paper. Paper misfeed at Job separator. Remove paper. JAM51 Important! The drum section inside the main body is sensitive to scratches and contaminants. When removing paper, be careful not - Kyocera KM-1650 | 1650/2050/2550 Operation Guide Rev-4 (Basic) - Page 125
Operation Guide, Paper power mode: 10 seconds Time for recovery from sleep mode: 20 seconds (At room temperature: around 73.4 °F (23 °C), humidity: around 50 %) Memory For copier 64 MB For printer 64 MB Additional memory For copier: 16 MB, 32 MB, 64 MB, and 128 MB For printer: 32 MB, 64 - Kyocera KM-1650 | 1650/2050/2550 Operation Guide Rev-4 (Basic) - Page 126
103.4 lbs/47 kg 62 dB(A) 64.7 dB(A) Copier Functions Copying speed Platen (1:1) Document processor 20 sheets/minute B5R: 13 sheets/minute A5R: 10 sheets/minute A6R: 10 sheets/minute 25 ppm model A3/11 × 17" 5.0 seconds or less (1:1, A4/11 × 8 1/2") Scanning: 600 × 600 dpi Printing: 600 × 600 dpi - Kyocera KM-1650 | 1650/2050/2550 Operation Guide Rev-4 (Basic) - Page 127
1200 mode Microsoft Windows 95/98/Me Microsoft Windows NT4.x/2000/XP Apple Macintosh OS 9.x/OS X 10.x UNIX/Linux Parallel " (Letter), 5 1/2 × 8 1/2" (Statement), 8 1/2 × 13" (Oficio II), 8K, 16K Weight: 64 to 105 g/m² Types: Standard paper, recycled paper, and color paper 22 7/16 × 21 3/16 × 5 - Kyocera KM-1650 | 1650/2050/2550 Operation Guide Rev-4 (Basic) - Page 128
Appendix Duplex Unit (optional) System Paper sizes Acceptable paper Dimensions (W) × (D) × (H) 8 1/2 × 11" (Letter), 5 1/2 × 8 1/2" (Statement), 8 1/2 × 13" (Oficio II), 8K, 16K, 16KR Weight: 64 to 80 g/m² Types: Standard paper, recycled paper, and color paper 14 1/2 × 2 1/16 × 7 1/16" 368 × 53 × 180 - Kyocera KM-1650 | 1650/2050/2550 Operation Guide Rev-4 (Basic) - Page 129
to the low power mode (at time of purchase) Transition time to the sleep mode (at time of purchase) Duplex (2-sided) copying Paper feed 10 seconds 9 minutes 19 minutes Option Recycled paper made from 100 % recycled pulp may be used with this product. Note Please consult with your dealer or service - Kyocera KM-1650 | 1650/2050/2550 Operation Guide Rev-4 (Basic) - Page 130
Appendix Appendix-6 - Kyocera KM-1650 | 1650/2050/2550 Operation Guide Rev-4 (Basic) - Page 131
...3-17 Connecting the cables ...2-11 Connecting the power cord ...2-13 Copier basic screen ...1-7 Copier functions ...Appendix-2 Copy ...3-1 D Date ...2-21 Date and time ...2-19 Default gateway ...2-18 Displayed messages ...6-4 Document processor 4-1, Appendix-3 Duplex copying ...3-9 Duplex unit - Kyocera KM-1650 | 1650/2050/2550 Operation Guide Rev-4 (Basic) - Page 132
Index F Fax kit ...4-10 Finisher ...4-6, Appendix-4 Front cover ...1-2 H Hard disk ...4-11 I If trouble occurs ...6-1 Image quality mode ...3-2 Initial mode ...1-6 Installation precautions ...xi Interrupt mode ...3-21 IP address ...2-15 J Jam location indicators ...6-8 Job separator ...4-9, - Kyocera KM-1650 | 1650/2050/2550 Operation Guide Rev-4 (Basic) - Page 133
Parallel interface connector 1-3, 2-12 Photo ...3-2 Platen ...1-2, 3-1 Power cord ...2-13 Precautions for use ...xii Preset zoom mode ...3-8 Printer basic screen ...1-7 Printer cable ...2-11 Printer driver ...3-25 Printer functions ...Appendix-3 Printing ...3-25 R Resolution Appendix-2, Appendix - Kyocera KM-1650 | 1650/2050/2550 Operation Guide Rev-4 (Basic) - Page 134
Index T Text ...3-2 Text + Photo ...3-2 Time ...2-20 Time difference ...2-20 Toner container ...1-2, 5-5 Turning the power on ...2-14 U USB cable ...2-11 USB interface connector 1-3, 2-12 W Warm up ...2-14, 3-1 Waste toner box ...1-2, 5-5 Z Zoom copying ...3-5 Zoom mode ...3-6 Index-4 - Kyocera KM-1650 | 1650/2050/2550 Operation Guide Rev-4 (Basic) - Page 135
MEMO - Kyocera KM-1650 | 1650/2050/2550 Operation Guide Rev-4 (Basic) - Page 136
MEMO - Kyocera KM-1650 | 1650/2050/2550 Operation Guide Rev-4 (Basic) - Page 137
MEMO - Kyocera KM-1650 | 1650/2050/2550 Operation Guide Rev-4 (Basic) - Page 138
For best print results and machine performance, we recommend that you use only KYOCERA original supplies for your KYOCERA products. A1 - Kyocera KM-1650 | 1650/2050/2550 Operation Guide Rev-4 (Basic) - Page 139
©2004 is a trademark of Kyocera Corporation - Kyocera KM-1650 | 1650/2050/2550 Operation Guide Rev-4 (Basic) - Page 140
-
 1
1 -
 2
2 -
 3
3 -
 4
4 -
 5
5 -
 6
6 -
 7
7 -
8
-
9
-
10
-
11
-
12
-
13
-
14
-
15
-
16
-
17
-
18
-
19
-
20
-
21
-
22
-
23
-
24
-
25
-
26
-
27
-
28
-
29
-
30
-
31
-
32
-
33
-
34
-
35
-
36
-
37
-
38
-
39
-
40
-
41
-
42
-
43
-
44
-
45
-
46
-
47
-
48
-
49
-
50
-
51
-
52
-
53
-
54
-
55
-
56
-
57
-
58
-
59
-
60
-
61
-
62
-
63
-
64
-
65
-
66
-
67
-
68
-
69
-
70
-
71
-
72
-
73
-
74
-
75
-
76
-
77
-
78
-
79
-
80
-
81
-
82
-
83
-
84
-
85
-
86
-
87
-
88
-
89
-
90
-
91
-
92
-
93
-
94
-
95
-
96
-
97
-
98
-
99
-
100
-
101
-
102
-
103
-
104
-
105
-
106
-
107
-
108
-
109
-
110
-
111
-
112
-
113
-
114
-
115
-
116
-
117
-
118
-
119
-
120
-
121
-
122
-
123
-
124
-
125
-
126
-
127
-
128
-
129
-
130
-
131
-
132
-
133
-
134
-
135
-
136
-
137
-
138
-
139
-
140
 |
 |