Kyocera KM-1650 1650/2050/2550 Operation Guide Rev-4 (Basic) - Page 84
Notes on Use, Important, Names of Parts, Setting Originals in the Document Processor
 |
View all Kyocera KM-1650 manuals
Add to My Manuals
Save this manual to your list of manuals |
Page 84 highlights
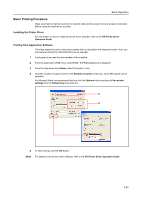
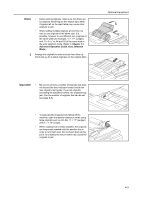
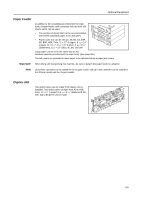
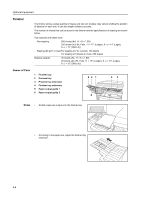
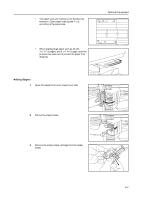
Optional Equipment Notes on Use Be sure not to use the following as originals in the document processor. In addition, originals with punched holes or perforations should be set so that the edge of the paper with the holes or perforations is facing away from the direction of insertion into the document processor. • Transparencies • Carbon paper, crumpled originals or originals with strong folds, and soft originals such as vinyl • Originals which are not rectangular, wet originals, and originals with adhesive tape or glue • Originals with clips or staples (To use such originals, remove the clips or staples and straighten any crumples or folds before using them.) • Clippings or originals with very slippery surfaces • Originals with wet correction fluid • Originals with folds (If you must use such originals, smooth out the folded portions before setting them in the document processor.) • Curled originals (If you must use such originals, smooth out the curled portions before setting them in the document processor.) Important! When moving this machine, be sure to close the document processor. Names of Parts 1 Original table - Set originals to be copied on this table. 2 Original insert guides - Adjust these guides to the width of the originals to be copied. 3 2 1 24 5 3 Left cover - Open this cover if an original jam occurs. 4 Original eject table - Originals that have been copied are ejected and stored here. 5 Ejection extension - Open this extension when using large originals such as A3, B4, 11 × 17" (Ledger), and 8 1/2 × 14" (Legal). 6 Document processor release grip - Hold this grip to open or close the document processor. 76 7 Ejection tray - In the case of two-sided originals, the originals will be temporarily ejected here. Setting Originals in the Document Processor 1 Adjust the original insert guides to the width of original to be copied. 4-2
-
 1
1 -
2
-
3
-
4
-
5
-
6
-
7
-
8
-
9
-
10
-
11
-
12
-
13
-
14
-
15
-
16
-
17
-
18
-
19
-
20
-
21
-
22
-
23
-
24
-
25
-
26
-
27
-
28
-
29
-
30
-
31
-
32
-
33
-
34
-
35
-
36
-
37
-
38
-
39
-
40
-
41
-
42
-
43
-
44
-
45
-
46
-
47
-
48
-
49
-
50
-
51
-
52
-
53
-
54
-
55
-
56
-
57
-
58
-
59
-
60
-
61
-
62
-
63
-
64
-
65
-
66
-
67
-
68
-
69
-
70
-
71
-
72
-
73
-
74
-
75
-
76
-
77
-
78
-
 79
79 -
 80
80 -
 81
81 -
 82
82 -
 83
83 -
 84
84 -
 85
85 -
 86
86 -
 87
87 -
 88
88 -
 89
89 -
90
-
91
-
92
-
93
-
94
-
95
-
96
-
97
-
98
-
99
-
100
-
101
-
102
-
103
-
104
-
105
-
106
-
107
-
108
-
109
-
110
-
111
-
112
-
113
-
114
-
115
-
116
-
117
-
118
-
119
-
120
-
121
-
122
-
123
-
124
-
125
-
126
-
127
-
128
-
129
-
130
-
131
-
132
-
133
-
134
-
135
-
136
-
137
-
138
-
139
-
140
 |
 |
