Kyocera KM-1820 1820 Operation Guide (Basic Edition) Rev-1.1
Kyocera KM-1820 Manual
 |
View all Kyocera KM-1820 manuals
Add to My Manuals
Save this manual to your list of manuals |
Kyocera KM-1820 manual content summary:
- Kyocera KM-1820 | 1820 Operation Guide (Basic Edition) Rev-1.1 - Page 1
KM-1820 FS-1118MFP (Eur) Operation Guide - Kyocera KM-1820 | 1820 Operation Guide (Basic Edition) Rev-1.1 - Page 2
The KM-1820 model is applicable to USA, Canada, and the Asia Pacific region. The FS-1118MFP model is applicable to Europe and Australasia. - Kyocera KM-1820 | 1820 Operation Guide (Basic Edition) Rev-1.1 - Page 3
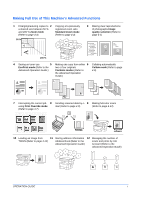
4-1) 200 % 4 Saving on toner use 5 Making one copy from either 6 Collating automatically EcoPrint mode (Refer to the two or four originals Collate mode (Refer to page Advanced Operation Guide.) Combine modes (Refer to 4-6) the Advanced Operation Guide.) 7 Interrupting the current job - Kyocera KM-1820 | 1820 Operation Guide (Basic Edition) Rev-1.1 - Page 4
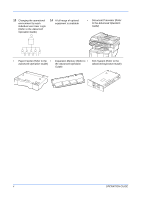
user User Login (Refer to the Advanced Operation Guide) 14 A full range of optional equipment is available • Document Processor (Refer to the Advanced Operation Guide) • Paper Feeder (Refer to the • Expansion Memory (Refer to • FAX System (Refer to the Advanced Operation Guide) the Advanced - Kyocera KM-1820 | 1820 Operation Guide (Basic Edition) Rev-1.1 - Page 5
Legal and Safety 1 Machine Parts Main Body 1-1 Operation Panel 1-4 Message Display 1-5 Setting the Current Date and Time 3-6 Default Operation Mode 3-7 Character Entry 3-8 Keys Used for 3-11 Other Settings 3-11 4 Basic Operation Basic Copying Procedure 4-1 Canceling Copy 4-3 - Kyocera KM-1820 | 1820 Operation Guide (Basic Edition) Rev-1.1 - Page 6
Touch Keys 4-13 Scan with TWAIN Driver 4-13 Selecting Color Scan Mode 4-13 Basic Printing Procedure 4-14 Installing the Printer Driver 4-14 Printing from Application Software 4-14 5 Maintenance Cleaning the Machine 5-1 Toner Container Replacement 5-1 Online Help Messages 5-1 Replacing - Kyocera KM-1820 | 1820 Operation Guide (Basic Edition) Rev-1.1 - Page 7
edition. No responsibility is assumed if accidents occur while the user is following the instructions in this manual. No responsibility is assumed for defects in the printer's firmware (contents of its read-only memory). This guide, any copyrightable subject matter sold or provided with or in - Kyocera KM-1820 | 1820 Operation Guide (Basic Edition) Rev-1.1 - Page 8
Software printers, you need to acquire a multi-user license agreement which can be obtained from Agfa Japan. Agfa Japan retains all rights, title and interest to the Software Software and Typefaces. 4 You agree not to duplicate or copy the Software Software Software Software is free from all bugs, errors - Kyocera KM-1820 | 1820 Operation Guide (Basic Edition) Rev-1.1 - Page 9
of Agfa Japan in connection with the Software and Typefaces is repair or replacement of defective parts, upon their return to Agfa Japan. the device was last used, as well as a Sleep Mode where printer and fax functions remain in a waiting state but power consumption is still OPERATION GUIDE vii - Kyocera KM-1820 | 1820 Operation Guide (Basic Edition) Rev-1.1 - Page 10
recommended paper types. Please read this Operation Guide before using the machine. Keep it close to the machine for easy reference. The sections of this guide and parts of the machine marked with symbols are safety warnings meant to protect the user, other individuals and surrounding objects, and - Kyocera KM-1820 | 1820 Operation Guide (Basic Edition) Rev-1.1 - Page 11
action] .... [Remove the power plug from the outlet] .... [Always connect the machine to an outlet with a ground connection] Please contact your service representative to order a replacement if the safety warnings in this Operation Guide are illegible or if the guide itself is missing. (fee required - Kyocera KM-1820 | 1820 Operation Guide (Basic Edition) Rev-1.1 - Page 12
replacing toner. NOTE: Do not remove these labels. Label 1 High temperature inside. Do not touch parts in this area, because there is a danger of getting burned Label 2 High temperature inside. Do not touch parts in this area, because there is a danger of getting burned x OPERATION GUIDE - Kyocera KM-1820 | 1820 Operation Guide (Basic Edition) Rev-1.1 - Page 13
fire. To keep the machine cool and facilitate changing of parts and maintenance, allow access space as shown below. Leave adequate Adverse environmental conditions may affect the safe operation and performance of the machine. Install in an air-conditioned room (recommended room . OPERATION GUIDE xi - Kyocera KM-1820 | 1820 Operation Guide (Basic Edition) Rev-1.1 - Page 14
short. If an earth connection is not possible, contact your service representative. Other Precautions Connect the power plug to the closest outlet the main disconnect device. Ensure that the socket/outlet is located/installed near the equipment and is easily accessible. Handling of Plastic Bags - Kyocera KM-1820 | 1820 Operation Guide (Basic Edition) Rev-1.1 - Page 15
to avoid the danger of fire or electrical shock. Then contact your service representative. Do not remove or connect the power plug with wet hands, as there is a danger of electrical shock. Always contact your service representative for maintenance or repair of internal parts. OPERATION GUIDE xiii - Kyocera KM-1820 | 1820 Operation Guide (Basic Edition) Rev-1.1 - Page 16
the outlet when performing cleaning operations. If dust accumulates within the machine, there is a danger of fire or other trouble. It is therefore recommended that you consult with your service representative in regard to cleaning of internal parts. This is particularly effective if accomplished - Kyocera KM-1820 | 1820 Operation Guide (Basic Edition) Rev-1.1 - Page 17
the Toner Container in accordance with Federal, State and Local rules and regulations. Store all consumables in a cool, dark location. If the machine will not be used for an extended period of time, remove the paper from the cassette, return it to its original package and reseal it. OPERATION GUIDE - Kyocera KM-1820 | 1820 Operation Guide (Basic Edition) Rev-1.1 - Page 18
of procedures other than those specified in this manual may result in hazardous radiation exposure. This label is attached to the laser scanner unit inside the machine and is not in a user access area. The labels shown below are attached on the rear side of the machine. xvi OPERATION GUIDE - Kyocera KM-1820 | 1820 Operation Guide (Basic Edition) Rev-1.1 - Page 19
Legal and Safety Safety Instructions Regarding the Disconnection of Power (Europe) CAUTION: The power plug is the main equipment, including electrical equipment EN60950 Radiation Safety of laser products, equipment classification, requirements and user's guide EN60825-1 OPERATION GUIDE xvii - Kyocera KM-1820 | 1820 Operation Guide (Basic Edition) Rev-1.1 - Page 20
and must be attached to laser products marketed in the United States. On this copier, the label is on the rear. 3. Optical unit When checking the optical unit For safety of the service personnel, follow the maintenance instructions in the other section of this manual. xviii OPERATION GUIDE - Kyocera KM-1820 | 1820 Operation Guide (Basic Edition) Rev-1.1 - Page 21
The power to the laser unit is cut off when the upper front cover is opened. Safety Instructions Regarding the Disconnection of Power CAUTION: The power plug is the main isolation device! Other switches on be recycled or disposed of according to local, state or federal laws. OPERATION GUIDE xix - Kyocera KM-1820 | 1820 Operation Guide (Basic Edition) Rev-1.1 - Page 22
Safety Warranty (USA) 1820 COPIER LIMITED WARRANTY 1 Kyocera Mita America, Inc. and Kyocera Mita Canada, Ltd. (both referred to as Kyocera) warrants the Customer's new Multifunctional Product (referred to as MFP), and the new accessories installed with the initial installation of the MFP, against - Kyocera KM-1820 | 1820 Operation Guide (Basic Edition) Rev-1.1 - Page 23
problems if trouble occurs. Advanced Operation Guide The Advanced Operation Guide contains explanations on copier, printer, and scanner functions as well as default settings that can be adjusted on this machine. This guide is stored on the CD-ROM as a PDF document. Kyocera Extended Driver (KX Driver - Kyocera KM-1820 | 1820 Operation Guide (Basic Edition) Rev-1.1 - Page 24
files without starting Adobe Acrobat by directly sending a PDF file through the Windows spooler. This guide describes how to install and operate KM-NET for Direct Printing. This guide is stored on the CD-ROM as a PDF document. Network FAX Driver Operation Guide Describes how to use the Network FAX - Kyocera KM-1820 | 1820 Operation Guide (Basic Edition) Rev-1.1 - Page 25
1 Machine Parts Main Body 1 7 8 3 2 4 5 6 9 10 11 1 Original Cover 2 Platen 3 Original Size Indicator Plate 4 Operation Panel 5 Top Cover 6 Front Cover 7 Process Unit 8 Charger Cleaner 9 Lock Lever 10 Toner Container 11 Toner Container Release Lever OPERATION GUIDE 1-1 - Kyocera KM-1820 | 1820 Operation Guide (Basic Edition) Rev-1.1 - Page 26
Machine Parts 12 13 14 15 16 15 17 17 18 19 12 Output Tray 13 Stopper Extension Lock 14 Paper Stopper 15 Paper Width Guides 16 Cassette 17 Paper Width Guides (MP Tray) 18 MP (Multi-Purpose) Tray 19 MP Tray Extension 1-2 OPERATION GUIDE - Kyocera KM-1820 | 1820 Operation Guide (Basic Edition) Rev-1.1 - Page 27
Machine Parts 20 21 22 23 25 24 26 27 20 Document Processor Connector 21 Parallel Interface Connector 22 USB Interface Connector 23 Right Cover Anchor Pin 24 Network Interface Connector 25 Rear Cover (Face-up Tray) 26 Power Switch 27 Power Cord Receptacle OPERATION GUIDE 1-3 - Kyocera KM-1820 | 1820 Operation Guide (Basic Edition) Rev-1.1 - Page 28
on. For further information refer to Maintenance and Error 30 X Key Messages, on page 6-3. 31 Stop/Clear Key 12 System Menu/Counter Key and Indicator 32 Start Key and Indicator 13 Log Out Key and Indicator 14 Numeric Keys 15 Reset/Power Key 16 Main Power Indicator 1-4 OPERATION GUIDE - Kyocera KM-1820 | 1820 Operation Guide (Basic Edition) Rev-1.1 - Page 29
7 :[email protected] 9 10 Left Off 11 Placemnt Subject 5 Copier Screen Send Screen Reference number Meaning 1 Indicates the current status of the machine. Also displays the title of the current menu whenever the operation panel is being used. 2 Displays an icon that indicates the - Kyocera KM-1820 | 1820 Operation Guide (Basic Edition) Rev-1.1 - Page 30
Machine Parts 1-6 OPERATION GUIDE - Kyocera KM-1820 | 1820 Operation Guide (Basic Edition) Rev-1.1 - Page 31
For details on the media types that can be used, refer to the Advanced Operation Guide. After taking new paper out of its packet, fan it to separate size and type that can be loaded into a cassette, refer to the Advanced Operator Guide. 1 Carefully pull the cassette all the way out of the machine. 2 - Kyocera KM-1820 | 1820 Operation Guide (Basic Edition) Rev-1.1 - Page 32
and the stopper or guides and that it does not exceed the level of the lines located on the width guides. 5 Push the cassette securely all the way back into the machine until it stops. 6 Register the paper size loaded in the cassette. Refer to the Advanced Operation Guide. 2-2 OPERATION GUIDE - Kyocera KM-1820 | 1820 Operation Guide (Basic Edition) Rev-1.1 - Page 33
. Loading Paper on the MP Tray For details of the paper size and type that can be loaded into the MP tray, refer to the Advanced Operator Guide. Only load the MP Tray when you are planning to use it. Do not leave paper in the MP tray for long periods of time - Kyocera KM-1820 | 1820 Operation Guide (Basic Edition) Rev-1.1 - Page 34
the MP tray towards you until it click into place. 2 Pull out the MP tray extension and then flip it open. 3 Adjust the paper width guides to fit the width of the paper. 4 Slide the paper, with the side to be copied or printed onto is facing upward, along the paper - Kyocera KM-1820 | 1820 Operation Guide (Basic Edition) Rev-1.1 - Page 35
tray (located at the rear of the machine). 2 Perform the standard copying or printing procedure. Completed pages will be output onto the face-up tray. OPERATION GUIDE 2-5 - Kyocera KM-1820 | 1820 Operation Guide (Basic Edition) Rev-1.1 - Page 36
Loading Paper 2-6 OPERATION GUIDE - Kyocera KM-1820 | 1820 Operation Guide (Basic Edition) Rev-1.1 - Page 37
the Parallel or USB Cable To connect the machine directly to your computer, use either a parallel cable or USB cable. For details refer to the Advanced Operation Guide. 1 Turn the machine off, remove the power cord from the outlet and turn the computer off - Kyocera KM-1820 | 1820 Operation Guide (Basic Edition) Rev-1.1 - Page 38
at the rear side of the machine. Parallel Cable USB Cable 3 Connect the other end of the printer cable to the appropriate connector on your computer. Connecting the Power Cord Connect the power cord to the will begin to warm up after which the basic screen is displayed. 3-2 OPERATION GUIDE - Kyocera KM-1820 | 1820 Operation Guide (Basic Edition) Rev-1.1 - Page 39
the machine, you do so by accessing a menu item and making your setting from there. Each configuration instruction in this guide tells you to access the menu item and provides a route map to direct you to that item. An the up or down button until IP Address is displayed. OPERATION GUIDE 3-3 - Kyocera KM-1820 | 1820 Operation Guide (Basic Edition) Rev-1.1 - Page 40
the machine off and then back on again. To manually register the IP address. System Menu/ Counter S or 3 Press Enter on completion. If you make an error in entering a portion of the IP address, press 3 Press Enter on completion. If you make an error in entering a portion of the Subnet Mask, press - Kyocera KM-1820 | 1820 Operation Guide (Basic Edition) Rev-1.1 - Page 41
to move between segments. 3 Press Enter on completion. If you make an error in entering a portion of the Default Gateway, press W to return to setting using COMMAND CENTER. For details on COMMAND CENTER, refer to the Advanced Operation Guide. System Menu/ Counter S or T Date/Timer Set Enter S or - Kyocera KM-1820 | 1820 Operation Guide (Basic Edition) Rev-1.1 - Page 42
. Setting the Current Date and Time You can also make this setting using COMMAND CENTER. For details on COMMAND CENTER, refer to the Advanced Operation Guide. System Menu/ Counter S or T Date/Timer Set Enter S or T Year/Time Enter NOTE: Periodically check the time that is shown in the message - Kyocera KM-1820 | 1820 Operation Guide (Basic Edition) Rev-1.1 - Page 43
set the operation mode selected when the machine is powered on. Modes available are Copy Operation, Send Operation or Status Operation. It is Default Operat and press Enter. 3 Press S or T to select the default operation mode from among Status, Copy or Send. 4 Press Enter. The message display - Kyocera KM-1820 | 1820 Operation Guide (Basic Edition) Rev-1.1 - Page 44
to delete the character at the cursor. If the cursor is not on a character, the character to the left of the cursor will be deleted. 3-8 OPERATION GUIDE - Kyocera KM-1820 | 1820 Operation Guide (Basic Edition) Rev-1.1 - Page 45
/Symbol Numeric Alphabetic/Symbol Numeric Alphabetic/Symbol Numeric Alphabetic/Symbol Numeric Alphabetic/Symbol Numeric Available characters 1 1 a b c A B C 2 2 d e f D E F 3 3 g h i G H I 4 4 j k l J K L 5 5 m n o M N O 6 6 p q r s P Q R S 7 7 t u v T U V 8 8 OPERATION GUIDE 3-9 - Kyocera KM-1820 | 1820 Operation Guide (Basic Edition) Rev-1.1 - Page 46
the rest of the characters in the same way, and press Enter. Completed will appear and the message display returns to the basic screen. 3-10 OPERATION GUIDE - Kyocera KM-1820 | 1820 Operation Guide (Basic Edition) Rev-1.1 - Page 47
Selecting Message Language You can select the language of the messages display by following the procedure in the Advanced Operation Guide. You can optionally download messages in other languages. Contact your dealer for information. The following languages are available for selection: English, Fran - Kyocera KM-1820 | 1820 Operation Guide (Basic Edition) Rev-1.1 - Page 48
Preparations 3-12 OPERATION GUIDE - Kyocera KM-1820 | 1820 Operation Guide (Basic Edition) Rev-1.1 - Page 49
Copying Procedure To change the default settings for the machine, refer to the Advanced Operation Guide. 1 Turn the machine on. At the end of warm-up, the Start indicator will light. 2 Select from the copier's various functions. 3 Press Paper Select to select the paper feed location, and press - Kyocera KM-1820 | 1820 Operation Guide (Basic Edition) Rev-1.1 - Page 50
Basic Operation 6 The copy exposure can be adjusted either automatically or manually. This machine is initially set for manual exposure adjustment. Normally there will be no need for you to adjust to Canceling Copy on page 4-3. Completed copies are delivered to the output tray. 4-2 OPERATION GUIDE - Kyocera KM-1820 | 1820 Operation Guide (Basic Edition) Rev-1.1 - Page 51
Canceling Copy 1 Press Stop/Clear. The Pausing Job List screen will be displayed. Basic Operation 2 Press S or T to select the copying job to cancel. 3 Press left Select. 4 Cancel Job. Are 8 To enable copying again, press Copy. The message display returns to the basic screen. OPERATION GUIDE 4-3 - Kyocera KM-1820 | 1820 Operation Guide (Basic Edition) Rev-1.1 - Page 52
Basic Operation Zoom Copies It is possible to change the zoom ratio in order to make copies of an enlarged or reduced size. The following modes and returns to the basic screen. The new zoom ratio is registered. To start copying, place the original on the platen and press Start. 4-4 OPERATION GUIDE - Kyocera KM-1820 | 1820 Operation Guide (Basic Edition) Rev-1.1 - Page 53
Basic Operation Variable Zoom Perform the following procedure to make settings for the Variable Zoom mode. 1 Press Copy. 2 Press left Select. 3 Press S or T to the basic screen. The new zoom ratio is registered. To start copying, place the original on the platen and press Start. OPERATION GUIDE 4-5 - Kyocera KM-1820 | 1820 Operation Guide (Basic Edition) Rev-1.1 - Page 54
Multiple originals can be collated. To use the collate mode turn the continuous scan function on. For details, refer to the Advanced Operation Guide. 1 Press Copy. Originals Copies 2 Press Function. 3 Press S or T to select Collate. 4 Press Enter. 5 Press S or T to select On. 6 Press Enter. The - Kyocera KM-1820 | 1820 Operation Guide (Basic Edition) Rev-1.1 - Page 55
Basic Operation Print Override Mode The print override mode temporarily stops processing of the current job to enable copies of a more urgent are delivered to the output tray. 9 When the interruption is completed, perform steps 1 through 4 to switch Print Override mode Off. OPERATION GUIDE 4-7 - Kyocera KM-1820 | 1820 Operation Guide (Basic Edition) Rev-1.1 - Page 56
) the machine waits before auto sleep is activated. The factory default time is 30 minutes. For details, refer to the Advanced Operation Guide. To engage auto sleep manually, press and hold Reset/Power for at least three seconds. The auto sleep mode will engage immediately. The machine wakes from - Kyocera KM-1820 | 1820 Operation Guide (Basic Edition) Rev-1.1 - Page 57
book (LDAP) or using a one-touch key. Refer to the Advanced Operation Guide for the registration method to an address book and one-touch keys. The scanner can be operated from a PC connected locally through a USB connection using a Kyocera TWAIN driver contained in attached CD-ROM. The format of the - Kyocera KM-1820 | 1820 Operation Guide (Basic Edition) Rev-1.1 - Page 58
, a PDF attachment named doc04252005101530.pdf is a file sent on 2005 April 25th at 10:15:30. Recipient Selection from Address Book 1 Press Send. 2 Press X. 3 Press S or T to select Address Book or Ext Address Book. 4 Press Enter. 5 Press S or T to select a desired name. 4-10 OPERATION GUIDE - Kyocera KM-1820 | 1820 Operation Guide (Basic Edition) Rev-1.1 - Page 59
image (PDF) is named as doc plus the date and time at which it was transmitted. For example, a pdf attachment named doc04252005101530.pdf is a to the Advanced Operation Guide for information on registering an address in the address book. Entering a Recipient Address from the Operation Panel 1 Press - Kyocera KM-1820 | 1820 Operation Guide (Basic Edition) Rev-1.1 - Page 60
a desired name. 4 Press Enter. 5 Press S or T to select the folder. 6 Press Enter. Login User Name input screen is displayed. 7 Enter the login user name and press Enter. If you also have a domain name, enter it after the user name. 8 Enter the login password and press Enter. 4-12 OPERATION GUIDE - Kyocera KM-1820 | 1820 Operation Guide (Basic Edition) Rev-1.1 - Page 61
.pdf is a file sent on 2005 April 25th at 10:15:30. Scan with TWAIN Driver Be sure that you connect your PC with the machine using the USB cable and install the Kyocera TWAIN Driver. The scan can be carried out from any TWAIN compatible application program. Refer to Advanced Operation Guide - Kyocera KM-1820 | 1820 Operation Guide (Basic Edition) Rev-1.1 - Page 62
cord are properly connected. Installing the Printer Driver To use the printer function, the printer driver must be installed. For information on how to install the printer driver software, refer to the Kyocera Extended Driver Operation Guide. Printing from Application Software 1 Be sure that paper - Kyocera KM-1820 | 1820 Operation Guide (Basic Edition) Rev-1.1 - Page 63
document processor is installed in your machine, Toner is displayed, press left Select (Help) to display the procedure to replace the toner container. Press S to display the next step or press T to display the previous step. Press Enter to exit the online help message display. OPERATION GUIDE - Kyocera KM-1820 | 1820 Operation Guide (Basic Edition) Rev-1.1 - Page 64
towards to the UNLOCK position then pull the toner container release lever to the right. 5 Gently remove the old toner container. Put it in the supplied plastic bag and dispose of it according to local rules and regulations. CAUTION: Do not burn or open the toner container. 5-2 OPERATION GUIDE - Kyocera KM-1820 | 1820 Operation Guide (Basic Edition) Rev-1.1 - Page 65
container horizontally 5 or 6 times to distributed the toner inside. 7 Remove the orange protective seal. 8 Align the knob on the left side of the container with ). Clean the charge and registration roller. Refer to Cleaning the Charger and the Registration Roller on page 5-4. OPERATION GUIDE 5-3 - Kyocera KM-1820 | 1820 Operation Guide (Basic Edition) Rev-1.1 - Page 66
the guides inside the machine, and carefully slide the process unit into the machine until in stops. (C) (A) (C) 4 Close the front cover. 5 Close the top cover. 6 When the toner container is replaced, reset the toner gauge. For details, refer to the Advanced Operation Guide. 5-4 OPERATION GUIDE - Kyocera KM-1820 | 1820 Operation Guide (Basic Edition) Rev-1.1 - Page 67
S or T Service Setting Enter S or T Transport Mode Enter Follow the instructions below to reinstall the transport pin before moving the machine 1 Access Transport mode. If you are unsure how to use this route map refer to Accessing Menu Items on page 3-3. 2 Press left Select on the operation panel - Kyocera KM-1820 | 1820 Operation Guide (Basic Edition) Rev-1.1 - Page 68
Maintenance 5-6 OPERATION GUIDE - Kyocera KM-1820 | 1820 Operation Guide (Basic Edition) Rev-1.1 - Page 69
troubleshoot the problems before calling for service. Symptom Check Item Corrective Action Nothing lights on the operation the trouble on the operation panel? copier in the EcoPrint mode? Select an image quality mode other than the EcoPrint mode. Is the Add Toner indicator lit? Replace the toner - Kyocera KM-1820 | 1820 Operation Guide (Basic Edition) Rev-1.1 - Page 70
Troubleshooting Advanced Operation Guide Toner indicator doesn't go out after replacing the toner container. Did you shake the new toner container enough? Shake the toner container horizontally 5 or 6 times. Reference page 5-4 page 5-1 page 4-1 - page 2-1 - page 6-7 - page 5-3 6-2 OPERATION GUIDE - Kyocera KM-1820 | 1820 Operation Guide (Basic Edition) Rev-1.1 - Page 71
Entry error. Enter correctly. An invalid character was entered. Error occurred. Call service person. C#### Error user ID. Job is canceled. When user login is enabled and the wrong user ID or password is entered, press right Select to cancel the job. Reference page 2-1 - - - OPERATION GUIDE - Kyocera KM-1820 | 1820 Operation Guide (Basic Edition) Rev-1.1 - Page 72
the document processor because of the way it was placed. Remove all the document pages inside the document processor, and set them again correctly. Reference - - Advanced Operation Guide page 2-1 Advanced Operation Guide page 6-7 - - page 6-10 6-4 OPERATION GUIDE - Kyocera KM-1820 | 1820 Operation Guide (Basic Edition) Rev-1.1 - Page 73
has stopped operating. Check the cable connection or the hub. Reference page 5-1 page 4-3, Advanced Operation Guide Advanced Operation Guide page 4-11 Advanced Operation Guide page 4-9 Advanced Operation Guide Advanced Operation Guide page 3-1 Advanced Operation Guide page 3-1 OPERATION GUIDE 6-5 - Kyocera KM-1820 | 1820 Operation Guide (Basic Edition) Rev-1.1 - Page 74
Troubleshooting Message Send error. #### This key is not registered. Toner low. Waste toner near full. Waiting to scan. Wrong account ID. Wrong password. Wrong user ID. Procedure 3101: SMTP Authentication error. Consult with your network administrator to verify that the Login Account Name and - Kyocera KM-1820 | 1820 Operation Guide (Basic Edition) Rev-1.1 - Page 75
Troubleshooting Paper Jam If a paper jam occurs, a message will be displayed about the jam and copying or printing will stop. Leave the message display. MP Tray and Inside Machine Remove any prints on the output tray before performing this procedure. 1 Open the top cover. OPERATION GUIDE 6-7 - Kyocera KM-1820 | 1820 Operation Guide (Basic Edition) Rev-1.1 - Page 76
Troubleshooting 2 Open the front cover. 3 Take the process unit out of the machine. 4 If the up Tray procedure. 5 Replace the process unit by aligning the pins on both sides with the guides inside the machine, and slide it into the machine until it stops. 6 Close the front cover. 7 Close the top - Kyocera KM-1820 | 1820 Operation Guide (Basic Edition) Rev-1.1 - Page 77
Cassette 1 Pull out the cassette that is in use. Troubleshooting 2 Remove the jammed paper. If a paper jam occurs in the optional paper feeder, the procedure is the 2 Remove the jammed paper. CAUTION: The fixing unit is extremely hot. Take care when working in this area. OPERATION GUIDE 6-9 - Kyocera KM-1820 | 1820 Operation Guide (Basic Edition) Rev-1.1 - Page 78
Troubleshooting 3 Close the rear cover. 4 Open and then close the top cover. The jam indications will disappear. Optional Document Processor 1 Remove all of 3 Remove the jammed original. If the original is caught in the rollers or difficult to remove, proceed to the next step. 6-10 OPERATION GUIDE - Kyocera KM-1820 | 1820 Operation Guide (Basic Edition) Rev-1.1 - Page 79
4 Open the document processor. 5 Remove the jammed original. 6 Close the document processor. 7 Place the originals. Troubleshooting OPERATION GUIDE 6-11 - Kyocera KM-1820 | 1820 Operation Guide (Basic Edition) Rev-1.1 - Page 80
Troubleshooting 6-12 OPERATION GUIDE - Kyocera KM-1820 | 1820 Operation Guide (Basic Edition) Rev-1.1 - Page 81
Oficio II) 3.15 to 8.50 inches × 5.83 to 14.02 inches 80 to 216 mm × 148 to 356 mm 0.5 to 5.5 mm Refer to Appendix in Advanced Operation Guide. 250 sheets (80 g/m²) 50 sheets (80 g/m²) 25 sheets (120 g/m²) 10 sheets (160 g/m²) 1 sheet (Transparency) Approx. 150 sheets (80 g/m²) Approx. 30 sheets (80 - Kyocera KM-1820 | 1820 Operation Guide (Basic Edition) Rev-1.1 - Page 82
conditions Temperature Humidity Altitude Illumination Power source Dimensions (W) × (D) × (H) Weight (without toner container) Noise emission Required space (W) × (D) Specification 96 MB (64 MB fixed 86, 90, 100, 115, 129, 141, and 200 % Any 1 % increment between 50 and 200 % 7-2 OPERATION GUIDE - Kyocera KM-1820 | 1820 Operation Guide (Basic Edition) Rev-1.1 - Page 83
Ethernet: 1 port (10BASE-T/100BASE-TX) Emulations Line printer, IBM proprinter, DIABLO 630, EPSON LQ850, PCL6, color) Grayscale: 8 bit/dot Monochrome: 1 bit/dot File format PDF, TIFF (Only monochrome mode), JPEG (Only full color and grayscale modes Advanced Operator Guide. OPERATION GUIDE 7-3 - Kyocera KM-1820 | 1820 Operation Guide (Basic Edition) Rev-1.1 - Page 84
14 inches (Legal), 8 1/2 × 11 inches (Letter), 7 1/4 × 10 1/2 inches (Executive), and 8 1/2 × 13 inches (Oficio II) Refer to Appendix in Advanced Operation Guide. 14 7/8 × 14 3/4 × 3 1/8 inches 378 × 375 × 79 mm Approx. 4.5 lbs. Approx. 2.0 kg Environmental Specifications Item Duplex copying Paper - Kyocera KM-1820 | 1820 Operation Guide (Basic Edition) Rev-1.1 - Page 85
INDEX A Application software 4-14 C Canceling copy 4-3 Error messages 6-3 F Face-up tray 2-5 K KX printer driver 4-14 L Language selection 3-11 Loading paper 2-1 OPERATION GUIDE Low power mode 4-8 M Maintenance 5-1 Maintenance messages 6-3 Message display 1-5 MP tray 2-3 N Names of machine parts - Kyocera KM-1820 | 1820 Operation Guide (Basic Edition) Rev-1.1 - Page 86
) 7-4 Printing Functions 7-3 Scanning Functions 7-3 Standard zoom 4-4 Stopper extension lock 2-3 Subnet mask 3-4 Summer time 3-6 T Text mode 4-1 Text+Photo mode 4-1 Time zone 3-5 Toner container 5-1 Transfer roller 5-4 TWAIN 4-13 V Variable zoom 4-4, 4-5 Z Zoom copy 4-4 INDEX-2 OPERATION GUIDE - Kyocera KM-1820 | 1820 Operation Guide (Basic Edition) Rev-1.1 - Page 87
For best results and machine performance, we recommend that you use only our original supplies for your products. A1 - Kyocera KM-1820 | 1820 Operation Guide (Basic Edition) Rev-1.1 - Page 88
- Kyocera KM-1820 | 1820 Operation Guide (Basic Edition) Rev-1.1 - Page 89
©2005 is a trademark of Kyocera Corporation - Kyocera KM-1820 | 1820 Operation Guide (Basic Edition) Rev-1.1 - Page 90
Rev. 1.1 2006.9 Printed in China 302GM56011
-
 1
1 -
 2
2 -
 3
3 -
 4
4 -
 5
5 -
 6
6 -
 7
7 -
8
-
9
-
10
-
11
-
12
-
13
-
14
-
15
-
16
-
17
-
18
-
19
-
20
-
21
-
22
-
23
-
24
-
25
-
26
-
27
-
28
-
29
-
30
-
31
-
32
-
33
-
34
-
35
-
36
-
37
-
38
-
39
-
40
-
41
-
42
-
43
-
44
-
45
-
46
-
47
-
48
-
49
-
50
-
51
-
52
-
53
-
54
-
55
-
56
-
57
-
58
-
59
-
60
-
61
-
62
-
63
-
64
-
65
-
66
-
67
-
68
-
69
-
70
-
71
-
72
-
73
-
74
-
75
-
76
-
77
-
78
-
79
-
80
-
81
-
82
-
83
-
84
-
85
-
86
-
87
-
88
-
89
-
90
 |
 |

Operation Guide
KM-1820
FS-1118MFP
(Eur)