Kyocera KM-5035 Print/Scan System (U) Operation Guide (Setup Edition) - Page 13
• Registering and editing user information 3, key. The System Basic - unable to use scanner
 |
View all Kyocera KM-5035 manuals
Add to My Manuals
Save this manual to your list of manuals |
Page 13 highlights
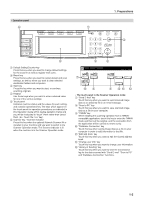
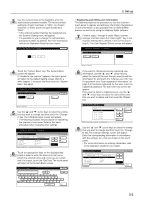
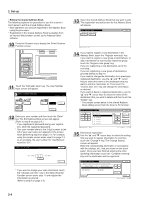
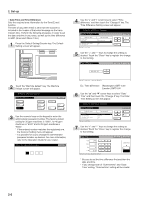
2. Set-up 3 Use the numeric keys on the keypad to enter the administrator password number. The factory default setting for 30 ppm machines is "3000", for 40 ppm machines is "4000" and for 50 ppm machines is "5000". * If the entered number matches the registered one, the Scanner Setting menu will appear. * It is possible for you to change the administrator password number as desired. For more information, refer to the Operation Guide for your copier. • Registering and editing user information The following explains the procedure to use the scanner's touch panel to register and edit user information. Registration of user information is also possible from an Internet Web browser as well as by using the Address Editor software. 7 Perform steps 1 through 3 under "Basic scanner settings" and then touch the "User registr." key in the Scanner Setting menu (shown in the screen shot in step 4). The User Register/Delete screen will appear. 4 Touch the "System Basic" key. The System Basic screen will appear. If "Unable to use scanner" appears, the touch panel will return to the Default Setting screen. Wait for a while (approx. 2 minutes) and then touch the "System Basic" key again. 8 If you want to change previously registered user information, use the "L" and "M" cursor keys to select the name of the user that you want to edit the information for and touch the "Change user info." key. If a password (see "User registration information" on page 2-5) has been registered for that user, enter the registered password. The Edit User Info screen will appear. If you want to delete a registered user, use the "L" and "M" cursor keys to select the name of the user that you want to delete and then touch the "Delete" key. 5 Use the "L" and "M" cursor keys to select the setting that you want to change and then touch the "Change #" key. The Character Input screen will appear. • The following explains the procedure for registering the scanner's host name. Refer to this basic procedure when changing other settings. 6 Touch the appropriate keys on the displayed keyboard in order to enter the scanner's host name. Check the entered name and, once you are certain that it is correct, touch the "End" key. The touch panel will return to the System Basic screen. 9 Use the "L" and "M" cursor keys to select the setting that you want to change and then touch the "Change #" key. The Change Settings screen will appear. Enter the corresponding information in accordance with the settings, etc., that are shown on the touch panel. • For more information on entering characters, refer to the Operation Guide for your copier. 2-3
-
 1
1 -
2
-
3
-
4
-
5
-
6
-
7
-
 8
8 -
 9
9 -
 10
10 -
 11
11 -
 12
12 -
 13
13 -
 14
14 -
 15
15 -
 16
16 -
 17
17 -
 18
18 -
19
-
20
-
21
-
22
-
23
-
24
-
25
-
26
-
27
-
28
-
29
-
30
-
31
-
32
 |
 |
