Kyocera TASKalfa 4551ci Printing System (11),(12),(13),(14) Printing Guide (Fi - Page 42
Windows Server 2008: Click Start, choose Control Panel, and under Classic View, double-click
 |
View all Kyocera TASKalfa 4551ci manuals
Add to My Manuals
Save this manual to your list of manuals |
Page 42 highlights
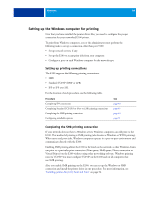
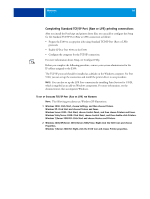
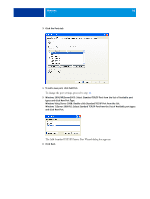
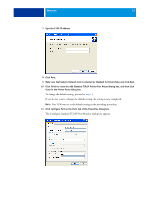
WINDOWS 42 You can print to a virtual printer as you would print to the E100. Depending on how the virtual printer is configured, you may not be able to set some print options. When you print to a virtual printer installed using Point and Print, you must open the Printing Preferences window and click OK before the job is printed. This applies the virtual printer settings to the job. Enabling Two-Way Communication You must enable Two-Way Communication to automatically update your printer driver to reflect the options currently installed on the copier. NOTE: You must log on with Administrator privileges to add or change the installable options after the Windows Vista, Windows 7, or Windows Server 2008 R2 printer driver is installed. For more information, see "Configuring installable options for the Windows Vista/Windows 7/Server 2008 R2 printer driver" on page 51. TO ENABLE TWO-WAY COMMUNICATION 1 Windows 2000: Click Start, choose Settings, and then choose Printers. Windows XP: Click Start and choose Printers and Faxes. Windows Server 2003: Click Start, choose Control Panel, and then choose Printers and Faxes. Windows Vista: Click Start, choose Control Panel, and then double-click Printers. Windows Server 2008: Click Start, choose Control Panel, and under Classic View, double-click Printers. Windows 7/Server 2008 R2: Click Start and choose Devices and Printers. 2 Windows 2000/XP/Server 2003/Server 2008/Vista: Right-click the E100 icon and choose Properties. Windows 7/Server 2008 R2: Right-click the E100 icon and choose Printer properties. 3 Click the Installable Options tab. 4 Select Two-Way Communication. 5 Type the E100 IP address or DNS name. 6 Select Update Fiery Driver When Opened to display the printer's current default settings when the printer driver is opened. 7 Click Update. NOTE: To confirm that Two-Way Communication is enabled, click the About tab and check that the E100 name and other server information is displayed. 8 Click OK.
-
 1
1 -
2
-
3
-
4
-
5
-
6
-
7
-
8
-
9
-
10
-
11
-
12
-
13
-
14
-
15
-
16
-
17
-
18
-
19
-
20
-
21
-
22
-
23
-
24
-
25
-
26
-
27
-
28
-
29
-
30
-
31
-
32
-
33
-
34
-
35
-
36
-
 37
37 -
 38
38 -
 39
39 -
 40
40 -
 41
41 -
 42
42 -
 43
43 -
 44
44 -
 45
45 -
 46
46 -
 47
47 -
48
-
49
-
50
-
51
-
52
-
53
-
54
-
55
-
56
-
57
-
58
-
59
-
60
-
61
-
62
-
63
-
64
-
65
-
66
-
67
-
68
-
69
-
70
-
71
-
72
-
73
-
74
-
75
-
76
-
77
-
78
-
79
-
80
-
81
-
82
-
83
-
84
-
85
-
86
-
87
-
88
-
89
-
90
-
91
-
92
-
93
-
94
-
95
-
96
-
97
-
98
-
99
-
100
-
101
-
102
-
103
-
104
-
105
-
106
-
107
-
108
-
109
-
110
 |
 |
