Kyocera TASKalfa 4551ci Printing System (11),(12),(13),(14) Printing Guide (Fi - Page 51
Configuring installable options, Windows Vista, Windows 7
 |
View all Kyocera TASKalfa 4551ci manuals
Add to My Manuals
Save this manual to your list of manuals |
Page 51 highlights
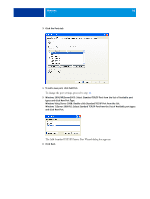
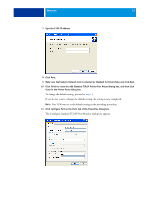
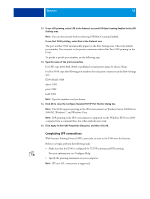
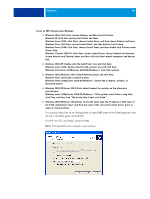
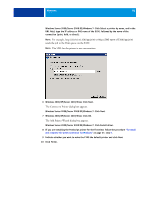
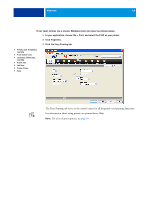
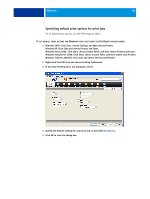
WINDOWS 51 Configuring installable options After you complete the printer driver installation, you must configure the E100 for the options installed on the copier to allow the E100 to take advantage of the copier options. Configure the options manually, or for TCP/IP network connections, use the Two-Way Communication option to configure the options automatically. For information about specifying installable options, see printer driver Help. Configuring installable options for the Windows Vista/Windows 7/Server 2008 R2 printer driver Windows Vista, Windows 7, and Windows Server 2008 R2 have a User Account Control (UAC) feature. You must log on with Administrator privileges to add or change the installable options after the printer driver is installed. TO CHANGE INSTALLABLE OPTIONS 1 Windows Vista: Open the Printers Control Panel. Windows 7/Server 2008 R2: Open the Devices and Printers Control Panel. 2 Windows Vista: Right-click the E100 printer icon, choose Run as administrator, and then choose Properties. Windows 7/Server 2008 R2: Right-click the E100 printer icon, choose Run as administrator, and then choose Printer properties. The User Account Control dialog box opens. 3 Choose the User that has administrator privileges, type the password, and then click OK. 4 Windows Vista: Right-click the E100 printer icon again and choose Properties. Windows 7/Server 2008 R2: Right-click the E100 printer icon again and choose Printer properties. 5 Click the Installable Options tab and make your selections. 6 Click Apply, and then click OK.
-
 1
1 -
2
-
3
-
4
-
5
-
6
-
7
-
8
-
9
-
10
-
11
-
12
-
13
-
14
-
15
-
16
-
17
-
18
-
19
-
20
-
21
-
22
-
23
-
24
-
25
-
26
-
27
-
28
-
29
-
30
-
31
-
32
-
33
-
34
-
35
-
36
-
37
-
38
-
39
-
40
-
41
-
42
-
43
-
44
-
45
-
 46
46 -
 47
47 -
 48
48 -
 49
49 -
 50
50 -
 51
51 -
 52
52 -
 53
53 -
 54
54 -
 55
55 -
 56
56 -
57
-
58
-
59
-
60
-
61
-
62
-
63
-
64
-
65
-
66
-
67
-
68
-
69
-
70
-
71
-
72
-
73
-
74
-
75
-
76
-
77
-
78
-
79
-
80
-
81
-
82
-
83
-
84
-
85
-
86
-
87
-
88
-
89
-
90
-
91
-
92
-
93
-
94
-
95
-
96
-
97
-
98
-
99
-
100
-
101
-
102
-
103
-
104
-
105
-
106
-
107
-
108
-
109
-
110
 |
 |
