LG LGVN150 Revere User Guide - Page 49
Social Networks, Messaging Settings
 |
View all LG LGVN150 manuals
Add to My Manuals
Save this manual to your list of manuals |
Page 49 highlights
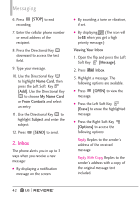
8. Social Networks The upgraded "Text based SNS" that allow user to update "Wall" and "Message" on the social network site. 1. Open the flip and press the Left Soft Key [Message]. 2. Press Social Networks. 3. Select one of the social networking service providers. 4. Update your information as desired. Messaging Settings Allows you to configure settings for your messages. 1. With the flip open, press the Left Soft Key [Message]. 2. Press the Left Soft Key [Settings]. 3. Use the Directional Key to highlight one of the settings and press to select it. Message Settings Sub-Menu Descriptions 1. Inbox View Select Time to display messages chronologically in Inbox and Sent folders. Select Contact to sort all messages alphabetically by Contact in one message folder. NOTE By default, Time is set as the Inbox View setting. If changed to Contact, the Messaging menu will appear differently. 2. Entry Mode Select T9 Word , Abc , ABC, 123, T9 Palabra, Simplified Chinese or Korean to be your default input method. 3. Auto Save Sent Select On to automatically save your Sent messages. Select Off if you don't want to save automatically. Select Prompt to be asked to save. 4. Auto Erase Inbox Select On to automatically delete read messages when you exceed the storage limit. Or, select Off. 47
-
 1
1 -
2
-
3
-
4
-
5
-
6
-
7
-
8
-
9
-
10
-
11
-
12
-
13
-
14
-
15
-
16
-
17
-
18
-
19
-
20
-
21
-
22
-
23
-
24
-
25
-
26
-
27
-
28
-
29
-
30
-
31
-
32
-
33
-
34
-
35
-
36
-
37
-
38
-
39
-
40
-
41
-
42
-
43
-
 44
44 -
 45
45 -
 46
46 -
 47
47 -
 48
48 -
 49
49 -
 50
50 -
 51
51 -
 52
52 -
 53
53 -
 54
54 -
55
-
56
-
57
-
58
-
59
-
60
-
61
-
62
-
63
-
64
-
65
-
66
-
67
-
68
-
69
-
70
-
71
-
72
-
73
-
74
-
75
-
76
-
77
-
78
-
79
-
80
-
81
-
82
-
83
-
84
-
85
-
86
-
87
-
88
-
89
-
90
-
91
-
92
-
93
-
94
-
95
-
96
-
97
-
98
-
99
-
100
-
101
-
102
-
103
-
104
-
105
-
106
-
107
-
108
-
109
-
110
-
111
-
112
-
113
-
114
-
115
-
116
-
117
-
118
-
119
-
120
-
121
-
122
-
123
-
124
-
125
-
126
-
127
-
128
-
129
-
130
-
131
-
132
-
133
-
134
-
135
-
136
-
137
-
138
-
139
-
140
-
141
-
142
-
143
-
144
-
145
-
146
-
147
-
148
-
149
-
150
-
151
-
152
-
153
-
154
-
155
-
156
-
157
-
158
-
159
-
160
-
161
-
162
-
163
-
164
-
165
-
166
-
167
-
168
-
169
-
170
-
171
-
172
-
173
-
174
-
175
-
176
-
177
-
178
-
179
-
180
-
181
-
182
-
183
-
184
-
185
-
186
-
187
-
188
-
189
-
190
-
191
-
192
-
193
-
194
-
195
-
196
-
197
-
198
-
199
-
200
-
201
-
202
-
203
-
204
-
205
-
206
-
207
-
208
-
209
-
210
-
211
-
212
-
213
-
214
-
215
-
216
-
217
-
218
-
219
-
220
-
221
-
222
-
223
-
224
-
225
-
226
-
227
-
228
-
229
-
230
-
231
-
232
-
233
-
234
-
235
-
236
-
237
-
238
-
239
-
240
-
241
-
242
-
243
-
244
-
245
-
246
-
247
-
248
-
249
-
250
-
251
-
252
-
253
-
254
-
255
-
256
-
257
-
258
-
259
-
260
-
261
-
262
-
263
-
264
-
265
-
266
-
267
-
268
-
269
-
270
-
271
-
272
-
273
-
274
-
275
 |
 |
