Lenovo ThinkCentre M55e Hardware Maintenance Manual - Page 111
Replacing, diskette, drive
 |
View all Lenovo ThinkCentre M55e manuals
Add to My Manuals
Save this manual to your list of manuals |
Page 111 highlights
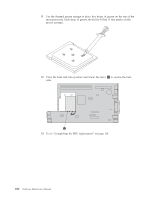
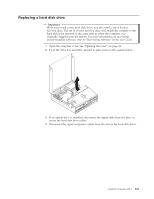
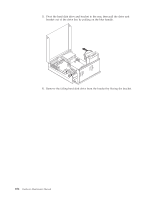
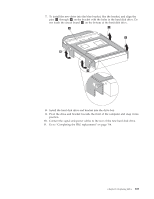
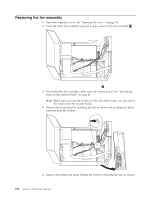
Replacing the diskette drive 1. Open the computer cover. See "Opening the cover" on page 83. 2. Pivot the drive bay assembly upward to gain access to the diskette drive. 3. Slide the diskette drive lock 1 to the unlocked position. 4. Slide the diskette drive towards the rear of the computer and remove the drive. 5. Disconnect the flat cable from the rear of the diskette drive. 6. Connect the flat cable to the new diskette drive. 7. Install the new drive from the rear of the drive bay assembly and lock the drive into position. 8. Go to "Completing the FRU replacement" on page 114. Chapter 8. Replacing FRUs 105
-
 1
1 -
2
-
3
-
4
-
5
-
6
-
7
-
8
-
9
-
10
-
11
-
12
-
13
-
14
-
15
-
16
-
17
-
18
-
19
-
20
-
21
-
22
-
23
-
24
-
25
-
26
-
27
-
28
-
29
-
30
-
31
-
32
-
33
-
34
-
35
-
36
-
37
-
38
-
39
-
40
-
41
-
42
-
43
-
44
-
45
-
46
-
47
-
48
-
49
-
50
-
51
-
52
-
53
-
54
-
55
-
56
-
57
-
58
-
59
-
60
-
61
-
62
-
63
-
64
-
65
-
66
-
67
-
68
-
69
-
70
-
71
-
72
-
73
-
74
-
75
-
76
-
77
-
78
-
79
-
80
-
81
-
82
-
83
-
84
-
85
-
86
-
87
-
88
-
89
-
90
-
91
-
92
-
93
-
94
-
95
-
96
-
97
-
98
-
99
-
100
-
101
-
102
-
103
-
104
-
105
-
 106
106 -
 107
107 -
 108
108 -
 109
109 -
 110
110 -
 111
111 -
 112
112 -
 113
113 -
 114
114 -
 115
115 -
 116
116 -
117
-
118
-
119
-
120
-
121
-
122
-
123
-
124
-
125
-
126
-
127
-
128
-
129
-
130
-
131
-
132
-
133
-
134
-
135
-
136
-
137
-
138
-
139
-
140
-
141
-
142
-
143
-
144
-
145
-
146
-
147
-
148
-
149
-
150
-
151
-
152
-
153
-
154
-
155
-
156
-
157
-
158
-
159
-
160
-
161
-
162
-
163
-
164
-
165
-
166
-
167
-
168
-
169
-
170
-
171
-
172
-
173
-
174
-
175
-
176
-
177
-
178
-
179
-
180
-
181
-
182
-
183
-
184
-
185
-
186
-
187
-
188
-
189
-
190
-
191
-
192
-
193
-
194
-
195
-
196
-
197
-
198
-
199
-
200
-
201
-
202
-
203
-
204
-
205
-
206
-
207
-
208
-
209
-
210
 |
 |
Replacing
the
diskette
drive
1.
Open
the
computer
cover.
See
“Opening
the
cover”
on
page
83.
2.
Pivot
the
drive
bay
assembly
upward
to
gain
access
to
the
diskette
drive.
3.
Slide
the
diskette
drive
lock
±1²
to
the
unlocked
position.
4.
Slide
the
diskette
drive
towards
the
rear
of
the
computer
and
remove
the
drive.
5.
Disconnect
the
flat
cable
from
the
rear
of
the
diskette
drive.
6.
Connect
the
flat
cable
to
the
new
diskette
drive.
7.
Install
the
new
drive
from
the
rear
of
the
drive
bay
assembly
and
lock
the
drive
into
position.
8.
Go
to
“Completing
the
FRU
replacement”
on
page
114.
Chapter
8.
Replacing
FRUs
105