Lenovo ThinkCentre M55e Hardware Maintenance Manual - Page 120
Completing, replacement
 |
View all Lenovo ThinkCentre M55e manuals
Add to My Manuals
Save this manual to your list of manuals |
Page 120 highlights
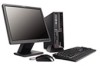
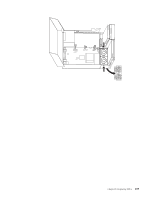
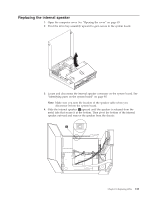
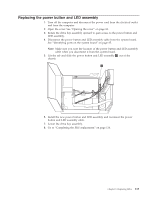
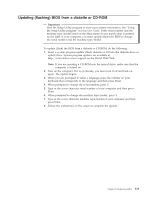
Completing the FRU replacement After replacing the parts, you need to close the cover and reconnect cables, including telephone lines and power cords. Also, depending on the part that was replaced, you might need to confirm the updated information in the Setup Utility program. See ″Using the Setup Utility program″ in your User Guide. To complete the part installation: 1. Ensure that all components have been reassembled correctly and that no tools or loose screws are left inside your computer. See"Locating FRUs" on page 84 for the location of various components. 2. Make sure that the cables are routed correctly before lowering the drive bay assembly. Important Correctly route all power supply cables to avoid interference with the drive bay assembly. Keep cables clear of the hinges and sides of the computer chassis. 3. Lower the drive bay assembly and position the drive locks to the locked position. Otherwise, you cannot close the computer cover. 4. Close the computer cover. 5. If a cover lock is installed, lock the cover. 6. Reconnect the external cables and power cords to the computer. See "Locating connectors on the rear of your computer" on page 82. 7. If you are replacing the system board or microprocessor, you must update (flash) the BIOS. See "Updating (flashing) BIOS from a diskette or CD-ROM" on page 115. 8. To update your configuration, see ″Using the Setup Utility program″ in the User Guide. Note: In most areas of the world, Lenovo requires the return of the defective CRU. Information about this will come with the CRU or will come a few days after the CRU arrives. 114 Hardware Maintenance Manual
-
 1
1 -
2
-
3
-
4
-
5
-
6
-
7
-
8
-
9
-
10
-
11
-
12
-
13
-
14
-
15
-
16
-
17
-
18
-
19
-
20
-
21
-
22
-
23
-
24
-
25
-
26
-
27
-
28
-
29
-
30
-
31
-
32
-
33
-
34
-
35
-
36
-
37
-
38
-
39
-
40
-
41
-
42
-
43
-
44
-
45
-
46
-
47
-
48
-
49
-
50
-
51
-
52
-
53
-
54
-
55
-
56
-
57
-
58
-
59
-
60
-
61
-
62
-
63
-
64
-
65
-
66
-
67
-
68
-
69
-
70
-
71
-
72
-
73
-
74
-
75
-
76
-
77
-
78
-
79
-
80
-
81
-
82
-
83
-
84
-
85
-
86
-
87
-
88
-
89
-
90
-
91
-
92
-
93
-
94
-
95
-
96
-
97
-
98
-
99
-
100
-
101
-
102
-
103
-
104
-
105
-
106
-
107
-
108
-
109
-
110
-
111
-
112
-
113
-
114
-
 115
115 -
 116
116 -
 117
117 -
 118
118 -
 119
119 -
 120
120 -
 121
121 -
 122
122 -
 123
123 -
 124
124 -
 125
125 -
126
-
127
-
128
-
129
-
130
-
131
-
132
-
133
-
134
-
135
-
136
-
137
-
138
-
139
-
140
-
141
-
142
-
143
-
144
-
145
-
146
-
147
-
148
-
149
-
150
-
151
-
152
-
153
-
154
-
155
-
156
-
157
-
158
-
159
-
160
-
161
-
162
-
163
-
164
-
165
-
166
-
167
-
168
-
169
-
170
-
171
-
172
-
173
-
174
-
175
-
176
-
177
-
178
-
179
-
180
-
181
-
182
-
183
-
184
-
185
-
186
-
187
-
188
-
189
-
190
-
191
-
192
-
193
-
194
-
195
-
196
-
197
-
198
-
199
-
200
-
201
-
202
-
203
-
204
-
205
-
206
-
207
-
208
-
209
-
210
 |
 |
