Lenovo ThinkPad Edge L330 (English) User Guide - Page 32
The Setting for Microphone, OnScreen Display Utility
 |
View all Lenovo ThinkPad Edge L330 manuals
Add to My Manuals
Save this manual to your list of manuals |
Page 32 highlights
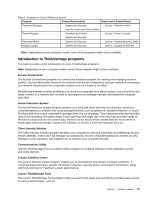
3. On the VoIP Call Settings tab, click Microphone mute button settings. The Setting for Microphone Mute window opens. 4. Select Only the recording device selected below:. Then select the recording device from the drop-down list box. 5. Click OK. Power conversation • Fn+F4 Put your computer into sleep mode. To return from sleep mode, press the Fn key or power button. If you want to use the combination to put the computer into hibernation mode, change the settings in the Power Manager program. Enabling or disabling the wireless features • Fn+F5 Enable or disable the built-in wireless networking features. Notes: If you want to use Fn+F5 to enable or disable the wireless features, the following device drivers must be installed on your computer beforehand: - Power Management driver - OnScreen Display Utility - Wireless device drivers You can download these drivers from http://www.lenovo.com/ThinkPadDrivers. Launching the communications settings utility • Fn+F6 Press Fn+F6 to open the communications settings window. Then customize the settings as desired. Switching a display output location • Fn+F7 Switch the display output location between the computer display and an external monitor by selecting one of the following options: - Computer display only (LCD) - Computer display and external monitor (same image) - Computer display and external monitor (the Extend desktop function) - External monitor only Note: The Windows+P key combination has the same functionality as Fn+F7. Adjusting the brightness level of the computer display • Fn+F8: The computer display becomes dimmer. • Fn+F9: The computer display becomes brighter. This function changes the brightness level temporarily. To change the default brightness level, change the settings through the Power Manager program. Multimedia controls • Fn+F10: Previous track/scene 18 User Guide
-
 1
1 -
2
-
3
-
4
-
5
-
6
-
7
-
8
-
9
-
10
-
11
-
12
-
13
-
14
-
15
-
16
-
17
-
18
-
19
-
20
-
21
-
22
-
23
-
24
-
25
-
26
-
 27
27 -
 28
28 -
 29
29 -
 30
30 -
 31
31 -
 32
32 -
 33
33 -
 34
34 -
 35
35 -
 36
36 -
 37
37 -
38
-
39
-
40
-
41
-
42
-
43
-
44
-
45
-
46
-
47
-
48
-
49
-
50
-
51
-
52
-
53
-
54
-
55
-
56
-
57
-
58
-
59
-
60
-
61
-
62
-
63
-
64
-
65
-
66
-
67
-
68
-
69
-
70
-
71
-
72
-
73
-
74
-
75
-
76
-
77
-
78
-
79
-
80
-
81
-
82
-
83
-
84
-
85
-
86
-
87
-
88
-
89
-
90
-
91
-
92
-
93
-
94
-
95
-
96
-
97
-
98
-
99
-
100
-
101
-
102
-
103
-
104
-
105
-
106
-
107
-
108
-
109
-
110
-
111
-
112
-
113
-
114
-
115
-
116
-
117
-
118
-
119
-
120
-
121
-
122
-
123
-
124
-
125
-
126
 |
 |
