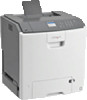
Lexmark C748 Quick Reference - Page 10
Using the touch-screen printer, model
 |
View all Lexmark C748 manuals
Add to My Manuals
Save this manual to your list of manuals |
Page 10 highlights
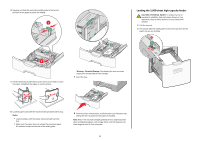
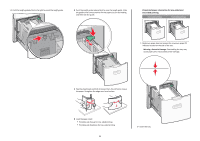
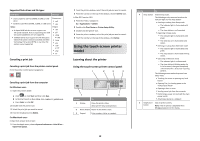
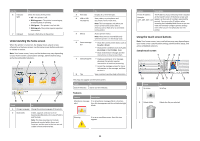
Supported flash drives and file types Flash drive File type • Lexar JumpDrive 2.0 Pro (256MB, 512MB, or 1GB sizes) • SanDisk Cruzer Mini (256MB, 512MB, or 1GB sizes) Notes: • Hi‑Speed USB flash drives must support the full‑speed standard. Devices supporting only USB low‑speed capabilities are not supported. • USB flash drives must support the File Allocation Table (FAT) system. Devices formatted with New Technology File System (NTFS) or any other file system are not supported. Documents: • .pdf • .xps Images: • .dcx • .gif • .JPEG or .jpg • .bmp • .pcx • .TIFF or .tif • .png • .fls Canceling a print job Canceling a print job from the printer control panel From the printer control panel, navigate to: > Canceling a print job from the computer For Windows users 1 Open the printers folder: a Click , or click Start and then click Run. b In the Start Search or Run dialog, type control printers. c Press Enter, or click OK. 2 Double‑click the printer icon. 3 Select the print job you want to cancel. 4 From the keyboard, press Delete. For Macintosh users In Mac OS X version 10.5 or later: 1 From the Apple menu, choose System Preferences > Print & Fax > Open Print Queue. 2 From the printer window, select the print job you want to cancel. 3 From the icon bar at the top of the window, click the Delete icon. In Mac OS X version 10.4: 1 From the Finder, navigate to: Go > Applications > Utilities 2 Double‑click Print Center or Printer Setup Utility. 3 Double‑click the printer icon. 4 From the printer window, select the print job you want to cancel. 5 From the icon bar at the top of the window, click Delete. Using the touch-screen printer model Learning about the printer Using the touch‑screen printer control panel 1 2 3 4 1 2 3 ABC DEF 4 GHI 5 JKL 6 MNO 7 PQR 8 9 STU WXYZ 0 7 6 5 Use the To 1 Display Show the printer status. Allow printer setup and operation. 2 Home button Return to the home screen. 3 Keypad Enter numbers, letter, or symbols. 10 Use the To 4 Sleep button Enable Sleep mode. The following are the statuses based on the indicator light and the Sleep button: • Entering or waking from Sleep mode - The indicator light is illuminated solid green. - The sleep button is unilluminated. • Operating in Sleep mode - The indicator light is illuminated solid green. - The sleep button is illuminated solid amber. • Entering or waking from Hibernate mode - The indicator light is illuminated solid green. - The sleep button is illuminated blinking amber. • Operating in Hibernate mode - The indicator light is unilluminated. - The sleep button is blinking amber for 0.1 of a second, then goes completely unilluminated for 1.9 seconds in pulsing pattern. The following actions wake the printer from Sleep mode: • Touching the screen or pressing any hard button • Opening Tray 1 or loading paper in the multipurpose feeder • Opening a door or cover • Sending a print job from the computer • Performing a power‑on reset with the main power switch • Attaching a device to a USB port 5 Stop/Cancel Stop all printer activity. button Note: A list of options is displayed when Stopped appears on the display.
-
 1
1 -
2
-
3
-
4
-
 5
5 -
 6
6 -
 7
7 -
 8
8 -
 9
9 -
 10
10 -
 11
11 -
 12
12 -
 13
13 -
 14
14 -
 15
15 -
16
-
17
-
18
-
19
-
20
-
21
-
22
-
23
-
24
-
25
-
26
-
27
 |
 |