Lexmark C748 Quick Reference - Page 3
Loading the optional 550, sheet special media
 |
View all Lexmark C748 manuals
Add to My Manuals
Save this manual to your list of manuals |
Page 3 highlights
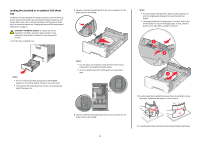
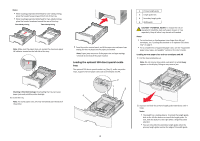
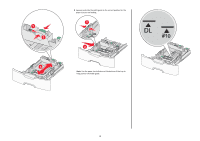
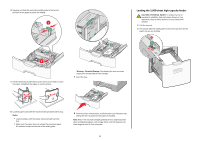
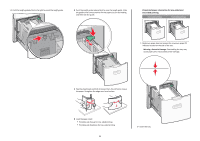
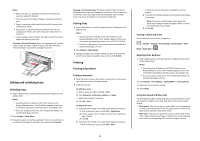
Notes: • When loading preprinted letterhead for one‑sided printing, place the header faceup toward the front of the tray. • When loading preprinted letterhead for two‑sided printing, place the header facedown toward the rear of the tray. One‑sided printing Two‑sided printing LETTERHEAD LETTERHEAD Note: Make sure the paper does not exceed the maximum paper fill indicator located on the left side of the tray. Warning-Potential Damage: Overloading the tray can cause paper jams and possible printer damage. 6 Insert the tray. Note: For some paper sizes, the tray will extend past the back of the printer. 7 From the printer control panel, verify the paper size and paper type setting for the tray based on the paper you loaded. Note: Paper jams may occur if the paper size and type settings selected do not match the paper loaded. Loading the optional 550‑sheet special media tray The optional 550‑sheet special media tray (Tray 2), unlike any other trays, supports narrow paper sizes such as envelopes and A6. 2 1 3 4 3 1 Primary length guide 2 Length guide lock 3 Secondary length guide 4 Width guide CAUTION-POTENTIAL INJURY: To reduce the risk of equipment instability, load each paper drawer or tray separately. Keep all other trays closed until needed. Notes: • For instructions on loading paper sizes larger than A6 and envelopes, see "Loading the standard or an optional 550‑sheet tray" on page 2. • For a complete list of supported paper sizes, see the "Supported paper sizes, types, and weights" section in the User's Guide. Loading narrow paper sizes such as envelopes and A6 1 Pull the tray completely out. Note: Do not remove trays while a job prints or while Busy appears on the display. Doing so may cause a jam. 2 Squeeze and slide the primary length guide toward you until it stops. Notes: • The length has a locking device. To unlock the length guide, slide to the left the button on top of the length guide. To lock, slide the button to the right when a length has been selected. • You can only slide the secondary length guide when the primary length guide reaches the edge of the width guide.
-
 1
1 -
 2
2 -
 3
3 -
 4
4 -
 5
5 -
 6
6 -
 7
7 -
 8
8 -
 9
9 -
10
-
11
-
12
-
13
-
14
-
15
-
16
-
17
-
18
-
19
-
20
-
21
-
22
-
23
-
24
-
25
-
26
-
27
 |
 |
