Lexmark C748 Quick Reference - Page 22
Clearing jams
 |
View all Lexmark C748 manuals
Add to My Manuals
Save this manual to your list of manuals |
Page 22 highlights
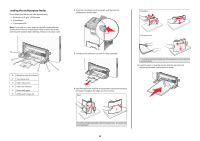
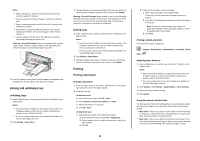
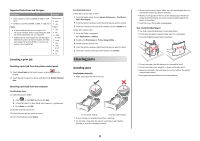
Supported flash drives and file types Flash drive File type • Lexar JumpDrive 2.0 Pro (256MB, 512MB, or 1GB sizes) • SanDisk Cruzer Mini (256MB, 512MB, or 1GB sizes) Notes: • Hi‑Speed USB flash drives must support the full‑speed standard. Devices supporting only USB low‑speed capabilities are not supported. • USB flash drives must support the File Allocation Table (FAT) system. Devices formatted with New Technology File System (NTFS) or any other file system are not supported. Documents: • .pdf • .xps Images: • .dcx • .gif • .JPEG or .jpg • .bmp • .pcx • .TIFF or .tif • .png • .fls Canceling a print job Canceling a print job from the printer control panel 1 Touch Cancel Jobs on the touch screen, or press keypad. on the 2 Touch the job you want to cancel, and then touch Delete Selected Jobs. Canceling a print job from the computer For Windows users 1 Open the printers folder: a Click , or click Start and then click Run. b In the Start Search or Run dialog, type control printers. c Press Enter, or click OK. 2 Double‑click the printer icon. 3 Select the print job you want to cancel. 4 From the keyboard, press Delete. For Macintosh users In Mac OS X version 10.5 or later: 1 From the Apple menu, choose System Preferences > Print & Fax > Open Print Queue. 2 From the printer window, select the print job you want to cancel. 3 From the icon bar at the top of the window, click the Delete icon. In Mac OS X version 10.4: 1 From the Finder, navigate to: Go > Applications > Utilities 2 Double‑click Print Center or Printer Setup Utility. 3 Double‑click the printer icon. 4 From the printer window, select the print job you want to cancel. 5 From the icon bar at the top of the window, click Delete. Clearing jams Avoiding jams Load paper properly • Make sure paper lies flat in the tray. Correct paper loading Incorrect paper loading • Do not remove a tray while the printer is printing. • Do not load a tray while the printer is printing. Load it before printing, or wait for a prompt to load it. • Do not load too much paper. Make sure the stack height does not exceed the maximum paper fill indicator. • Make sure the guides in the tray or the multipurpose feeder are properly positioned and are not pressing too tightly against the paper or envelopes. • Push the tray in firmly after loading paper. Use recommended paper • Use only recommended paper or specialty media. • Do not load wrinkled, creased, damp, bent, or curled paper. • Flex and straighten paper before loading it. • Do not use paper that has been cut or trimmed by hand. • Do not mix paper sizes, weights, or types in the same stack. • Make sure all paper sizes and types are set correctly in the printer control panel menus. • Store paper per manufacturer recommendations. 22
-
 1
1 -
2
-
3
-
4
-
5
-
6
-
7
-
8
-
9
-
10
-
11
-
12
-
13
-
14
-
15
-
16
-
 17
17 -
 18
18 -
 19
19 -
 20
20 -
 21
21 -
 22
22 -
 23
23 -
 24
24 -
 25
25 -
 26
26 -
 27
27
 |
 |