Lexmark C748 User's Guide - Page 48
Loading paper and specialty media, Setting the paper size and type
 |
View all Lexmark C748 manuals
Add to My Manuals
Save this manual to your list of manuals |
Page 48 highlights
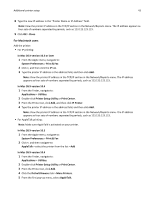
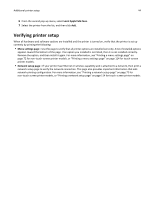
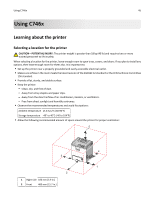
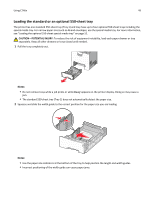
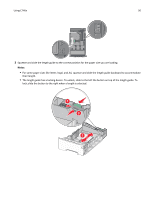
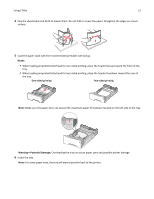
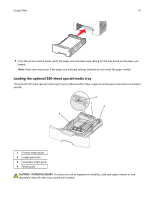
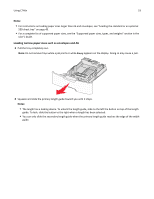
Using C746x 48 Use the To 8 Home button Go to the home screen. 9 Indicator light Check the status of the printer. • Off-The printer is off. • Blinking green-The printer is warming up, processing data, or printing. • Solid green-The printer is on, but idle. • Blinking red-The printer requires operator intervention. 10 USB port Connect a flash drive to the printer. Loading paper and specialty media The selection and handling of paper and specialty media can affect how reliably documents print. For more information, see "Avoiding jams" on page 201 and "Storing paper" on page 128. Setting the paper size and type 1 From the printer control panel, navigate to: > Settings > > Paper Menu > > Paper Size/Type > 2 Press the up or down arrow button to select the paper tray or feeder, and then press . 3 Press the up or down arrow button to select the paper size, and then press . 4 Press the up or down arrow button to select the paper type, and then press to change the settings. Configuring Universal paper settings The Universal paper size is a user‑defined setting that lets you print on paper sizes that are not preset in the printer menus. Notes: • The smallest supported Universal size is 76.2 x 127 mm (3 x 5 in.) and is loaded only in the multipurpose feeder. • The largest supported Universal size is 215.9 x 1219.2 mm (8.5 x 48 in.) and is loaded only in the multipurpose feeder. From the printer control panel, navigate to: > Settings > measure > > Paper Menu > > Universal Setup > > Units of Measure > > select unit of
-
 1
1 -
2
-
3
-
4
-
5
-
6
-
7
-
8
-
9
-
10
-
11
-
12
-
13
-
14
-
15
-
16
-
17
-
18
-
19
-
20
-
21
-
22
-
23
-
24
-
25
-
26
-
27
-
28
-
29
-
30
-
31
-
32
-
33
-
34
-
35
-
36
-
37
-
38
-
39
-
40
-
41
-
42
-
 43
43 -
 44
44 -
 45
45 -
 46
46 -
 47
47 -
 48
48 -
 49
49 -
 50
50 -
 51
51 -
 52
52 -
 53
53 -
54
-
55
-
56
-
57
-
58
-
59
-
60
-
61
-
62
-
63
-
64
-
65
-
66
-
67
-
68
-
69
-
70
-
71
-
72
-
73
-
74
-
75
-
76
-
77
-
78
-
79
-
80
-
81
-
82
-
83
-
84
-
85
-
86
-
87
-
88
-
89
-
90
-
91
-
92
-
93
-
94
-
95
-
96
-
97
-
98
-
99
-
100
-
101
-
102
-
103
-
104
-
105
-
106
-
107
-
108
-
109
-
110
-
111
-
112
-
113
-
114
-
115
-
116
-
117
-
118
-
119
-
120
-
121
-
122
-
123
-
124
-
125
-
126
-
127
-
128
-
129
-
130
-
131
-
132
-
133
-
134
-
135
-
136
-
137
-
138
-
139
-
140
-
141
-
142
-
143
-
144
-
145
-
146
-
147
-
148
-
149
-
150
-
151
-
152
-
153
-
154
-
155
-
156
-
157
-
158
-
159
-
160
-
161
-
162
-
163
-
164
-
165
-
166
-
167
-
168
-
169
-
170
-
171
-
172
-
173
-
174
-
175
-
176
-
177
-
178
-
179
-
180
-
181
-
182
-
183
-
184
-
185
-
186
-
187
-
188
-
189
-
190
-
191
-
192
-
193
-
194
-
195
-
196
-
197
-
198
-
199
-
200
-
201
-
202
-
203
-
204
-
205
-
206
-
207
-
208
-
209
-
210
-
211
-
212
-
213
-
214
-
215
-
216
-
217
-
218
-
219
-
220
-
221
-
222
-
223
-
224
-
225
-
226
-
227
-
228
-
229
-
230
-
231
-
232
-
233
-
234
-
235
-
236
-
237
-
238
-
239
-
240
-
241
-
242
-
243
-
244
-
245
-
246
-
247
-
248
-
249
-
250
-
251
-
252
-
253
-
254
-
255
-
256
-
257
-
258
-
259
-
260
-
261
-
262
-
263
-
264
-
265
-
266
-
267
-
268
-
269
-
270
-
271
-
272
-
273
-
274
 |
 |