Lexmark X748 Quick Reference
Lexmark X748 Manual
 |
View all Lexmark X748 manuals
Add to My Manuals
Save this manual to your list of manuals |
Lexmark X748 manual content summary:
- Lexmark X748 | Quick Reference - Page 1
no effect. 7 Stop button Stop all printer activity. Note: A list of options is displayed once Stopped appears on the display. 8 Home button Return to the home screen. Note: Pressing the Home button from the home screen resets all workflow factory defaults. 9 Back button • Delete the right-most - Lexmark X748 | Quick Reference - Page 2
Transfer Protocol (FTP) menus and scan documents directly to an FTP server. Touch To Status message bar • Show the current printer status such as Ready or Busy. • Show printer conditions such as Toner Low or Cartridge following items: • User name for held or job names for supported file types - Lexmark X748 | Quick Reference - Page 3
not saved, and it does not become the default setting. Attendance message If an attendance message affects printer is located at the top left corner of the home screen and appears as four sets of numbers separated To Save a setting. Cancel Reset • Cancel an action or a selection. • - Lexmark X748 | Quick Reference - Page 4
supported only in select printer models. • There may be additional solutions and applications available for purchase. To learn more, visit www.lexmark as four sets of numbers separated by periods, such as 123.123.123.123. 2 Open a Web browser, and then type the printer IP address in the address - Lexmark X748 | Quick Reference - Page 5
menu. • The factory default Paper Type setting is Plain Paper. • The Paper Type setting must be set manually for all trays. Configuring Universal paper settings The Universal Paper Size is a user‑defined setting that lets you print on paper sizes that are not preset in the printer menus. Set the - Lexmark X748 | Quick Reference - Page 6
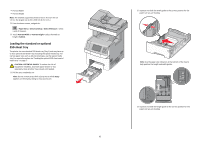
separately. Keep all other trays closed until needed. 1 Pull the tray completely out. Note: Do not remove trays while a job prints or while Busy appears on the display. Doing so may cause a jam. 6 2 Squeeze and slide the width guide to the correct position for the paper size you are loading. Note - Lexmark X748 | Quick Reference - Page 7
paper. Straighten the edges on a level surface. Warning-Potential Damage: Overloading the tray can cause paper jams and possible printer damage. 7 From the printer control panel, verify the paper size and paper type setting for the tray based on the paper you loaded. Loading the optional 550‑sheet - Lexmark X748 | Quick Reference - Page 8
1 3 4 1 Primary length guide 2 Length guide lock 3 Secondary length guide 4 Width guide CAUTION-POTENTIAL INJURY: To reduce the risk of equipment instability, load each paper drawer or tray separately. Keep all other trays closed until needed. Notes: • For instructions on loading paper sizes larger - Lexmark X748 | Quick Reference - Page 9
paper size indicators at the bottom of the tray to help position the width guide. 4 Squeeze and slide the secondary length guide to the correct position for the paper size Notes: • Load envelopes with the stamp side entering the printer first. • Make sure the paper does not exceed the maximum paper - Lexmark X748 | Quick Reference - Page 10
‑capacity feeder CAUTION-POTENTIAL INJURY: To reduce the risk of equipment instability, load each paper tray separately. Keep all other trays closed until needed. 1 Pull the tray out. 2 Pull up and slide the width guide to the correct position for the paper size you are loading. 3 Unlock the length - Lexmark X748 | Quick Reference - Page 11
you are loading, and then lock the guide. 5 Flex the sheets back and forth tray may cause paper jams and possible printer damage. Loading the multipurpose feeder The multipurpose feeder can hold approximately: • 100 sheets of 75‑g/m2 (20‑lb) paper • 10 envelopes • 75 transparencies Note: Do not add - Lexmark X748 | Quick Reference - Page 12
1 Press the tray release latch to the left, and then pull the multipurpose feeder down. 3 it. • Load envelopes with the flap on the right side up and the stamp edge entering the printer first. Warning-Potential Damage: Never use envelopes with stamps, clasps, snaps, windows, coated linings, or self - Lexmark X748 | Quick Reference - Page 13
then verify that the correct paper type is associated with the custom name. Note: Plain Paper is the factory default paper type for all user‑defined custom names. 13 Configuring a custom name If the printer is on a network, then you can use the Embedded Web Server to define a name other than Custom - Lexmark X748 | Quick Reference - Page 14
Print. For Macintosh users a Customize the tray or feeder. 3 Click Print. Adjusting toner darkness 1 Open a Web browser, and then type the printer IP address in the address field. Notes: • View the printer IP address on the printer home screen. The IP address appears as four sets of numbers separated - Lexmark X748 | Quick Reference - Page 15
New Technology File System (NTFS) or any other file system are not supported. Documents: • .pdf • .xps Images: • .dcx • . computer For Windows users 1 Open the printers folder: a Click , or click Start and a document into the ADF, adjust the paper guides. • Make sure the size of the original - Lexmark X748 | Quick Reference - Page 16
separate each address with a comma (,). 5 Select the scan settings (Format, Content, Color, and Resolution). 6 Enter a shortcut number, and then click Add Sending a fax using the computer The printer driver fax option allows you to "print to fax," where the printer will send a queued document as a - Lexmark X748 | Quick Reference - Page 17
be required. If you do not have an ID and password, get one from your system support person. 3 Type a unique name for the shortcut, and then enter the fax number. To create a multiple‑number shortcut, enter the fax numbers for the group. Note: Separate each fax number in the group with a semicolon - Lexmark X748 | Quick Reference - Page 18
paper guides. 3 guides. guides. printer, you can: • View the IP address on the printer instructions guides. guides. 3 Insert the flash drive into the USB port on the front of the printer default. The printer reprints jammed pages unless the memory required to hold the pages is needed for other printer - Lexmark X748 | Quick Reference - Page 19
door, and then remove the jammed paper from behind the toner cartridge area. Open the front door, and then remove the jammed paper from under the photoconductor units. Open the front door, and then remove the jammed paper from under the fuser. Open the front door, and then remove the jammed paper - Lexmark X748 | Quick Reference - Page 20
it from behind the toner cartridge area. Note: Make sure all paper fragments are removed. 4 Close the front door, and then close the top access cover. 5 From the printer control panel, touch Continue, jam cleared. Paper jam under the photoconductor units 1 Ope the printer top access cover. Note - Lexmark X748 | Quick Reference - Page 21
them. e Pull and then rotate the green rectangular knob clockwise to unlock the top paper guide. 1 2 2 Using the handholds on each side, lift and pull the fuser out of the printer. CAUTION-HOT SURFACE: The fuser might be hot. To reduce the risk of injury from a hot component, allow the surface - Lexmark X748 | Quick Reference - Page 22
rectangular knob counterclockwise to firmly secure the top paper guide. 1 2 j Reinstall the fuser unit: 1 Align the fuser unit using the handholds on each side, and then place it back into the printer. 2 Turn the screws clockwise to fasten the fuser securely. 4 Close the front door, and then close - Lexmark X748 | Quick Reference - Page 23
and then rotate the green rectangular knob counterclockwise to firmly secure the top paper guide. 1 2 j Reinstall the fuser unit: 4 Close the front door, and then close the top access cover. 5 From the printer control panel, touch Continue, jam cleared. g Firmly grasp the jammed paper on each side - Lexmark X748 | Quick Reference - Page 24
. 2 Open the front door. 24x paper jam Paper jam in Tray 1 1 Open Tray 1. Warning-Potential Damage: To avoid overexposing the photoconductors, do not leave the front door open for more than 10 minutes. CAUTION-HOT SURFACE: The inside of the printer might be hot. To reduce the risk of injury from - Lexmark X748 | Quick Reference - Page 25
grasp the jammed paper on each side, and then gently pull it out. Note: Make sure all paper fragments are removed. 2 3 Close the tray. 4 From the printer control panel, touch Continue, jam cleared. 250 paper jam 1 Press the paper release lever, and then remove any jammed pages from the multipurpose - Lexmark X748 | Quick Reference - Page 26
6 Close the scanner cover. 7 Reload original documents into the ADF, straighten the stack, and then adjust the paper guide. 26
-
 1
1 -
 2
2 -
 3
3 -
 4
4 -
 5
5 -
 6
6 -
 7
7 -
8
-
9
-
10
-
11
-
12
-
13
-
14
-
15
-
16
-
17
-
18
-
19
-
20
-
21
-
22
-
23
-
24
-
25
-
26
 |
 |

Quick Reference
Learning about the printer
Using the printer control panel
3
1
2
ABC
3
DEF
4
GHI
5
JKL
6
MNO
7
PQR
8
STU
9
WXYZ
0
9
1
4
5
6
7
8
10
2
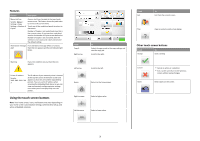
Use the
To
1
Display
View printing, e
‑
mailing, copying, and faxing
options, as well as status and error messages.
2
Sleep
button
Enable Sleep Mode or Hibernate Mode.
The following are the statuses of the indicator light
and the Sleep button:
•
Entering or waking from Sleep mode
–
The indicator light is illuminated solid green.
–
The Sleep button is illuminated.
•
Operating in Sleep mode
–
The indicator light is illuminated solid green.
–
The Sleep button is illuminated solid amber.
•
Entering or waking from Hibernate mode
–
The indicator light is unilluminated.
–
The Sleep button is blinking amber for 0.10
of a second, then goes completely
unilluminated for 1.9 seconds in pulsing
pattern.
•
Operating in Hibernate mode
–
The indicator light is unilluminated.
–
The Sleep button is blinking amber for 0.10
of a second, then goes completely
unilluminated for 1.9 seconds in pulsing
pattern.
The following actions wake the printer from Sleep
mode:
•
Touching the screen or pressing any hard
button
•
Opening an input tray, cover, or door
•
Loading paper into the automatic document
feeder (ADF)
•
Opening the scanner glass cover or lid.
•
Sending a print job from the computer
•
Performing a power
‑
on reset (POR) with the
main power switch
3
Keypad
Enter numbers, letters, or symbols.
Use the
To
4
Dial pause
button
•
Cause a two- or three-second dial pause in a fax
number. In the Fax To field, a dial pause is
represented by a comma (,).
•
Redial a fax number.
Notes:
•
Pressing
outside of the Fax menu
causes an error beep.
•
Pressing
from the home screen redials
the most recent fax number.
5
Indicator
light
•
Off
—The printer is off.
•
Blinking green
—The printer is warming up,
processing data, or printing.
•
Solid green
—The printer is on, but idle.
•
Blinking red
— Operator intervention is
needed.
6
Start
button
•
Initiate the current job indicated on the display.
•
Start a copy job with the default settings.
Note:
Pressing the button while scanning has no
effect.
7
Stop
button
Stop all printer activity.
Note:
A list of options is displayed once
Stopped
appears on the display.
8
Home
button
Return to the home screen.
Note:
Pressing the Home button from the home
screen resets all workflow factory defaults.
9
Back
button
•
Delete the right-most digit of the value in the
Copy Count field. The factory default value of 1
appears if the entire number is deleted by
pressing
numerous times.
•
Delete the right-most digit of a number entered
manually in the Fax Destination List field. You
can also press
to delete an entire
shortcut entry. When an entire line is deleted,
another press of
causes the cursor to
move up one line.
•
Delete the character to the left of the cursor in
the E-mail Destination List field. If the character
is in a shortcut, then the shortcut is deleted.
1