Lexmark X748 Quick Reference - Page 5
Loading paper and specialty, media - service manual
 |
View all Lexmark X748 manuals
Add to My Manuals
Save this manual to your list of manuals |
Page 5 highlights
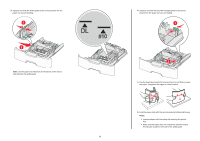
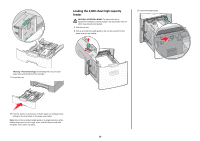
Setting up My MFP Icon Description The application lets you customize your touch‑screen settings and store those preferences in a flash drive. Each time you want to copy, fax, or scan, insert the flash drive into the USB port of the printer. All your personal preferences are automatically uploaded, including job settings, home screen preferences, and address book. Note: The icon appears only when a flash drive with My MFP settings is inserted into the USB port of the printer. To set up My MFP, insert a flash drive into the USB port of the printer, and then follow the instructions on the printer display to run the setup wizard. To use My MFP, insert the flash drive into the USB port of the printer when you want to copy, fax, or scan. Understanding WS‑Scan Icon Description The Web Services‑Scan application lets you scan documents at the network printer, and then send the scanned image to your computer. WS‑Scan is a Microsoft application that is similar to Scan to Network, but has the capability of sending the scanned image to a Windows‑based application. To learn more about WS‑Scan, see the Microsoft documentation. Note: The icon appears on the printer home screen only when there is a computer registered with the network printer. The computer must have either Windows 7 or Windows Vista operating system installed. Setting up Remote Operator Panel This application shows the printer control panel on your computer screen and lets you interact with the printer control panel, even when you are not physically near the network printer. From your computer screen, you can view the printer status, release held print jobs, create bookmarks, and do other print-related tasks you might normally do while standing at the network printer. 1 Open a Web browser, and then type the printer IP address in the address field. Note: View the printer IP address on the printer control panel home screen. The IP address appears as four sets of numbers separated by periods, such as 123.123.123.123. 2 Click Settings > Device Solutions > Solutions (eSF) > Remote Operator Panel. 3 Select the Enabled check box, and then customize the settings. 4 Click Apply. To use the application, from the Embedded Web Server, click Applications > Remote Operator Panel > Launch VNC Applet. Exporting and importing a configuration You can export configuration settings into a text file, and then import it to apply the settings to other printers. Exporting a configuration to a file 1 Open a Web browser, and then type the printer IP address in the address field. Note: View the printer IP address on the printer control panel home screen. The IP address appears as four sets of numbers separated by periods, such as 123.123.123.123. 2 Click Settings or Configuration. 3 Click Device Solutions > Solutions (eSF), or click Embedded Solutions. 4 From Installed Solutions, click the name of the application you want to configure. 5 Click Configure > Export. 6 Follow the instructions on the computer screen to save the configuration file, and then type a unique file name or use the default name. Note: If a JVM Out of Memory error occurs, then repeat the export process until the configuration file is saved. Importing a configuration from a file 1 Open a Web browser, and then type the printer IP address in the address field. 5 Note: View the printer IP address on the printer control panel home screen. The IP address appears as four sets of numbers separated by periods, such as 123.123.123.123. 2 Click Settings or Configuration. 3 Click Device Solutions > Solutions (eSF), or click Embedded Solutions. 4 From Installed Solutions, click the name of the application you want to configure. 5 Click Configure > Import. 6 Browse to the saved configuration file that was exported from a previously configured printer, and then load or preview it. Note: If a timeout occurs and a blank screen appears, then refresh the Web browser, and then click Apply. Loading paper and specialty media Setting the paper size and type From the home screen, navigate to: > Paper Menu > Paper Size/Type > select a tray > select the paper size or type > Submit Notes: • The Paper Size setting is automatically set according to the position of the paper guides in each tray except the standard 550‑sheet tray (Tray 1) and the multipurpose feeder. • The Paper Size setting for Tray 1 and the multipurpose feeder must be set manually in the Paper Size menu. • The factory default Paper Type setting is Plain Paper. • The Paper Type setting must be set manually for all trays. Configuring Universal paper settings The Universal Paper Size is a user‑defined setting that lets you print on paper sizes that are not preset in the printer menus. Set the Paper Size for the specified tray to Universal when the size you want is not available from the Paper Size menu. Then, specify all of the following Universal size settings for your paper: • Units of Measure
-
 1
1 -
 2
2 -
 3
3 -
 4
4 -
 5
5 -
 6
6 -
 7
7 -
 8
8 -
 9
9 -
 10
10 -
 11
11 -
12
-
13
-
14
-
15
-
16
-
17
-
18
-
19
-
20
-
21
-
22
-
23
-
24
-
25
-
26
 |
 |