Lexmark X782e User's Guide - Page 87
Understanding printer jam messages, yy Paper Jam, 24<x>.yy Paper Jam - fuser unit
 |
View all Lexmark X782e manuals
Add to My Manuals
Save this manual to your list of manuals |
Page 87 highlights
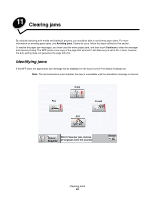
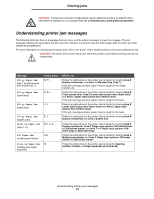
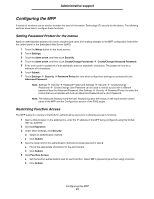
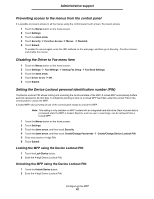
Clearing jams CAUTION: Certain floor-mounted configurations require additional furniture for stability. More information is available on our Lexmark Web site at www.lexmark.com/multifunctionprinters. Understanding printer jam messages The following table lists the jam messages that can occur and the action necessary to clear the message. The jam message indicates the area where the jam occurred. However, it is best to clear the entire paper path to ensure you have cleared all possible jams. For more information on clearing printer paper jams, refer to the printer User's Guide located on the printer publications CD. CAUTION: The inside of the printer may be hot. Allow the printer to cool before touching any internal components. Message 200.yy Paper Jam (tray 1 and left access door beside tray 1) 201.yy Paper Jam (fuser area) 202.yy Paper Jam (fuser area) 230.yy Paper Jam (duplex area) 24.yy Paper Jam (trays 1-4) 250 Paper Jam (multipurpose feeder) 27.yy Paper Jam (mailbox and output expander) Check Areas B, T1 D, K, L K, L E, J B,C, T A,D M What to do Follow the instructions in the printer User's Guide for clearing Area E Duplex mechanism, and Area T1 Standard tray (Tray 1). If the jam message persists, paper may be caught in the image transfer unit. Follow the instructions in the printer User's Guide for clearing Area D Front access door, Area K Lower right access door (fuser area), and Area L Upper right access door (redrive area). If the jam message persists, paper may be caught in the fuser. Follow the instructions in the printer User's Guide for clearing Area K Lower right access door (fuser area) and Area L Upper right access door (redrive area). If the jam message persists, paper may be caught in the fuser. Follow the instructions in the printer User's Guide for clearing Area E Duplex mechanism and Area J Duplex tray. Follow the instructions in the printer User's Guide for clearing Area E Duplex mechanism, Area C Paper input options: 500-sheet drawer or 2000-sheet drawer and Area T Paper input options: 500sheet trays or 2000-sheet tray. Follow the instructions in the printer User's Guide for clearing Area A Multipurpose feeder and Area C Paper input options: 500-sheet drawer or 2000-sheet drawer. Follow the instructions in the printer User's Guide for Clearing mailbox, finisher, or output expander jams (Area M). Understanding printer jam messages 87
-
 1
1 -
2
-
3
-
4
-
5
-
6
-
7
-
8
-
9
-
10
-
11
-
12
-
13
-
14
-
15
-
16
-
17
-
18
-
19
-
20
-
21
-
22
-
23
-
24
-
25
-
26
-
27
-
28
-
29
-
30
-
31
-
32
-
33
-
34
-
35
-
36
-
37
-
38
-
39
-
40
-
41
-
42
-
43
-
44
-
45
-
46
-
47
-
48
-
49
-
50
-
51
-
52
-
53
-
54
-
55
-
56
-
57
-
58
-
59
-
60
-
61
-
62
-
63
-
64
-
65
-
66
-
67
-
68
-
69
-
70
-
71
-
72
-
73
-
74
-
75
-
76
-
77
-
78
-
79
-
80
-
81
-
 82
82 -
 83
83 -
 84
84 -
 85
85 -
 86
86 -
 87
87 -
 88
88 -
 89
89 -
 90
90 -
 91
91 -
 92
92 -
93
-
94
-
95
-
96
-
97
-
98
-
99
-
100
-
101
-
102
-
103
-
104
-
105
-
106
-
107
-
108
-
109
-
110
-
111
-
112
-
113
-
114
 |
 |
