Magnavox MBP5120F User manual, English (US) - Page 21
Adjusting the Picture
 |
View all Magnavox MBP5120F manuals
Add to My Manuals
Save this manual to your list of manuals |
Page 21 highlights
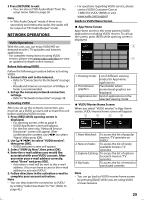
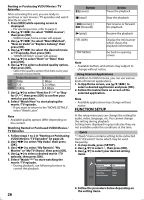
• To repeat the current track / file in the random selection, press [REPEAT] repeatedly until " Track" appears during playback. To repeat the entire random selection press [REPEAT] repeatedly until " All" appears during playback. • Playback from a desired track / file is not available during random playback. • In stop mode, press [RETURN] to switch to the program playback mode. Rapid Playback This function plays back approximately at 1.3 times the normal playback while keeping the sound output. This function is available only on discs recorded in the Dolby Digital format. 1. During playback, press [MODE] repeatedly until the Rapid playback setting appears. Off 2. Press [OK] or [s/B] to switch (1.3x), or "Off". "Off" : Plays back in normal speed. " ": Plays back approximately at 1.3 times of normal playback. 3. Press [B (play)] to return to normal playback. Note • Picture adjustment and audio language setting cannot be changed during this function. • Virtual surround does not work during this function. • This function may not work at some points on a disc. • During this function, 2ch LPCM will be output from HDMI OUT jack and DIGITAL OUT jack. Adjusting the Picture You can adjust the picture quality. 1. During playback, press [MODE] repeatedly until appears. 2. Use [K/L] to select your desired item, then use [s/B] to adjust the setting. Black Level On Noise Reduction Off e.g.) DVD-video Black level You can adjust the black level setting to make the black parts of the pictures as bright as you prefer. You can select "On" or "Off". "On" :Makes the dark parts brighter. "Off" :Shows the original picture as recorded. Noise reduction (DVD-video only) Reduces the noise of the playback picture. "Off" :Shows the original picture as recorded. "1" :Executes 3D noise reduction which detects and deletes the noise by comparing each picture frames. "2" :Executes MPEG noise reduction which reduces the block noise and mosquito noise on the subtitle on movie. "3" :Executes both MPEG noise reduction and 3D noise reduction. 3. Press [RETURN] to exit. Note • The setting will remain the same even if the unit is turned to the standby mode. • "Black Level" is not effective under the following conditions. - When the picture is output from HDMI OUT jack. • You cannot adjust the setting during rapid playback. Virtual Surround You can enjoy stereophonic virtual space through your existing 2 channel stereo system. 1. During playback, press [MODE]. 2. Use [K/L] to select your desired setting. Off "Off" :No surround effect "1" :Natural surround effect "2" :Stronger surround effect 3. Press [RETURN] to exit. Note • Set the virtual surround setting to "Off" or lower the volume if the sound is distorted. • Virtual surround does not function during rapid playback. • For the virtual surround, audio signal will always be 2-channel LPCM. 21
-
 1
1 -
2
-
3
-
4
-
5
-
6
-
7
-
8
-
9
-
10
-
11
-
12
-
13
-
14
-
15
-
 16
16 -
 17
17 -
 18
18 -
 19
19 -
 20
20 -
 21
21 -
 22
22 -
 23
23 -
 24
24 -
 25
25 -
 26
26 -
27
-
28
-
29
-
30
-
31
-
32
-
33
-
34
-
35
-
36
-
37
-
38
-
39
-
40
-
41
-
42
-
43
-
44
-
45
-
46
-
47
-
48
 |
 |
