Magnavox ZV427MG9 User manual, English (US) - Page 11
Recording, Playback, Editing, Connections, Basic Setup, Function Setup, VCR Functions, Others - remote
 |
UPC - 053818570722
View all Magnavox ZV427MG9 manuals
Add to My Manuals
Save this manual to your list of manuals |
Page 11 highlights
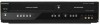
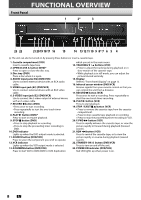
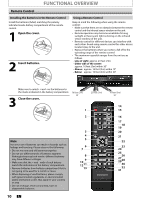
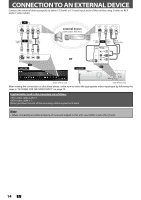
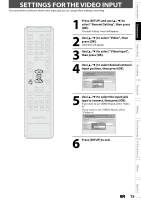
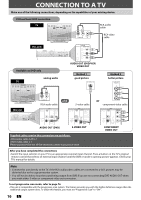
Introduction Connections Basic Setup Recording Playback FUNCTIONAL OVERVIEW 1. STANDBY-ON y button (DVD/VCR) • Press to turn on the unit, or to turn the unit to the standby mode. (To completely shut down the unit, you must unplug the AC power cord.) 2. Number/Character buttons (DVD/VCR) • Press to select a title/chapter/track/file on display. • Press to enter values for the settings in the main menu. • Press to enter title names. • Press to start the index/time search in VCR mode. 3. DISPLAY button (DVD/VCR) • Press to display the display menu on or off. 4. DISC MENU button (DVD) • Press to display the disc menu. 5. OK button (DVD/VCR) • Press to confirm or select menu items. 6. SETUP button (DVD/VCR) • Press to display the main menu. • During DVD playback, press and hold for more than 3 seconds to switch the progressive scanning mode to the interlace mode. 7. VCR button • Press to select the VCR output mode. 8. PREV H button (DVD) • During playback, press to return to the beginning of the current chapter, track or file. • When playback is in pause, press repeatedly to reverse the playback step by step. 9. REW E button (DVD/VCR) DVD mode: • During playback, press to fast reverse playback. • When playback is paused, press to slow reverse playback. VCR mode: • During playback, press to rewind the cassette tape or to view the picture rapidly in reverse. 10. CM SKIP button (DVD) • During playback, press to skip 30 seconds. 11. PAUSE F button (DVD/VCR) • Press to pause playback or recording. 12. D.DUBBING button (DVD/VCR) • Press to start VCR to DVD (DVD to VCR) duplication which you set in the main menu. 13. REC MODE button (DVD/VCR) • Press repeatedly to switch the recording mode. 14. SOURCE button (DVD/VCR) • Press to select the appropriate input. 15. OPEN/CLOSE A button (DVD/VCR) DVD mode: • Press to open or close the disc tray. VCR mode: • Press to remove the cassette tape from the cassette compartment. 16.TRACKING / buttons (VCR) • Press to adjust the tracking during playback or in slow motion of the cassette tape. • While playback is in still mode, you can adjust the picture blurred vertically. 17. HDMI button (DVD) • Press to set the HDMI connector's video signal output mode. 18. CLEAR button (DVD/VCR) DVD mode: • Press to clear the password once entered or to cancel the programming for CD or to clear the selected marker number, etc. VCR mode: • Press to reset the tape counter. 19. AUDIO button (DVD/VCR) DVD mode: • Press to display the audio menu during playback. VCR mode: • During playback of a Hi-Fi videotape, press to change the audio out setting. 20. TIMER button (DVD/VCR) • Press to display the timer programming list. 21. TITLE button (DVD) • Press to display the title list. 22.Cursor K / L/ { / B buttons (DVD/VCR) • Press to select items or settings. 23. RETURN button (DVD/VCR) • Press to return to the previously displayed menu screen. 24. DVD button • Press to select the DVD output mode. 25. PLAY B button (DVD/VCR) • Press to start playback or resume playback. 26. NEXT G button (DVD) • During playback, press to skip to the next chapter, track or file. • When playback is in pause, press repeatedly to forward the playback step by step. 27. STOP C button (DVD/VCR) • Press to stop playback or recording. DVD mode: • Press to exit from the title list. 28. FFW D button (DVD/VCR) DVD mode: • During playback, press to fast forward playback. • When playback is paused, press to slow forward playback. VCR mode: • During playback, press to rapidly advance the cassette tape or view the picture rapidly in forward. • When playback is paused, press to view the cassette tape in slow motion. 29. RAPID PLAY button (DVD) • During playback, press to play back in a slightly faster/slower mode with keeping the audio quality. 30.SEARCH button (VCR) • Press to call up the index or time search menu. 31. TIMER SET button (DVD/VCR) • Press to set the unit in the timer standby mode. In the timer standby mode, press to cancel the mode and to turn the unit on. 32. REC button (DVD/VCR) • Press once to start a recording. • Press repeatedly to start the one-touch timer recording. Editing Function Setup VCR Functions Others Note • If you turn off this unit, [OPEN/CLOSE A] on the remote control is not available. Be sure to use [OPEN/CLOSE A] or [STOP / EJECT C A] on the unit. Español EN 11
-
 1
1 -
2
-
3
-
4
-
5
-
 6
6 -
 7
7 -
 8
8 -
 9
9 -
 10
10 -
 11
11 -
 12
12 -
 13
13 -
 14
14 -
 15
15 -
 16
16 -
17
-
18
-
19
-
20
-
21
-
22
-
23
-
24
-
25
-
26
-
27
-
28
-
29
-
30
-
31
-
32
-
33
-
34
-
35
-
36
-
37
-
38
-
39
-
40
-
41
-
42
-
43
-
44
-
45
-
46
-
47
-
48
-
49
-
50
-
51
-
52
-
53
-
54
-
55
-
56
-
57
-
58
-
59
-
60
-
61
-
62
-
63
-
64
-
65
-
66
-
67
-
68
-
69
-
70
-
71
-
72
-
73
-
74
-
75
-
76
-
77
-
78
-
79
-
80
-
81
-
82
-
83
-
84
-
85
-
86
-
87
-
88
-
89
-
90
-
91
-
92
 |
 |