Netgear MS2110-100NAS STORA User Manual - Page 10
Stora Hardware Overview, Front Panel, Disks and Disk Bays
 |
View all Netgear MS2110-100NAS manuals
Add to My Manuals
Save this manual to your list of manuals |
Page 10 highlights
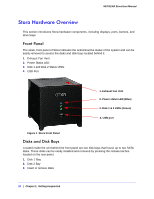
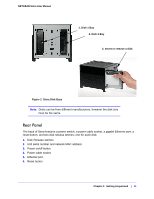
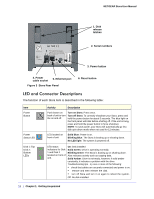
NETGEAR Stora User Manual Stora Hardware Overview This section introduces Stora hardware components, including displays, ports, buttons, and drive bays. Front Panel The sleek, front panel of Stora indicates the active/inactive status of the system and can be easily removed to access the disks and disk bays located behind it. 1. Exhaust Fan Vent 2. Power Status LED 3. Disk 1 and Disk 2 Status LEDs 4. USB Port 1. Exhaust Fan Vent 2. Power status LED (Blue) 3. Disk 1 & 2 LEDs (Green) 4. USB port Figure 1 Stora Front Panel Disks and Disk Bays Located inside the unit behind the front panel are two disk bays that house up to two SATA disks. These disks can be easily installed and removed by pressing the release latches located on the rear panel. 1. Disk 1 Bay 2. Disk 2 Bay 3. Insert or remove disks 10 | Chapter 1: Getting Acquainted
-
 1
1 -
2
-
3
-
4
-
 5
5 -
 6
6 -
 7
7 -
 8
8 -
 9
9 -
 10
10 -
 11
11 -
 12
12 -
 13
13 -
 14
14 -
 15
15 -
16
-
17
-
18
-
19
-
20
-
21
-
22
-
23
-
24
-
25
-
26
-
27
-
28
-
29
-
30
-
31
-
32
-
33
-
34
-
35
-
36
-
37
-
38
-
39
-
40
-
41
-
42
-
43
-
44
-
45
-
46
-
47
-
48
-
49
-
50
-
51
-
52
-
53
-
54
-
55
-
56
-
57
-
58
-
59
-
60
-
61
-
62
-
63
-
64
-
65
-
66
-
67
-
68
-
69
-
70
-
71
-
72
-
73
-
74
-
75
-
76
-
77
-
78
-
79
-
80
-
81
-
82
-
83
-
84
-
85
-
86
-
87
-
88
-
89
-
90
-
91
-
92
-
93
-
94
-
95
-
96
-
97
-
98
-
99
-
100
-
101
-
102
-
103
-
104
-
105
-
106
-
107
-
108
-
109
-
110
-
111
-
112
-
113
-
114
-
115
-
116
-
117
-
118
-
119
-
120
-
121
-
122
-
123
-
124
-
125
-
126
-
127
-
128
-
129
-
130
-
131
-
132
 |
 |
