Netgear MS2110-100NAS STORA User Manual - Page 12
LED and Connector Descriptions, Stora Rear Panel, Power button, Ethernet port, Power
 |
View all Netgear MS2110-100NAS manuals
Add to My Manuals
Save this manual to your list of manuals |
Page 12 highlights
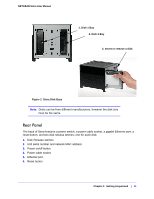
NETGEAR Stora User Manual 1. Disk release latches 2. Serial numbers 3. Power button 4. Power 5. Ethernet port cable socket Figure 3 Stora Rear Panel 6. Reset button LED and Connector Descriptions The function of each Stora item is described in the following table: Item Power Button Power Status LED Disk 1: Top Disk 2: Bottom LEDs Activity Description Push button on back of unit to turn the on and off. Turn on Stora: Press once. Turn off Stora: To correctly shutdown your Stora, press and hold the power button for about 5 seconds. The blue light on the front panel will blink before shutting off. If the unit is hung, press and hold the power button to force shutdown. NOTE: To save power, your Stora will automatically go into disk spin down mode when not used for 12 minutes. LED located on front of unit Solid Blue: Power is on. Blinking Blue: The Stora is booting up or shutting down. No LED light: The system is powered off. LED status indicators for Disk 1 and Disk 2 located on front of unit. On: Disk installed Solid Green: Drive is operating normally. Blinking Green: The Stora is booting up or shutting down. Also indicates activity such as copying data. Solid Amber: Drive is not ready, however, if solid amber constantly, it indicates a problem with the drive. Troubleshooting tips - try one or more of the following: • check that cables are securely connected and power is on. • remove and then reinsert the disk. • turn off Stora and turn it on again to reboot the system. Off: No disk installed. 12 | Chapter 1: Getting Acquainted
-
 1
1 -
2
-
3
-
4
-
5
-
6
-
 7
7 -
 8
8 -
 9
9 -
 10
10 -
 11
11 -
 12
12 -
 13
13 -
 14
14 -
 15
15 -
 16
16 -
 17
17 -
18
-
19
-
20
-
21
-
22
-
23
-
24
-
25
-
26
-
27
-
28
-
29
-
30
-
31
-
32
-
33
-
34
-
35
-
36
-
37
-
38
-
39
-
40
-
41
-
42
-
43
-
44
-
45
-
46
-
47
-
48
-
49
-
50
-
51
-
52
-
53
-
54
-
55
-
56
-
57
-
58
-
59
-
60
-
61
-
62
-
63
-
64
-
65
-
66
-
67
-
68
-
69
-
70
-
71
-
72
-
73
-
74
-
75
-
76
-
77
-
78
-
79
-
80
-
81
-
82
-
83
-
84
-
85
-
86
-
87
-
88
-
89
-
90
-
91
-
92
-
93
-
94
-
95
-
96
-
97
-
98
-
99
-
100
-
101
-
102
-
103
-
104
-
105
-
106
-
107
-
108
-
109
-
110
-
111
-
112
-
113
-
114
-
115
-
116
-
117
-
118
-
119
-
120
-
121
-
122
-
123
-
124
-
125
-
126
-
127
-
128
-
129
-
130
-
131
-
132
 |
 |
