Netgear WNDR4000 User Manual - Page 79
Add a Static Route, Advanced > Static Routes, Private, Active, Apply - updates
 |
UPC - 606449077629
View all Netgear WNDR4000 manuals
Add to My Manuals
Save this manual to your list of manuals |
Page 79 highlights
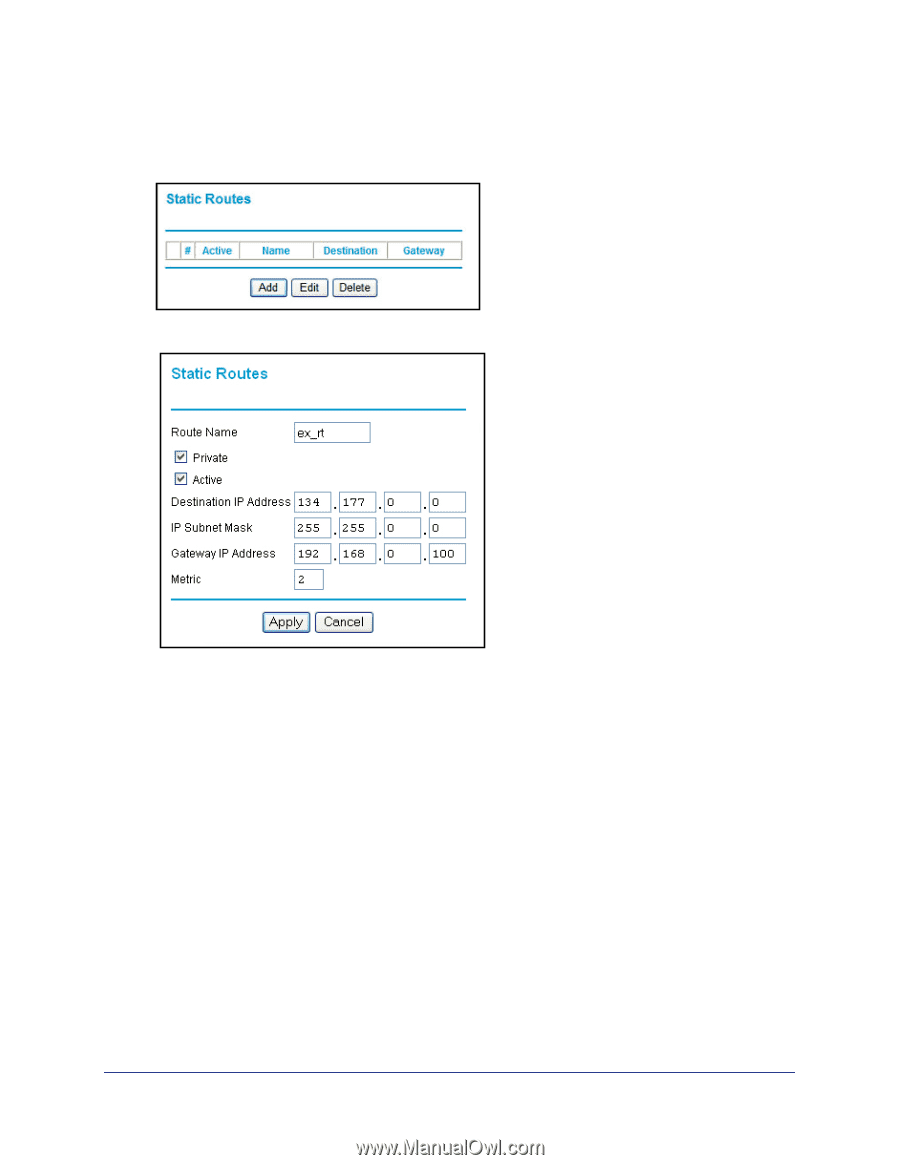
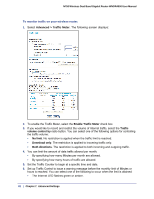
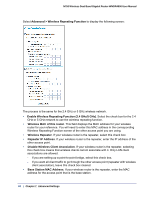
N750 Wireless Dual Band Gigabit Router WNDR4000 User Manual Add a Static Route 1. Select Advanced > Static Routes to display the following screen: 2. Click Add to open the following screen. 3. Fill in the fields: • In the Route Name field, enter a route name for this static route. This name is for identification purpose only. • Select Private if you want to limit access to the LAN only. The static route will not be reported in RIP. • Select Active to make this route effective. • Enter the destination IP address of the final destination. • Enter the IP subnet mask for this destination. If the destination is a single host, type 255.255.255.255. • Enter the gateway IP address, which has to be a router on the same LAN segment as the wireless router. • In the Metric field, enter a number between 2 and 15 as the metric value. This represents the number of routers between your network and the destination. Usually, a setting of 2 or 3 works. 4. Click Apply to save your changes. The Static Routes table is updated to show the new entry. Chapter 7. Advanced Settings | 79
-
 1
1 -
2
-
3
-
4
-
5
-
6
-
7
-
8
-
9
-
10
-
11
-
12
-
13
-
14
-
15
-
16
-
17
-
18
-
19
-
20
-
21
-
22
-
23
-
24
-
25
-
26
-
27
-
28
-
29
-
30
-
31
-
32
-
33
-
34
-
35
-
36
-
37
-
38
-
39
-
40
-
41
-
42
-
43
-
44
-
45
-
46
-
47
-
48
-
49
-
50
-
51
-
52
-
53
-
54
-
55
-
56
-
57
-
58
-
59
-
60
-
61
-
62
-
63
-
64
-
65
-
66
-
67
-
68
-
69
-
70
-
71
-
72
-
73
-
 74
74 -
 75
75 -
 76
76 -
 77
77 -
 78
78 -
 79
79 -
 80
80 -
 81
81 -
 82
82 -
 83
83 -
 84
84 -
85
-
86
-
87
-
88
-
89
-
90
-
91
-
92
-
93
-
94
-
95
-
96
-
97
-
98
-
99
-
100
-
101
-
102
-
103
-
104
 |
 |