Nikon B0012OGF6Q D60 User's Manual - Page 124
Self-Timer/FUNC Button
 |
UPC - 018208254385
View all Nikon B0012OGF6Q manuals
Add to My Manuals
Save this manual to your list of manuals |
Page 124 highlights
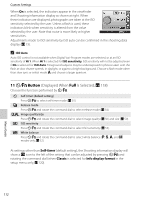
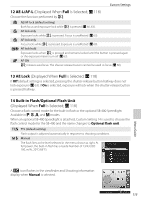
Custom Settings When On is selected, the indicators appear in the viewfinder and Shooting information display as shown at right. When these indicators are displayed, photographs are taken at the ISO sensitivity selected by the user. Unless a flash is used, these indicators blink when sensitivity is altered from the value selected by the user. Note that noise is more likely at higher sensitivities. Adjustments made to ISO sensitivity by ISO auto can be confirmed in the shooting data display (A 73). C ISO Auto Auto ISO control is not available when Digital Vari-Program modes are selected, or at an ISO sensitivity of Hi 1. When Hi 1 is selected for ISO sensitivity, ISO sensitivity will not be adjusted even if On is selected for ISO Auto. Foreground subjects may be underexposed in photos taken with the flash at slow shutter speeds, in daylight, or against a bright background. Choose a flash mode other than slow sync or select mode c and choose a larger aperture. 11 F/G Button (Displayed When Full Is Selected; A 118) Choose the function performed by F/G. F Self-timer (default setting) Press F/G to select self-timer mode (A 55). b Release mode Press F/G and rotate the command dial to select release mode (A 54). j Image quality/size Press F/G and rotate the command dial to select image quality (A 50) and size (A 50). k ISO sensitivity Press F/G and rotate the command dial to select ISO sensitivity (A 53). l White balance Press F/G and rotate the command dial to select white balance (a, b, c, and d modes only; A 52). At settings other than Self-timer (default setting), the Shooting information display will show a m icon to the left of the setting that can be adjusted by pressing F/G and rotating the command dial (when Classic is selected for Info display format in the setup menu only; A 120). 112 Menu Guide
-
 1
1 -
2
-
3
-
4
-
5
-
6
-
7
-
8
-
9
-
10
-
11
-
12
-
13
-
14
-
15
-
16
-
17
-
18
-
19
-
20
-
21
-
22
-
23
-
24
-
25
-
26
-
27
-
28
-
29
-
30
-
31
-
32
-
33
-
34
-
35
-
36
-
37
-
38
-
39
-
40
-
41
-
42
-
43
-
44
-
45
-
46
-
47
-
48
-
49
-
50
-
51
-
52
-
53
-
54
-
55
-
56
-
57
-
58
-
59
-
60
-
61
-
62
-
63
-
64
-
65
-
66
-
67
-
68
-
69
-
70
-
71
-
72
-
73
-
74
-
75
-
76
-
77
-
78
-
79
-
80
-
81
-
82
-
83
-
84
-
85
-
86
-
87
-
88
-
89
-
90
-
91
-
92
-
93
-
94
-
95
-
96
-
97
-
98
-
99
-
100
-
101
-
102
-
103
-
104
-
105
-
106
-
107
-
108
-
109
-
110
-
111
-
112
-
113
-
114
-
115
-
116
-
117
-
118
-
 119
119 -
 120
120 -
 121
121 -
 122
122 -
 123
123 -
 124
124 -
 125
125 -
 126
126 -
 127
127 -
 128
128 -
 129
129 -
130
-
131
-
132
-
133
-
134
-
135
-
136
-
137
-
138
-
139
-
140
-
141
-
142
-
143
-
144
-
145
-
146
-
147
-
148
-
149
-
150
-
151
-
152
-
153
-
154
-
155
-
156
-
157
-
158
-
159
-
160
-
161
-
162
-
163
-
164
-
165
-
166
-
167
-
168
-
169
-
170
-
171
-
172
-
173
-
174
-
175
-
176
-
177
-
178
-
179
-
180
-
181
-
182
-
183
-
184
-
185
-
186
-
187
-
188
-
189
-
190
-
191
-
192
-
193
-
194
-
195
-
196
-
197
-
198
-
199
-
200
-
201
-
202
-
203
-
204
 |
 |
