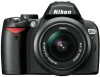
Nikon B0012OGF6Q D60 User's Manual - Page 99
Start printing, Printing at Printer Default
 |
UPC - 018208254385
View all Nikon B0012OGF6Q manuals
Add to My Manuals
Save this manual to your list of manuals |
Page 99 highlights
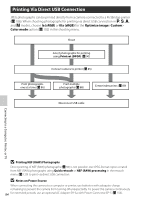
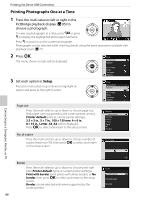
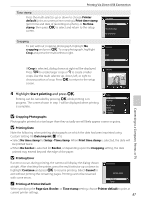
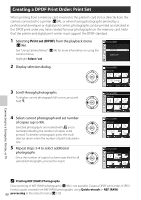
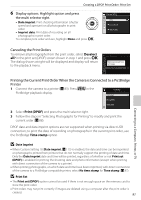
Printing Via Direct USB Connection Time stamp Press the multi selector up or down to choose Printer default (print at current printer settings), Print time stamp (print time and date of recording on photo), or No time stamp, then press Q to select and return to the setup screen. Time stamp Printer default Print time stamp No time stamp Cropping To exit without cropping photograph, highlight No cropping and press Q. To crop photograph, highlight Crop and press the multi selector right. Cropping Crop No cropping Connecting to a Computer, Printer, or TV If Crop is selected, dialog shown at right will be displayed. Press M to create larger crops or K to create smaller crops. Use the multi selector up, down, left, or right to choose position of crop. Press Q to return to the setup screen. Cropping OK 4 Highlight Start printing and press Q. Printing can be canceled by pressing Q while printing is in progress. The screen shown in step 1 will be displayed when printing is complete. B Cropping Photographs Setup Start printing Page size No. of copies Border Time stamp Cropping Photographs printed at a size larger than they actually are will likely appear coarse or grainy. B Printing Date Note the following when printing photographs on which the date has been imprinted using Custom Setting 18 (Date imprint; A 115). • Select No time stamp for Setup>Time stamp. When Print time stamp is selected, the date will be printed twice. • When No border is selected for Border, or depending upon the Cropping setting, the date printed may extend beyond the edge of the paper. B Printing Error If an error occurs during printing, the camera will display the dialog shown at right. After checking the printer, press the multi selector up or down to highlight Continue and press Q to resume printing. Select Cancel to exit without printing the remaining pages. Printing cannot be resumed with some errors. C Printing at Printer Default PRINT ERROR OUT OF PAPER. Continue Cancel When specifying the Page size, Border, or Time stamp setting, choose Printer default to print at current printer settings. 87
-
 1
1 -
2
-
3
-
4
-
5
-
6
-
7
-
8
-
9
-
10
-
11
-
12
-
13
-
14
-
15
-
16
-
17
-
18
-
19
-
20
-
21
-
22
-
23
-
24
-
25
-
26
-
27
-
28
-
29
-
30
-
31
-
32
-
33
-
34
-
35
-
36
-
37
-
38
-
39
-
40
-
41
-
42
-
43
-
44
-
45
-
46
-
47
-
48
-
49
-
50
-
51
-
52
-
53
-
54
-
55
-
56
-
57
-
58
-
59
-
60
-
61
-
62
-
63
-
64
-
65
-
66
-
67
-
68
-
69
-
70
-
71
-
72
-
73
-
74
-
75
-
76
-
77
-
78
-
79
-
80
-
81
-
82
-
83
-
84
-
85
-
86
-
87
-
88
-
89
-
90
-
91
-
92
-
93
-
 94
94 -
 95
95 -
 96
96 -
 97
97 -
 98
98 -
 99
99 -
 100
100 -
 101
101 -
 102
102 -
 103
103 -
 104
104 -
105
-
106
-
107
-
108
-
109
-
110
-
111
-
112
-
113
-
114
-
115
-
116
-
117
-
118
-
119
-
120
-
121
-
122
-
123
-
124
-
125
-
126
-
127
-
128
-
129
-
130
-
131
-
132
-
133
-
134
-
135
-
136
-
137
-
138
-
139
-
140
-
141
-
142
-
143
-
144
-
145
-
146
-
147
-
148
-
149
-
150
-
151
-
152
-
153
-
154
-
155
-
156
-
157
-
158
-
159
-
160
-
161
-
162
-
163
-
164
-
165
-
166
-
167
-
168
-
169
-
170
-
171
-
172
-
173
-
174
-
175
-
176
-
177
-
178
-
179
-
180
-
181
-
182
-
183
-
184
-
185
-
186
-
187
-
188
-
189
-
190
-
191
-
192
-
193
-
194
-
195
-
196
-
197
-
198
-
199
-
200
-
201
-
202
-
203
-
204
 |
 |
