Nikon COOLPIX L22 L22 / L21 User's Manual - Page 42
Using the Flash, Setting the Flash Mode
 |
View all Nikon COOLPIX L22 manuals
Add to My Manuals
Save this manual to your list of manuals |
Page 42 highlights
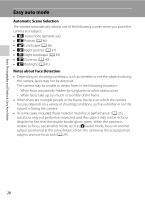
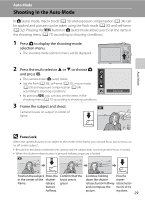
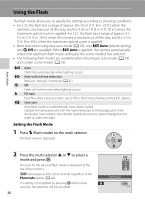
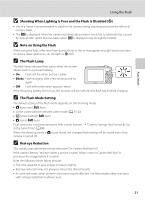
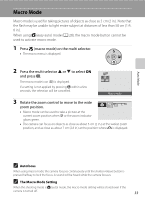
Auto Mode Using the Flash The flash mode allows you to specify the settings according to shooting conditions. • For L22, the flash has a range of approx. 0.5-7.0 m (1 ft. 8 in.-23 ft.) when the camera is zoomed out all the way, and 0.5-3.0 m (1 ft. 8 in.-9 ft. 10 in.) when the maximum optical zoom is applied. For L21, the flash has a range of approx. 0.55.5 m (1 ft. 8 in.-18 ft.) when the camera is zoomed out all the way, and 0.5-2.5 m (1 ft. 8 in.-8 ft.) when the maximum optical zoom is applied. • Note that when using easy auto mode (A 20), only U Auto (default setting) and W Off are available. When U Auto is applied, the camera automatically selects the optimum flash mode setting for the scene mode it has selected. • The following flash modes are available when shooting in auto mode (A 29) and certain scene modes (A 35). U Auto Flash fires automatically when lighting is poor. V Auto with red-eye reduction Reduces "red-eye" in portraits (A 31). W Off Flash will not fire even when lighting is poor. X Fill flash Flash fires when a picture is taken. Use to "fill-in" (illuminate) shadows and back-lit subjects. Y Slow sync Auto flash mode is combined with slow shutter speed. Suitable for taking portraits with the night landscape as the background. Flash illuminates main subject; slow shutter speeds are used to capture background at night or under dim light. Setting the Flash Mode 1 Press m (flash mode) on the multi selector. The flash menu is displayed. 2 Press the multi selector H or I to select a mode and press k. The icon for the selected flash mode is displayed at the top of the monitor. D will disappear after a few seconds regardless of the Photo info option (A 92). If a setting is not applied by pressing k within a few seconds, the selection will be cancelled. 30 Flash mode
-
 1
1 -
2
-
3
-
4
-
5
-
6
-
7
-
8
-
9
-
10
-
11
-
12
-
13
-
14
-
15
-
16
-
17
-
18
-
19
-
20
-
21
-
22
-
23
-
24
-
25
-
26
-
27
-
28
-
29
-
30
-
31
-
32
-
33
-
34
-
35
-
36
-
 37
37 -
 38
38 -
 39
39 -
 40
40 -
 41
41 -
 42
42 -
 43
43 -
 44
44 -
 45
45 -
 46
46 -
 47
47 -
48
-
49
-
50
-
51
-
52
-
53
-
54
-
55
-
56
-
57
-
58
-
59
-
60
-
61
-
62
-
63
-
64
-
65
-
66
-
67
-
68
-
69
-
70
-
71
-
72
-
73
-
74
-
75
-
76
-
77
-
78
-
79
-
80
-
81
-
82
-
83
-
84
-
85
-
86
-
87
-
88
-
89
-
90
-
91
-
92
-
93
-
94
-
95
-
96
-
97
-
98
-
99
-
100
-
101
-
102
-
103
-
104
-
105
-
106
-
107
-
108
-
109
-
110
-
111
-
112
-
113
-
114
-
115
-
116
-
117
-
118
-
119
-
120
-
121
-
122
-
123
-
124
-
125
-
126
-
127
-
128
-
129
-
130
-
131
-
132
-
133
-
134
-
135
-
136
-
137
-
138
-
139
-
140
-
141
-
142
-
143
-
144
-
145
-
146
-
147
-
148
 |
 |
