Nikon COOLPIX S3500 User Manual - Page 53
Flash Photography: The, Button, The Flash-Ready Light
 |
View all Nikon COOLPIX S3500 manuals
Add to My Manuals
Save this manual to your list of manuals |
Page 53 highlights
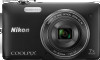
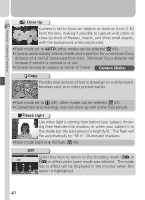
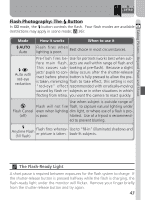
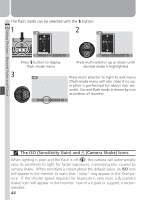
Taking Pictures-Beyond Point-and-Shoot AUTO Flash Photography: The Button In mode, the button controls the flash. Four flash modes are available (restrictions may apply in scene mode; 36): Mode How it works When to use it AUTO Auto Flash fires when lighting is poor. Best choice in most circumstances. Auto with red-eye reduction Pre-flash fires be- Use for portraits (works best when subfore main flash. jects are well within range of flash and This causes sub- looking at pre-flash). Because a slight jects' pupils to con- delay occurs after the shutter-release tract before photo button is fully pressed to allow the preis taken, minimizing flash to take effect, this setting is not "red-eye" effect recommended with erratically-moving caused by flash re- subjects or in other situations in which flecting from retina. you want the camera to react quickly. Use when subject is outside range of Flash will not fire flash, to capture natural lighting under Flash Cancel even when lighting dim light, or where use of a flash is pro- (off) is poor. hibited. Use of a tripod is recommend- ed to prevent blurring. Anytime Flash (fill flash) Flash fires whenever picture is taken. Use to "fill-in" (illuminate) shadows and back-lit subjects. The Flash-Ready Light A short pause is required between exposures for the flash system to charge. If the shutter-release button is pressed halfway while the flash is charging, the flash-ready light under the monitor will flicker. Remove your finger briefly from the shutter-release button and try again. 43
-
 1
1 -
2
-
3
-
4
-
5
-
6
-
7
-
8
-
9
-
10
-
11
-
12
-
13
-
14
-
15
-
16
-
17
-
18
-
19
-
20
-
21
-
22
-
23
-
24
-
25
-
26
-
27
-
28
-
29
-
30
-
31
-
32
-
33
-
34
-
35
-
36
-
37
-
38
-
39
-
40
-
41
-
42
-
43
-
44
-
45
-
46
-
47
-
 48
48 -
 49
49 -
 50
50 -
 51
51 -
 52
52 -
 53
53 -
 54
54 -
 55
55 -
 56
56 -
 57
57 -
 58
58 -
59
-
60
-
61
-
62
-
63
-
64
-
65
-
66
-
67
-
68
-
69
-
70
-
71
-
72
-
73
-
74
-
75
-
76
-
77
-
78
-
79
-
80
-
81
-
82
-
83
-
84
-
85
-
86
-
87
-
88
-
89
-
90
-
91
-
92
-
93
-
94
-
95
-
96
-
97
-
98
-
99
-
100
-
101
-
102
-
103
-
104
-
105
-
106
-
107
-
108
-
109
-
110
-
111
 |
 |