Nikon COOLPIX S6100 User Manual - Page 136
Glamour Retouch, tap the bottom tab to display
 |
View all Nikon COOLPIX S6100 manuals
Add to My Manuals
Save this manual to your list of manuals |
Page 136 highlights
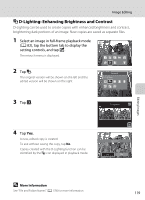
Image Editing j Glamour Retouch Glamour retouch can be used to soften the skin tone of faces detected in an image and make the faces look smaller with larger eyes. New copies are saved as separate files. 1 Select an image in full-frame playback mode (A 82), tap the bottom tab to display the setting controls, and tap M. The retouch menu is displayed. 2 Tap j. Retouch Glamour retouch Editing Images 3 Tap e (skin softening) or k (both). e: Soften facial skin tones. k: Soften facial skin tones, make faces look smaller, and make eyes look larger. The preview screen is displayed. Glamour retouch 4 Preview the result of the effects. Preview Skin tones in up to 12 faces, in the order of that closest to the center of the frame, are softened. Tap Before or After to view the image with or without the effects. If more than one face was retouched, tap M or N to Before After display a different face. To change the effect, tap J to return to step 3. Tap I to display the confirmation dialog for saving the new copy. 124
-
 1
1 -
2
-
3
-
4
-
5
-
6
-
7
-
8
-
9
-
10
-
11
-
12
-
13
-
14
-
15
-
16
-
17
-
18
-
19
-
20
-
21
-
22
-
23
-
24
-
25
-
26
-
27
-
28
-
29
-
30
-
31
-
32
-
33
-
34
-
35
-
36
-
37
-
38
-
39
-
40
-
41
-
42
-
43
-
44
-
45
-
46
-
47
-
48
-
49
-
50
-
51
-
52
-
53
-
54
-
55
-
56
-
57
-
58
-
59
-
60
-
61
-
62
-
63
-
64
-
65
-
66
-
67
-
68
-
69
-
70
-
71
-
72
-
73
-
74
-
75
-
76
-
77
-
78
-
79
-
80
-
81
-
82
-
83
-
84
-
85
-
86
-
87
-
88
-
89
-
90
-
91
-
92
-
93
-
94
-
95
-
96
-
97
-
98
-
99
-
100
-
101
-
102
-
103
-
104
-
105
-
106
-
107
-
108
-
109
-
110
-
111
-
112
-
113
-
114
-
115
-
116
-
117
-
118
-
119
-
120
-
121
-
122
-
123
-
124
-
125
-
126
-
127
-
128
-
129
-
130
-
 131
131 -
 132
132 -
 133
133 -
 134
134 -
 135
135 -
 136
136 -
 137
137 -
 138
138 -
 139
139 -
 140
140 -
 141
141 -
142
-
143
-
144
-
145
-
146
-
147
-
148
-
149
-
150
-
151
-
152
-
153
-
154
-
155
-
156
-
157
-
158
-
159
-
160
-
161
-
162
-
163
-
164
-
165
-
166
-
167
-
168
-
169
-
170
-
171
-
172
-
173
-
174
-
175
-
176
-
177
-
178
-
179
-
180
-
181
-
182
-
183
-
184
-
185
-
186
-
187
-
188
-
189
-
190
-
191
-
192
-
193
-
194
-
195
-
196
-
197
-
198
-
199
-
200
-
201
-
202
-
203
-
204
-
205
-
206
-
207
-
208
-
209
-
210
-
211
-
212
-
213
-
214
-
215
-
216
 |
 |
