Nikon Coolpix L11 L10 / L11 User's Manual - Page 72
Windows Vista/XP Home Edition/XP Professional, Windows 2000 Professional
 |
UPC - 018208255726
View all Nikon Coolpix L11 manuals
Add to My Manuals
Save this manual to your list of manuals |
Page 72 highlights
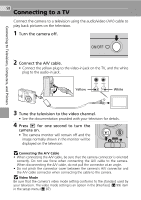
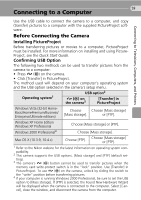
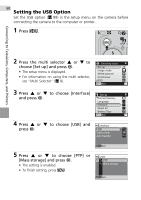
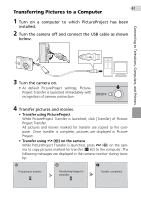
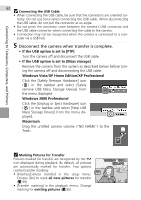
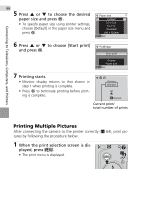
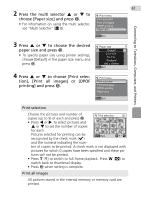
Connecting to Televisions, Computers, and Printers 62 j Connecting the USB Cable • When connecting the USB cable, be sure that the connectors are oriented correctly. Do not use force when connecting the USB cable. When disconnecting the USB cable, do not pull the connector at an angle. • Do not pinch the connector cover between the camera's USB connector and the USB cable connector when connecting the cable to the camera. • Connection may not be recognized when the camera is connected to a computer via a USB hub. 5 Disconnect the camera when transfer is complete. • If the USB option is set to [PTP] Turn the camera off and disconnect the USB cable. • If the USB option is set to [Mass storage] Remove the camera from the system as described below before turning the camera off and disconnecting the USB cable. Windows Vista/XP Home Edition/XP Professional Click the [Safely Remove Hardware] icon ( ) in the taskbar and select [Safely remove USB Mass Storage Device] from the menu displayed. Windows 2000 Professional Click the [Unplug or Eject Hardware] icon ( ) in the taskbar and select [Stop USB Mass Storage Device] from the menu displayed. Macintosh Drag the untitled camera volume ("NO NAME") to the Trash. k Marking Pictures for Transfer Pictures marked for transfer are recognized by the E icon displayed during playback. By default, all pictures are automatically marked for transfer. Two options control transfer marking: • [Interface]>[Auto transfer] in the setup menu: Choose [On] to mark all new pictures for transfer (c 99). • [Transfer marking] in the playback menu: Change marking for existing pictures (c 85). 15/05/2007 15:30 9999.JPG 4/ 4
-
 1
1 -
2
-
3
-
4
-
5
-
6
-
7
-
8
-
9
-
10
-
11
-
12
-
13
-
14
-
15
-
16
-
17
-
18
-
19
-
20
-
21
-
22
-
23
-
24
-
25
-
26
-
27
-
28
-
29
-
30
-
31
-
32
-
33
-
34
-
35
-
36
-
37
-
38
-
39
-
40
-
41
-
42
-
43
-
44
-
45
-
46
-
47
-
48
-
49
-
50
-
51
-
52
-
53
-
54
-
55
-
56
-
57
-
58
-
59
-
60
-
61
-
62
-
63
-
64
-
65
-
66
-
 67
67 -
 68
68 -
 69
69 -
 70
70 -
 71
71 -
 72
72 -
 73
73 -
 74
74 -
 75
75 -
 76
76 -
 77
77 -
78
-
79
-
80
-
81
-
82
-
83
-
84
-
85
-
86
-
87
-
88
-
89
-
90
-
91
-
92
-
93
-
94
-
95
-
96
-
97
-
98
-
99
-
100
-
101
-
102
-
103
-
104
-
105
-
106
-
107
-
108
-
109
-
110
-
111
-
112
-
113
-
114
-
115
-
116
-
117
-
118
-
119
-
120
-
121
-
122
-
123
-
124
-
125
-
126
-
127
-
128
-
129
-
130
-
131
-
132
-
133
-
134
-
135
 |
 |
