Nikon F75D Instruction Manual
Nikon F75D - F75 QD = N75 35mm SLR Camera Body Only Manual
 |
UPC - 018208803163
View all Nikon F75D manuals
Add to My Manuals
Save this manual to your list of manuals |
Nikon F75D manual content summary:
- Nikon F75D | Instruction Manual - Page 1
(En) INSTRUCTION MANUAL En www.mynikon.com.pl - Nikon F75D | Instruction Manual - Page 2
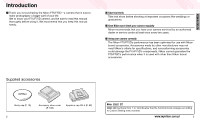
occasions like weddings or graduations. • Have Nikon spot-check your camera regularly Nikon recommends that you have your camera serviced by an authorised dealer or service centre at least once every two years. • Using your camera correctly The Nikon F75/F75D's performance has been optimised for use - Nikon F75D | Instruction Manual - Page 3
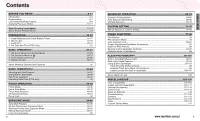
Batteries and Check Battery Power 16-17 2. Mount Lens ...18-19 3. Load Film...20-21 4. Set Date and Time (F75D 58-59 Manual Exposure Mode Lens Compatibility...104-106 Usable Optional Speedlights 107-111 Optional Accessories 112-113 Camera Care ...114-115 Notes on Batteries ...116 Troubleshooting - Nikon F75D | Instruction Manual - Page 4
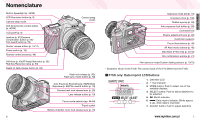
78) Camera back lock release lever (p. 20) Lens release button (p. 19) Focus mode selector (pp. 44-45) Tripod socket Battery chamber cover (p. 79/72) * Illustration shown is the F75D. The camera back of the F75 differs from the F75D. • F75D only: Data imprint LCD/buttons 1. Date/time LCD - Nikon F75D | Instruction Manual - Page 5
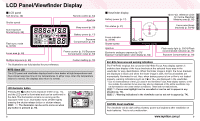
Compensation (p. 64) Vari-Brite focus area and warning indications The F75/F75D employs the convenient Vari-Brite Focus Area display system; it enables are displayed in black and when the finder image is dark, the focus brackets are momentarily illuminated in red. Also, when battery power is low or - Nikon F75D | Instruction Manual - Page 6
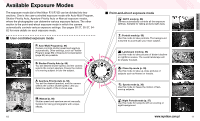
Nikon F75/F75D can be divided into two sections. One is the user-controlled exposure mode with Auto-Multi Program, Shutter-Priority Auto, Aperture-Priority Auto or Manual Auto (p. 56) You set desired shutter speed, and the camera selects the correct aperture. Freeze the motion of a moving subject - Nikon F75D | Instruction Manual - Page 7
Shooting Immediately 1 Open the battery chamber and install batteries while the camera's power is off (page 16). 5 Hold the camera properly, compose frame and focus (page 28) by lightly pressing the shutter release button (page 18). START SHOOTING IMMEDIATELY 2 Attach the lens and turn the power - Nikon F75D | Instruction Manual - Page 8
Lightly pressing • When the focus mode selector is set to AF (autofocus), camera starts to focus on the subject when the shutter release button is lightly you start shooting. • Install batteries and check battery power • Mount lens • Load film • Set date and time (F75D only) www.mynikon.com.pl 15 - Nikon F75D | Instruction Manual - Page 9
batteries, see page 128. 16 3 Turn the power switch on and confirm battery power with the N indication. Sufficient battery power Insufficient battery power Viewfinder LCD panel Camera's meter on Camera viewfinder. Shutter speed and aperture (ƒ-- when lens is not attached) indications in the LCD - Nikon F75D | Instruction Manual - Page 10
viewfinder, and the shutter cannot be released (except in Manual exposure mode). See page 106 for a non-CPU lens. 18 • Position lens in the camera's bayonet mount so that the mounting indexes on lens and camera body are aligned, then twist lens anticlockwise until it locks into place. (Be sure not - Nikon F75D | Instruction Manual - Page 11
, film speed will be set automatically (ISO 25-5000). When the camera back is closed, the film automatically advances and the number of available and ∑ in the viewfinder blink, film is not properly installed. Open the camera back again and reload film by aligning the film leader to the red index - Nikon F75D | Instruction Manual - Page 12
(F75D only) This camera allows Batteries in the camera body also power the quartz date. Set the date and time after installing batteries for the first time. When changing batteries functions explained in this section are as follows: Lens attached Focus mode Focus area Exposure metering system - Nikon F75D | Instruction Manual - Page 13
other background. BASIC OPERATION 1 NOTE: AF focus mode Do not rotate the lens focusing ring manually when the focus mode selector is set to AF. 2 Set the AF ). If the subject moves from the selected focus area, the camera automatically focuses on the subject determining the data from the other - Nikon F75D | Instruction Manual - Page 14
in the F75/F75D uses a lens (3D Matrix Metering is performed)-and makes the calculations necessary to assure correct exposure. This camera automatically selects Matrix Metering in all exposure modes except Manual See each reference page for operating instructions and details. Symbol Exposure mode - Nikon F75D | Instruction Manual - Page 15
support. • Stand with one foot forward a half step and keep your upper body still. • Grasp the camera handgrip with your right hand and use your left hand to cradle the camera (or lens). NOTE: Camera shake Camera camera's AF-Assist Illuminator (page 50) is automatically activated to guide F75/F75D's - Nikon F75D | Instruction Manual - Page 16
. (E appears without blinking and œ disappears when the exposure meter is off.) Make sure the film is completely rewound (E and œ are blinking), open the camera back away from sunlight and remove the film cartridge. ç 2 : Warning indications in the viewfinder can be set not to appear (p. 74). Check - Nikon F75D | Instruction Manual - Page 17
D-type Nikkor lenses, the F75/F75D camera performs 25-segment 3D Matrix F75/F75D, Matrix Metering is automatically selected when the exposure mode is set to other than Manual and Centre-Weighted Metering is selected with Manual exposure mode. • Exposure Light from the subject passes through the lens - Nikon F75D | Instruction Manual - Page 18
shooting situations, especially shooting night scenes, slow shutter speed is selected. To avoid camera shake, use a tripod. Use of self-timer or remote control also helps to avoid camera shake. • A wide-angle lens is suited to capturing a wide view of the landscape. • Shutter speed and aperture - Nikon F75D | Instruction Manual - Page 19
mode is set to ˜ continuous (p.79). • Use of ISO 400 or faster film speed is recommended. • A tripod is recommended when using a telephoto lens to avoid camera shake. h: Night Portrait mode Use this mode for subjects with an evening or night background. Night Portrait mode captures all the lighting - Nikon F75D | Instruction Manual - Page 20
is ready to fire, ‡ appears without blinking in the viewfinder (when the camera's meter is on). • When you want to take a picture without the in Speedlight offers an angle of coverage of 28mm lens with a guide number of 12 (ISO 100, m). When a wide-angle lens of less than 28mm focal length is used - Nikon F75D | Instruction Manual - Page 21
Use a tripod or place the camera on a stable surface before using the self-timer. • To shoot in an exposure mode other than Manual, cover the eyepiece with the front of the lens when setting the self-timer in autofocus mode. • Self-timer shooting cannot be performed unless the camera's shutter can - Nikon F75D | Instruction Manual - Page 22
Imprinting Date/Time (F75D only) You can imprint the following date information on your picture: Year/Month/Day, Day/Hour/Minute, Month/Day/Year or Day/Month/Year. See - Nikon F75D | Instruction Manual - Page 23
to the F75/F75D (page 104). • When using a lens with the A-M select function, set the switch/ring to M to focus manually. If M/A (autofocus with manual priority) is available with your lens, Manual focus is possible either with the switch/ring set to M or M/A. See the instruction manual of your - Nikon F75D | Instruction Manual - Page 24
F75/F75D's five focus areas cover a wide frame area. When the focus mode is set to AF (page 44), you can select either Dynamic AF Mode with Closest-Subject Priority, where the camera is set to either S or D and when using the manual focus. Centre focus area is highlighted with the Vari-Brite display - Nikon F75D | Instruction Manual - Page 25
Focus Area Selection This camera's five focus areas cover a wide frame area, and on again resets the focus area to the centre. When exposure mode is set to P, S, A or M, or in manual focus, selected focus area remains. • When exposure mode is changed within a and any of Vari-Program, or changed to - Nikon F75D | Instruction Manual - Page 26
AF Micro 200mm f/4 IF-ED AF-S 17-35mm f/2.8 ED AF 18-35mm f/3.5-4.5 ED AF 20-35mm f/2.8 IF AF 24-85mm f/2.8-4 IF AF 24-120mm f/3.5-5.6 IF AF Micro 70-180mm f/4.5-5.6 ED • Autofocus using the camera's AF-Assist Illuminator cannot be performed with following lens at a shooting distance within 1.5m at - Nikon F75D | Instruction Manual - Page 27
when you want to capture a subject that's framed outside of the F75/F75D's five focus areas. Tip Focus lock is best suited for a photograph button and shoot. • After you have locked focus, do not change the camera-to-subject distance. 52 EXPOSURE MODE This section describes how to take pictures - Nikon F75D | Instruction Manual - Page 28
The camera automatically controls exposure to achieve correct exposure in any shooting situation. For more complex shooting, use Flexible Program (page 55), Exposure Compensation (page 64) or Auto Exposure Bracketing (page 66). • P (Auto-Multi Program) can only be used with a CPU Nikkor lens such - Nikon F75D | Instruction Manual - Page 29
-Priority Auto Enables you to manually set the desired shutter speed (30-1/2000 sec.); the camera automatically selects the proper aperture to Always set the aperture ring of a CPU Nikkor lens (except G-type) to its minimum (largest f-number). When the lens is not set to its minimum aperture setting, - Nikon F75D | Instruction Manual - Page 30
Aperture-Priority Auto Exposure Mode Small aperture f/32 A: Aperture-Priority Auto Enables you to set the desired aperture (lens' minimum to maximum) manually. The camera automatically selects a shutter speed suitable for correct exposure. • A (Aperture-Priority Auto) can only be used with a CPU - Nikon F75D | Instruction Manual - Page 31
M. • Metering system automatically switches to Centre-Weighted from Matrix in Manual exposure mode. • When a non-CPU Nikkor lens is attached, ƒ-appears in the LCD panel and viewfinder. Set/confirm aperture with the lens aperture ring. Camera's exposure meter cannot be used. See page 106 for details - Nikon F75D | Instruction Manual - Page 32
exposure mode dial is set to M (Manual), set the shutter speed indication to scenes or stars. Tip In Long Time exposure, camera shake can be reduced by using the Self- hours with a fresh set of batteries. Note that continuous exposure time is of operations using the F75/F75D's advanced functions. • - Nikon F75D | Instruction Manual - Page 33
), use the Exposure Compensation function. This can be useful when intentionally achieving underor overexposure to obtain a specific photographic effect. This camera offers compensation of -3 EV to +3 EV in 1/2 steps. • Exposure Compensation can be set in P, S, A and Vari-Program. Tip Compensate to - Nikon F75D | Instruction Manual - Page 34
allows you to shoot in selected compensated EV values (maximum of ±2 EV) shifting from the automatically set proper exposure (or selected exposure in Manual exposure mode) for three shots each time the shutter is released. • Auto Exposure Bracketing is available in P, S, A and M exposure modes. Tip - Nikon F75D | Instruction Manual - Page 35
Auto Exposure Bracketing-continued • If the Exposure Compensation function (page 64) is also set, bracketing will be combined with the Exposure Compensation values. It is useful to perform Bracketing with a compensated value of over +2 EV or under -2 EV (maximum of ±5 EV). • If the end of the film - Nikon F75D | Instruction Manual - Page 36
, you can create a combination of functions that is different from the initial factory settings. The functions listed in this section can be selected with the F75/F75D. www.mynikon.com.pl 71 - Nikon F75D | Instruction Manual - Page 37
CUSTOM SETTING Menu/Features of Custom Setting • Creating Custom Setting 1 Set the Custom Setting selector to CSM and select a menu number by rotating the Command Dial. • Cancelling Custom Setting Set the Custom Setting selector to CSM and press the j and k buttons simultaneously for more than two - Nikon F75D | Instruction Manual - Page 38
Refer also to the Custom Setting Menu table at the end of this instruction manual. 1. Beep sound (pages 28, 41, 84) Options: 0: Activated 31, 78) Options: 0: Displayed (initial setting) 1: Off At initial setting, when battery power is low, no film is loaded, or film is not loaded properly, warning - Nikon F75D | Instruction Manual - Page 39
AF-Assist Illuminator of the optional Speedlight cannot be turned off with this option. OTHER FUNCTIONS This section describes other useful camera functions and information. • Film rewind • Film advance mode • Auto exposure lock • Dioptre adjustment • Viewfinder accessories • Depth-of-field preview - Nikon F75D | Instruction Manual - Page 40
battery power indication camera back is opened once and closed again after removing the film cartridge.) ç 2 : Warning indications in the viewfinder can be set not to appear (p. 74). Film Advance Mode Two film advance modes, single-frame and continuous shooting are available with the F75/F75D - Nikon F75D | Instruction Manual - Page 41
between the brightness of an area you want to set the exposure on and the area surrounding it. Set exposure to a mode other than Manual. 1 Position focus area on subject and lightly press the shutter release button, then press the x button. Confirm focus indicator / appears in the viewfinder - Nikon F75D | Instruction Manual - Page 42
OTHER FUNCTIONS Dioptre Adjustment/Viewfinder Accessories The F75/F75D enables near- or far-sighted photographers to adjust the eyepiece dioptre to suit their vision. Viewfinder accessories such as an eyepiece cap or eyepiece correction lens can also be attached. Dioptre adjustment • Remove the - Nikon F75D | Instruction Manual - Page 43
can also use the remote control instead of a cable release to reduce camera shake. NOTE: Before using the remote control When using the remote the first time, make sure to pull out the insulation sheet placed on the battery inside the remote control unit that is set when purchased. 1 Press the v - Nikon F75D | Instruction Manual - Page 44
, use the self-timer (page 40). Remote control operation cannot be performed when the camera has extreme backlighting. Change the camera position in this case. • If the shutter cannot be released with the remote control, change the battery inside the remote control unit (page 87). (The life of the - Nikon F75D | Instruction Manual - Page 45
Available Mode Combinations The following chart lists available modes when a CPU Nikkor lens such as a G- or D-type lens is attached. Exposure mode a s d f g h P S A M AF-Assist Illuminator R R - R - R R R R R Flexible Program R - - - Exposure mode a s d f g h P S A M Auto Exposure Bracketing - Nikon F75D | Instruction Manual - Page 46
modes This camera is equipped with a built-in Speedlight that provides an angle of coverage for a 28mm lens with a guide number lens Standard TTL*3 *1 When built-in Speedlight is used and the exposure mode is set to Manual combination of the F75/F75D camera and CPU Nikkor lens other than D/G-type. - Nikon F75D | Instruction Manual - Page 47
in a or s , and to 1/90 sec. in f, P or A exposure mode. £/‹: Slow Sync Slow Sync can be used in h, P or A exposure mode. Normally, the camera's shutter speed is automatically set to 1/90 sec. for flash photography. However, for shooting nighttime scenes, Slow Sync uses a slower shutter speed (down - Nikon F75D | Instruction Manual - Page 48
• With Slow Sync and Red-Eye Reduction with Slow Sync, keep the camera steady to prevent picture blur since the shutter speed is slow. Use of built-in Speedlight set to desired flash sync mode when a G- or D-type AF Nikkor lens is attached. 1 In P, S, A or M exposure mode, release the built-in - Nikon F75D | Instruction Manual - Page 49
distance, aperture or flash shooting distance range and shoot again. • When the subject is dark, the AF-Assist Illuminator automatically turns on to guide autofocus. See page 50 for details. • Available shutter speed and aperture in each exposure mode • In Front-Curtain Sync, Red-Eye Reduction or - Nikon F75D | Instruction Manual - Page 50
for the built-in Speedlight changes according to the film speed in use and aperture setting. ISO film speed Guide number Aperture value 25 50 100 200 400 800 6 8.5 12 17 24 34 - - 1.4 2 guide number by the selected aperture value. Example: When f/2.8 is selected with ISO 100 film using the camera - Nikon F75D | Instruction Manual - Page 51
hood. • The built-in Speedlight cannot be used with zoom lenses set to Macro in wideangle. • AF-S 17-35mm f/2.8 ED zoom lens cannot be used with the built-in Speedlight. • Vignetting is reduced with regular colour print film compared to colour slide film since the edges of - Nikon F75D | Instruction Manual - Page 52
32 C O L U M N 102 MISCELLANEOUS This section explains miscellaneous information. • Lens compatibility • Usable optional Speedlights • Optional accessories • Camera care • Notes on batteries • Troubleshooting • Glossary • Specifications • Index • Custom Setting menu www.mynikon.com.pl 103 - Nikon F75D | Instruction Manual - Page 53
- - AI-modified Nikkor Medical-Nikkor 120mm f/4 - R R - R*11 - - - Reflex-Nikkor - - R - R*10 - - - PC-Nikkor - R*5 R - R*10 - Manual. *2 IX-Nikkor lenses cannot be attached. *3 This camera is compatible with the Vibration Reduction function of the VR Nikkor lens. *4 The camera - Nikon F75D | Instruction Manual - Page 54
F75/F75D The following non-CPU Nikkor lenses/accessories cannot be attached to the F75/F75D (otherwise camera body or lens 35mm f/2.8 (No. 851001-906200) • Old-type PC 35mm f/3.5 • Old-type Reflex 1000mm f/6.3 • Reflex 1000mm f/11 (No. 142361-143000) • Reflex *1 Selecting Manual exposure mode - Nikon F75D | Instruction Manual - Page 55
be attached directly to the accessory shoe of the F75/F75D without a cord. This accessory shoe is equipped with manual for details. If the camera groups are defined in the manual of the Speedlight with TTL Auto Flash, see the section for camera to AF, an AF Nikkor lens is attached, the subject is - Nikon F75D | Instruction Manual - Page 56
you are using a lens with a maximum aperture smaller than that listed above, the automatically controlled aperture range is from the lens' maximum to minimum made by manufacturers other than Nikon Use only Nikon Speedlights. Other units may damage the camera's electrical circuit due to incompatible - Nikon F75D | Instruction Manual - Page 57
is compatible with the SB-80DX. • Speedlight SB-50DX uses two 3V lithium batteries with a guide number of 22 (manual flash, 35mm zoom-head position, ISO 100, m, 20°C). When used with the F75/F75D camera, flash photography such as bounce flash and wireless multiple flash is possible. Also, using - Nikon F75D | Instruction Manual - Page 58
the built-in Speedlight in peak condition, fire it a few times every month. This will enable you to use the flash for many years. Nikon cannot be held responsible for any malfunction resulting from the use of the camera other than as specified in this manual. www.mynikon.com.pl 115 MISCELLANEOUS - Nikon F75D | Instruction Manual - Page 59
film rewind. replace batteries with blink new ones and turn the power on again. If this warning appears frequently, contact authorised Nikon dealer or service centre. ©-- blinks ƒ-- blinks • Non-CPU lens is • Attach CPU lens. With a 18, attached or lens is not non-CPU lens, set the 106 - Nikon F75D | Instruction Manual - Page 60
Troubleshooting-continued LCD panel Viewfinder Cause Remedy Page E appears œ blinks • Film • Remove the film cartridge. 31 exposure meter camera after film is turned on rewind is complete. - / blinks • Autofocus is not • Focus manually. 29 possible. HI appears HI appears • - Nikon F75D | Instruction Manual - Page 61
indication remains, or this warning appears frequently, contact authorised Nikon dealer or service centre. In certain cases, due to static electricity, the F75/F75D's microcomputer may turn the camera off, even with fresh, properly installed batteries. For the same reason, the film may not advance - Nikon F75D | Instruction Manual - Page 62
after the front curtain of a focal plane shutter has completed its travel across the film plane. This is the way the F75/F75D operates with the flash sync mode at Normal Sync. (See "Rear-Curtain Sync".) Guide number The guide number indicates the power of a flash in relation to ISO film speed. The - Nikon F75D | Instruction Manual - Page 63
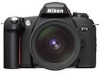
Program possible) ß: Shutter-Priority Auto å: Aperture-Priority Auto µ: Manual Picture format 24 x 36mm (standard 35mm film format) Lens mount Nikon F mount (with AF coupling, AF contacts) Lens Nikkor and Nikon lenses having Nikon F mount* * With limitations; see chart on page 104. Viewfinder - Nikon F75D | Instruction Manual - Page 64
button Guide number: 12 (at ISO 100, m); flash coverage: 28mm or longer lens; lens other than D/G-type (except in Manual exposure mode) • Standard TTL: in Manual Camera back Hinged back with film confirmation window F75D: data imprint LCD panel/buttons Power source Two 3V CR2 lithium batteries - Nikon F75D | Instruction Manual - Page 65
f/3.3-5.6G lens, covering the full range from infinity (∞) to the closest distance and back to infinity (∞) before each shot, with a shutter speed of 1/90 sec. or faster. 1/4 (ISO 1222) F75: Approx. 131 x 92.5 x 65mm F75D: Approx. 131 x 92.5 x 67.5mm F75: Approx. 380g F75D: Approx. 385g Battery Pack - Nikon F75D | Instruction Manual - Page 66
exposure mode 10, 27, 32, 60-62, 88, 97, 99 Manual focus 25, 45 Manual focus with electronic rangefinder ... 45 Matrix Metering 26, 32 Maximum aperture 58, 60, 110 Metering system............26, 32, 60, 88, 104 Minimum aperture ...19, 54, - Nikon F75D | Instruction Manual - Page 67
No reproduction in any form of this manual, in whole or in part (except for brief quotation in critical articles or reviews), may be made without written authorisation from NIKON CORPORATION. K NIKON CORPORATION FUJI BLDG., 2-3, MARUNOUCHI 3-CHOME, CHIYODA-KU, TOKYO 100-8331, JAPAN Printed in
-
 1
1 -
 2
2 -
 3
3 -
 4
4 -
 5
5 -
 6
6 -
 7
7 -
8
-
9
-
10
-
11
-
12
-
13
-
14
-
15
-
16
-
17
-
18
-
19
-
20
-
21
-
22
-
23
-
24
-
25
-
26
-
27
-
28
-
29
-
30
-
31
-
32
-
33
-
34
-
35
-
36
-
37
-
38
-
39
-
40
-
41
-
42
-
43
-
44
-
45
-
46
-
47
-
48
-
49
-
50
-
51
-
52
-
53
-
54
-
55
-
56
-
57
-
58
-
59
-
60
-
61
-
62
-
63
-
64
-
65
-
66
-
67
 |
 |
En
INSTRUCTION MANUAL
(En)
www.mynikon.com.pl