Nikon F75D Instruction Manual - Page 11
Load Film
 |
UPC - 018208803163
View all Nikon F75D manuals
Add to My Manuals
Save this manual to your list of manuals |
Page 11 highlights
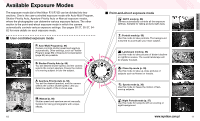
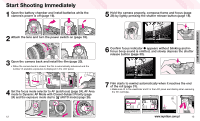
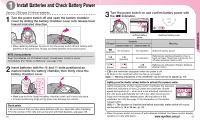
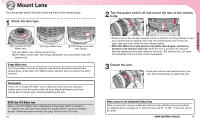
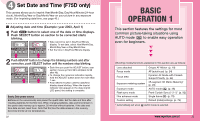
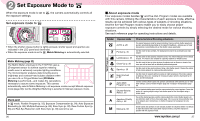
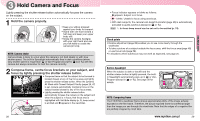
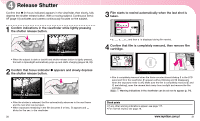
3 Load Film Turn the power switch on and load DX-coded film. With DX-coded film, film speed will be set automatically (ISO 25-5000). When the camera back is closed, the film automatically advances and the number of available exposures is displayed in the LCD panel. 1 Turn the power switch on, open the camera back by sliding the camera back lock release lever and load film. • Film cartridge can be loaded smoothly if inserted from the bottom. • Make sure to insert the film cartridge all the way in. 2 Pull film leader across to red index mark. • Make sure to align the film leader to the red index mark; if the film leader is not properly aligned to the index mark (short of or beyond the mark), film may not be loaded properly. • Hold the film cartridge and ensure film is properly positioned with no slack. NOTE: Loading/removing film Shutter curtains are very thin. Do not touch the shutter curtains with your finger or the film leader. 20 3 Gently close the camera back until the camera back snaps closed. • The film automatically advances to the final frame with blinking o, o-, o--, o--- as indicated in the LCD panel, and film rewinds one frame at a time as photos are taken. The LCD panel indicates number of exposures left on film. • When the film has completed set up, a shutter sound is let out but no picture has been taken. • When E appears in the LCD panel, or Err and E in the LCD panel and ∑ in the viewfinder blink, film is not properly installed. Open the camera back again and reload film by aligning the film leader to the red index mark. œ blinks in the viewfinder when the film is not loaded. • Pictures taken on frames beyond the indicated number of the exposures for the film roll may be discarded in the process of developing. ç 2 : Warning indications in the viewfinder can be set not to appear (p. 74). DX-coded film With DX-coded film, film speed will be set automatically between ISO 25 to ISO 5000. Film speed is set to ISO 100 with non-DXcoded film. DX-coded film ISO (film speed) DX mark Check points • Avoid direct sunlight when changing film outdoors. • You can check the number of available exposures on the film roll and film speed through the film confirmation window. • Infrared films cannot be used with this camera since an infrared sensor is used for the detection of the film frame position. www.mynikon.com.pl 21 PREPARATION
-
 1
1 -
2
-
3
-
4
-
5
-
 6
6 -
 7
7 -
 8
8 -
 9
9 -
 10
10 -
 11
11 -
 12
12 -
 13
13 -
 14
14 -
 15
15 -
 16
16 -
17
-
18
-
19
-
20
-
21
-
22
-
23
-
24
-
25
-
26
-
27
-
28
-
29
-
30
-
31
-
32
-
33
-
34
-
35
-
36
-
37
-
38
-
39
-
40
-
41
-
42
-
43
-
44
-
45
-
46
-
47
-
48
-
49
-
50
-
51
-
52
-
53
-
54
-
55
-
56
-
57
-
58
-
59
-
60
-
61
-
62
-
63
-
64
-
65
-
66
-
67
 |
 |
