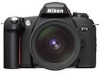
Nikon F75D Instruction Manual - Page 12
Basic, Operation 1
 |
UPC - 018208803163
View all Nikon F75D manuals
Add to My Manuals
Save this manual to your list of manuals |
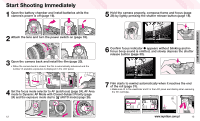
Page 12 highlights
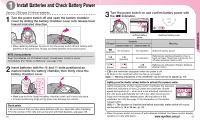
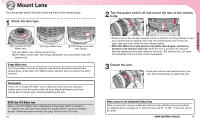
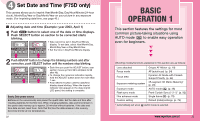
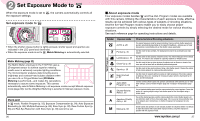
4 Set Date and Time (F75D only) This camera allows you to imprint Year/Month/Day, Day/Hour/Minute (24-hour clock), Month/Day/Year or Day/Month/Year on your picture in any exposure mode. (For imprinting date/time, see page 42.) • Adjusting date and time (Example: year 2003, April 1) 1 Push ¨ button to select one of the date or time displays. Push SELECT button so section to be corrected starts blinking. • Date cannot be set in Day/Hour/Minute display. To set date, select Year/Month/Day, Month/Day/Year or Day/Month/Year. • Set the time in Day/Hour/Minute display. 2 Push ADJUST button to change the blinking numbers and after correction, push SELECT button until the numbers stop blinking. • Each time you push the ADJUST button, year section moves up from 98 to 49 (back to 98 after 49). • To change the numerical indication rapidly, hold the ADJUST button down for more than 1 sec. • Push SELECT button until the date/time display stops blinking. When the imprint - indicator appears in the data imprint LCD panel, the setting is complete. Quartz Date power source Batteries in the camera body also power the quartz date. Set the date and time after installing batteries for the first time. When changing batteries, date and time remain in the quartz date memory up to approx. 30 minutes without batteries. If the date and time data are lost, reset them. Note that the time the data remains in the memory becomes shorter at low temperatures. 22 BASIC OPERATION 1 This section features the settings for most common picture-taking situations using AUTO mode (a) to enable easy operation even for beginners. Shooting modes/functions explained in this section are as follows: Lens attached Focus mode Focus area Exposure metering system Exposure mode Flash sync mode Film advance mode Custom setting G-type AF Nikkor (p. 18) AF (autofocus) (p. 24) Dynamic AF Mode with ClosestSubject Priority (p. 24) 25-segment 3D Matrix Metering* (p. 26) AUTO mode (a) (p. 26) Front-Curtain Sync (¡/™)* (p. 92) Single frame (ı) (p. 79) Default (initial) settings (p. 72) * Automatically set when a AUTO mode is selected. www.mynikon.com.pl 23
-
 1
1 -
2
-
3
-
4
-
5
-
6
-
 7
7 -
 8
8 -
 9
9 -
 10
10 -
 11
11 -
 12
12 -
 13
13 -
 14
14 -
 15
15 -
 16
16 -
 17
17 -
18
-
19
-
20
-
21
-
22
-
23
-
24
-
25
-
26
-
27
-
28
-
29
-
30
-
31
-
32
-
33
-
34
-
35
-
36
-
37
-
38
-
39
-
40
-
41
-
42
-
43
-
44
-
45
-
46
-
47
-
48
-
49
-
50
-
51
-
52
-
53
-
54
-
55
-
56
-
57
-
58
-
59
-
60
-
61
-
62
-
63
-
64
-
65
-
66
-
67
 |
 |
