Nikon F75D Instruction Manual - Page 9
Install Batteries and Check Battery Power
 |
UPC - 018208803163
View all Nikon F75D manuals
Add to My Manuals
Save this manual to your list of manuals |
Page 9 highlights
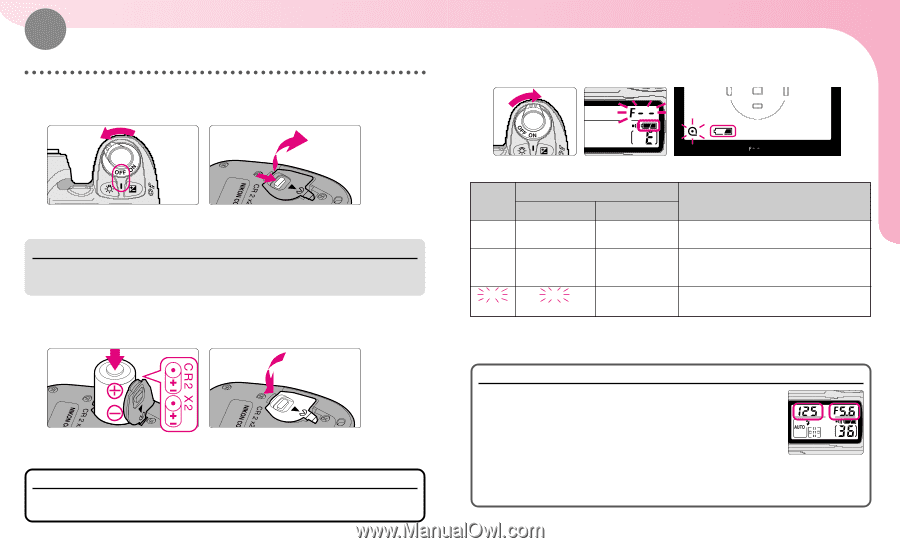
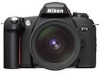
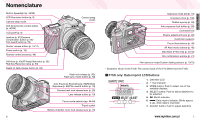
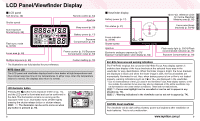
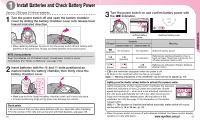
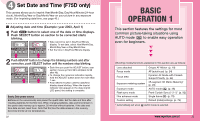
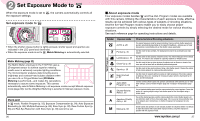
1 Install Batteries and Check Battery Power Use two CR2-type 3V lithium batteries. 1 Turn the power switch off and open the battery chamber cover by sliding the battery chamber cover lock release lever toward indicated direction. • When replacing batteries, be sure to turn the power switch off and replace both batteries at the same time. Always use fresh batteries of the same brand. NOTE: Storing batteries Keep the batteries out of children's reach. If swallowed, contact a doctor immediately. (For "Notes on Batteries", see page 116.) 2 Insert batteries with the ´ and ‰ ends positioned as marked inside the battery chamber, then firmly close the battery chamber cover. • Make sure to firmly close the battery chamber cover until it locks into place. • Incorrect positioning of ´ and ‰ poles may damage the camera. Check points • We recommend that you take spare batteries with you, especially when travelling. • For the number of film rolls that can be shot with fresh batteries, see page 128. 16 3 Turn the power switch on and confirm battery power with the N indication. Sufficient battery power Insufficient battery power Viewfinder LCD panel Camera's meter on Camera's meter off Meaning N (appears) No indication No indication Sufficient battery power. M (appears) m (appears) No indication Batteries are nearing exhaustion. Have a fresh set ready. (Viewfinder indications turn off when exposure meter is off.) M (blinks) m (blinks) m (appears) Batteries are exhausted. Replace batteries. (Shutter locks.) • m in the viewfinder disappears when the power is off. • œ blinks in the viewfinder when the film is not loaded. ç 2 : Warning indications in the viewfinder can be set not to appear (p. 74). Lightly press the shutter release button to activate the exposure meter. Lightly pressing the shutter release button reactivates the exposure meter and indications in the LCD panel and viewfinder. Shutter speed and aperture (ƒ-- when lens is not attached) indications in the LCD panel automatically turn off 5 sec. after removing your finger from the shutter release button. (All indications in the viewfinder turn off.) See page 14 for information on the shutter release button. ç 8 : The duration of inactive time before automatic meter switch-off occurs can be set to 3, 10 or 20 sec. (p. 75). • When the power switch is turned off with batteries installed, the frame counter display remains on in the LCD panel www.mynikon.com.pl 17 PREPARATION
-
 1
1 -
2
-
3
-
 4
4 -
 5
5 -
 6
6 -
 7
7 -
 8
8 -
 9
9 -
 10
10 -
 11
11 -
 12
12 -
 13
13 -
 14
14 -
15
-
16
-
17
-
18
-
19
-
20
-
21
-
22
-
23
-
24
-
25
-
26
-
27
-
28
-
29
-
30
-
31
-
32
-
33
-
34
-
35
-
36
-
37
-
38
-
39
-
40
-
41
-
42
-
43
-
44
-
45
-
46
-
47
-
48
-
49
-
50
-
51
-
52
-
53
-
54
-
55
-
56
-
57
-
58
-
59
-
60
-
61
-
62
-
63
-
64
-
65
-
66
-
67
 |
 |