Nokia 6256i Nokia 6256i User Guide in English - Page 33
To Pix Place, number or search for it in contacts, and select
 |
View all Nokia 6256i manuals
Add to My Manuals
Save this manual to your list of manuals |
Page 33 highlights
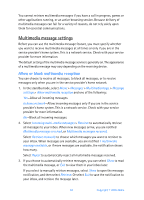
2. Enter the text of your message, and select Options > Insert > Image, Sound clip, New sound clip, Video clip, Slide, Business card or Calendar note. The list of available folders in the Gallery is shown. 3. Open the desired folder, scroll to the image, sound clip, or video clip, and select Options > Insert. Copyright protections may prevent some images, ring tones, and other content from being copied, modified, transferred, or forwarded. 4. To add a new page (also called a slide) to the message, select Options > Insert > Slide. Each slide can contain text, one image, a business card, calendar note, and one sound clip. If the message contains several slides, you can open the desired slide by selecting Previous slide, Next slide, or Slide list. 5. To set the time interval between the slides, select Options >Slide timing, enter the time interval, and select OK. 6. To move the text to the top or bottom of the message, select Options > Place text first or Place text last. 7. To insert a name from contacts, select Options > More options > Insert contact, scroll to the desired name, and select Select. 8. To insert a number, select Options > More options > Insert number, enter the number or search for it in contacts, and select OK. 9. To insert a calendar note, select Options > Insert > Calendar note. 10. To insert a business card, select Options > Insert > Business card. 11. To delete an image, slide, video clip, or sound clip from the message, select Options > Delete > Image, Sound clip, Video clip, or Slide. 12. To add a subject to the message, select Options > More options > Edit subject, enter a subject, and select OK. 13. To view the message or slide presentation before sending it, select Options > Preview. 14. To save the message to the Saved items folder, select Options > Save message. 15. To send the message, select Send, or select Options > Send to e-mail, To Pix Place, Send to many, or Send to distrib. list. To Pix Place is an online network service. Check with your service provider for more information. 32 Copyright © 2005 Nokia
-
 1
1 -
2
-
3
-
4
-
5
-
6
-
7
-
8
-
9
-
10
-
11
-
12
-
13
-
14
-
15
-
16
-
17
-
18
-
19
-
20
-
21
-
22
-
23
-
24
-
25
-
26
-
27
-
 28
28 -
 29
29 -
 30
30 -
 31
31 -
 32
32 -
 33
33 -
 34
34 -
 35
35 -
 36
36 -
 37
37 -
 38
38 -
39
-
40
-
41
-
42
-
43
-
44
-
45
-
46
-
47
-
48
-
49
-
50
-
51
-
52
-
53
-
54
-
55
-
56
-
57
-
58
-
59
-
60
-
61
-
62
-
63
-
64
-
65
-
66
-
67
-
68
-
69
-
70
-
71
-
72
-
73
-
74
-
75
-
76
-
77
-
78
-
79
-
80
-
81
-
82
-
83
-
84
-
85
-
86
-
87
-
88
-
89
-
90
-
91
-
92
-
93
-
94
-
95
-
96
-
97
-
98
-
99
-
100
-
101
-
102
-
103
-
104
-
105
-
106
-
107
-
108
-
109
-
110
-
111
-
112
-
113
-
114
-
115
-
116
-
117
-
118
-
119
-
120
-
121
-
122
-
123
 |
 |