Oki C7200 Service Manual - Page 253
Count, Description of Count
 |
View all Oki C7200 manuals
Add to My Manuals
Save this manual to your list of manuals |
Page 253 highlights
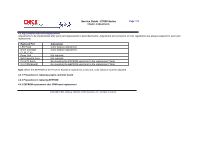
Service Guide - C7000 Series Chapter 4 Adjustments Page: 115 4.2.2 Precautions in replacing EEPROM When the EEPROM is not removed from the board and placed on the new board at the time of (engine controller board (71K PWB)) replacement, or when the EEPROM is replaced with new one, the version read (fuse cut) function shown in Section 2.14 is disabled. The printer must be switched from the factory mode to the shipping mode using the following setting procedure: Changing the setting using operator panel 1. Remove the main controller board. 2. While holding the (1) and (4) keys down, turn the power on to enter the engine maintenance mode (level 1). 3. With "ENGINE DIAG MODE XX.XX" on the display, press the (2) and (4) keys to enter the engine maintenance mode (level 3). 4. Press the (1) and (5) keys until 'LOCAL PARAMETER SET" appears on the upper display. 5. Press the (2) and (6) keys until "FACTORY WORKING MODE" appears. 6. While "FACTORY WORKING MODE" is being displayed, use the (3) and (7) keys to select a setting value. 7. Select "SHIPPING MODE" (fuse cut enabled), press the (3) and (7) keys in combination. Then, the mode name stops blinking and the set value is registered. The life information on the belt, toner, IDs etc. is cleared due to replacement of the EEPROM. Take note that an error occurs in the each unit's life count until the unit is replaced. Following is counts cleared after the replacement of the EEPROM. Item Fuser Transfer Belt Black Imaging Drum Cyan Imaging Drum Magenta Imaging Drum Yellow Imaging Drum Black Toner Cyan Toner Magenta Toner Yellow Toner Total Sheets Feed Count Fuser Life Transfer Belt Life Each Imaging Drum Life Toner Consumption Description of Count A value in letter paper sheets converted from the number of sheets fed after the installation of a new fuser unit. A value in letter paper sheets converted from the number of sheets fed after the installation of a new belt unit. A value in letter paper sheets converted from the installation of a new ID unit. The number of dots printed. Printer Life The total number of page printed.
-
 1
1 -
2
-
3
-
4
-
5
-
6
-
7
-
8
-
9
-
10
-
11
-
12
-
13
-
14
-
15
-
16
-
17
-
18
-
19
-
20
-
21
-
22
-
23
-
24
-
25
-
26
-
27
-
28
-
29
-
30
-
31
-
32
-
33
-
34
-
35
-
36
-
37
-
38
-
39
-
40
-
41
-
42
-
43
-
44
-
45
-
46
-
47
-
48
-
49
-
50
-
51
-
52
-
53
-
54
-
55
-
56
-
57
-
58
-
59
-
60
-
61
-
62
-
63
-
64
-
65
-
66
-
67
-
68
-
69
-
70
-
71
-
72
-
73
-
74
-
75
-
76
-
77
-
78
-
79
-
80
-
81
-
82
-
83
-
84
-
85
-
86
-
87
-
88
-
89
-
90
-
91
-
92
-
93
-
94
-
95
-
96
-
97
-
98
-
99
-
100
-
101
-
102
-
103
-
104
-
105
-
106
-
107
-
108
-
109
-
110
-
111
-
112
-
113
-
114
-
115
-
116
-
117
-
118
-
119
-
120
-
121
-
122
-
123
-
124
-
125
-
126
-
127
-
128
-
129
-
130
-
131
-
132
-
133
-
134
-
135
-
136
-
137
-
138
-
139
-
140
-
141
-
142
-
143
-
144
-
145
-
146
-
147
-
148
-
149
-
150
-
151
-
152
-
153
-
154
-
155
-
156
-
157
-
158
-
159
-
160
-
161
-
162
-
163
-
164
-
165
-
166
-
167
-
168
-
169
-
170
-
171
-
172
-
173
-
174
-
175
-
176
-
177
-
178
-
179
-
180
-
181
-
182
-
183
-
184
-
185
-
186
-
187
-
188
-
189
-
190
-
191
-
192
-
193
-
194
-
195
-
196
-
197
-
198
-
199
-
200
-
201
-
202
-
203
-
204
-
205
-
206
-
207
-
208
-
209
-
210
-
211
-
212
-
213
-
214
-
215
-
216
-
217
-
218
-
219
-
220
-
221
-
222
-
223
-
224
-
225
-
226
-
227
-
228
-
229
-
230
-
231
-
232
-
233
-
234
-
235
-
236
-
237
-
238
-
239
-
240
-
241
-
242
-
243
-
244
-
245
-
246
-
247
-
 248
248 -
 249
249 -
 250
250 -
 251
251 -
 252
252 -
 253
253 -
 254
254 -
 255
255 -
 256
256 -
 257
257 -
 258
258 -
259
-
260
-
261
-
262
-
263
-
264
-
265
-
266
-
267
-
268
-
269
-
270
-
271
-
272
-
273
-
274
-
275
-
276
-
277
-
278
-
279
-
280
-
281
-
282
-
283
-
284
-
285
-
286
-
287
-
288
-
289
-
290
-
291
-
292
-
293
-
294
-
295
-
296
-
297
-
298
-
299
-
300
-
301
-
302
-
303
-
304
-
305
-
306
-
307
-
308
-
309
-
310
-
311
-
312
-
313
-
314
-
315
-
316
-
317
-
318
-
319
-
320
-
321
-
322
-
323
-
324
-
325
-
326
-
327
-
328
-
329
-
330
-
331
-
332
-
333
-
334
-
335
-
336
-
337
-
338
-
339
-
340
-
341
-
342
-
343
-
344
-
345
-
346
-
347
-
348
-
349
-
350
-
351
-
352
-
353
-
354
-
355
-
356
-
357
-
358
-
359
-
360
-
361
-
362
-
363
-
364
-
365
-
366
-
367
-
368
-
369
-
370
-
371
-
372
-
373
-
374
-
375
-
376
-
377
-
378
-
379
-
380
-
381
-
382
-
383
-
384
-
385
-
386
-
387
-
388
-
389
-
390
-
391
 |
 |
