Onkyo TX SR501 Owner Manual
Onkyo TX SR501 - AV Receiver - 5.1 Channel Manual
 |
UPC - 751398005213
View all Onkyo TX SR501 manuals
Add to My Manuals
Save this manual to your list of manuals |
Onkyo TX SR501 manual content summary:
- Onkyo TX SR501 | Owner Manual - Page 1
AV Receiver TX-SR501 TX-SR501E Instruction Manual Thank you for purchasing the Onkyo AV Receiver. Please read this manual thoroughly before making connections and plugging in the unit. Following the instructions in this manual will enable you to obtain optimum performance and listening enjoyment - Onkyo TX SR501 | Owner Manual - Page 2
NO USER-SERVICEABLE PARTS INSIDE. REFER SERVICING TO QUALIFIED SERVICE PERSONNEL. Code, ANSI/NFPA 70, provides information with regard to proper grounding of the mast and supporting structure, grounding of the lead-in wire to an antennadischarge unit, size of grounding conductors, location of antenna - Onkyo TX SR501 | Owner Manual - Page 3
described in this instruction manual is in compliance with the corresponding technical standards such as EN60065, EN55013, EN55020 and EN61000-3-2, -3-3. GROEBENZELL, GERMANY I. MORI ONKYO EUROPE ELECTRONICS GmbH FIGURE 1: EXAMPLE OF ANTENNA GROUNDING AS PER NATIONAL ELECTRICAL CODE, ANSI/NFPA 70 - Onkyo TX SR501 | Owner Manual - Page 4
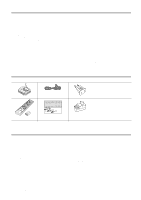
with North American and European models. Remote controller & two batteries (AA/R6) Speaker cable labels 75/300-ohm antenna adapter * In catalogs and on packaging, the letter added to the end of the product name indicates the color of the TX-SR501/TX-SR501E. Specifications and operation are the - Onkyo TX SR501 | Owner Manual - Page 5
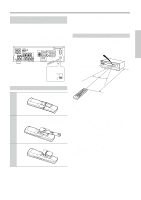
. Using the Remote Controller To use the remote controller, point it at the TX-SR501/ TX-SR501E's remote control sensor, as shown below. The TX-SR501/TX-SR501E's STANDBY indicator flashes while a signal is being received from the remote controller. Remote control sensor TX-SR501/TX-SR501E Standby - Onkyo TX SR501 | Owner Manual - Page 6
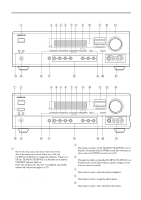
MODE MEMORY FM MODE CLEAR problem, plug the TX-SR501/TX-SR501E into a different branch circuit. R ST U B STANDBY/ON button (24) This button is used to set the TX-SR501/TX-SR501E TX-SR501/TX-SR501E is in Standby mode, and it flashes while a signal is being received from the remote controller - Onkyo TX SR501 | Owner Manual - Page 7
lights up when the TX-SR501E is tuned into a radio station that supports RDS (Radio Data System). MEMORY (31): This indicator lights up when programming radio presets. FM STEREO (31): This indicator lights up when the TX-SR501/TX-SR501E is tuned into a stereo FM station. 5 SLEEP indicator (33 - Onkyo TX SR501 | Owner Manual - Page 8
on another Onkyo AV component, for example, a CD player, DVD player, or cassette recorder. The TX-SR501/TX-SR501E's remote controller can then be used to control that component. To use , you must make an analog RCA/phono connection between your TX-SR501/ TX-SR501E and the other AV component, even - Onkyo TX SR501 | Owner Manual - Page 9
P This page describes only those buttons that can be used to control the TX-SR501/TX-SR501E when the remote controller is in RCVR mode (Receiver mode). The other modes, and information on using the remote controller to control your other AV components, are explained on page 40. To select RCVR mode - Onkyo TX SR501 | Owner Manual - Page 10
Digital Inputs The TX-SR501/TX-SR501E's optical digital connectors have a shutter-type cover that opens when an optical plug is inserted, and closes when it's removed. Push the plug in all the way. RCA/phono AV Connection Color Coding RCA/phono AV connections are usually color coded: red, white - Onkyo TX SR501 | Owner Manual - Page 11
supply power to another AV component, as shown. The connector type depends on the country in which you purchased your TX-SR501/TX-SR501E. COMPONENT VIDEO ANTENNA VIDEO 1 / 2 / 3 DVD IN IN OUT AM FM 75 Y PB PR DIGITAL INPUT OPTICAL COAXIAL 2 1 REMOTE CONTROL VIDEO 2 IN VIDEO 1 OUT - Onkyo TX SR501 | Owner Manual - Page 12
Use an S-Video cable to connect the TX-SR501/ TX-SR501E's S VIDEO MONITOR OUT to an S-Video input on your TV, as shown. COMPONENT VIDEO ANTENNA VIDEO 1 / 2 / 3 DVD IN IN OUT AM FM 75 Y PB PR DIGITAL INPUT OPTICAL COAXIAL 2 1 REMOTE CONTROL VIDEO 2 IN VIDEO 1 OUT IN DVD MONITOR - Onkyo TX SR501 | Owner Manual - Page 13
audio cable to connect the TX-SR501/ TX-SR501E's COAXIAL DIGITAL INPUT to the coaxial output on your DVD player, as shown. OPTICAL 1 COMPONENT VIDEO ANTENNA VIDEO 1 / 2 / 3 DVD IN IN OUT AM FM 75 Y PB PR DIGITAL INPUT OPTICAL COAXIAL 2 1 REMOTE CONTROL VIDEO 2 IN VIDEO 1 OUT IN - Onkyo TX SR501 | Owner Manual - Page 14
Use an RCA/phono audio cable to connect the TX-SR501/ TX-SR501E's L/R VIDEO 2 IN connectors to the analog audio outputs on your VCR, as shown. COMPONENT VIDEO ANTENNA VIDEO 1 / 2 / 3 DVD IN IN OUT AM FM 75 Y PB PR DIGITAL INPUT OPTICAL COAXIAL 2 1 REMOTE CONTROL VIDEO 2 IN VIDEO - Onkyo TX SR501 | Owner Manual - Page 15
RCA/phono audio cable to connect the TX-SR501/TX-SR501E's L/R VIDEO 1 OUT connectors to the analog audio inputs on your VCR, as shown. Connect one or the other COMPONENT VIDEO ANTENNA VIDEO 1 / 2 / 3 DVD IN IN OUT AM FM 75 Y PB PR DIGITAL INPUT OPTICAL COAXIAL 2 1 REMOTE CONTROL - Onkyo TX SR501 | Owner Manual - Page 16
-SR501/ TX-SR501E's S VIDEO VIDEO 2 IN to the S-Video output on your satellite/cable tuner, LD player, etc., as shown. • Your TV must also be connected via S-Video. COMPONENT VIDEO ANTENNA VIDEO 1 / 2 / 3 DVD IN IN OUT AM FM 75 Y PB PR DIGITAL INPUT OPTICAL COAXIAL 2 1 REMOTE CONTROL - Onkyo TX SR501 | Owner Manual - Page 17
-in Phono Preamp Use an RCA/phono audio cable to connect the TX-SR501/ TX-SR501E's L/R TAPE IN connectors to the audio outputs on your turntable, as shown. COMPONENT VIDEO ANTENNA VIDEO 1 / 2 / 3 DVD IN IN OUT AM FM 75 Y PB PR DIGITAL INPUT OPTICAL COAXIAL 2 1 REMOTE CONTROL VIDEO - Onkyo TX SR501 | Owner Manual - Page 18
, and use another RCA/phono audio cable to connect the TX-SR501/TX-SR501E's L/R TAPE OUT connectors to the DAT or CD/MD recorder inputs, as shown. COMPONENT VIDEO ANTENNA VIDEO 1 / 2 / 3 DVD IN IN OUT AM FM 75 Y PB PR DIGITAL INPUT OPTICAL COAXIAL 2 1 REMOTE CONTROL VIDEO 2 IN VIDEO - Onkyo TX SR501 | Owner Manual - Page 19
-SR501/TX-SR501E REMOTE CONTROL connector Onkyo CD player cable You must make an analog RCA/phono connection between your TX-SR501/ TX-SR501E and AV component, even if they are connected digitally. connector Onkyo cassette recorder COMPONENT VIDEO ANTENNA VIDEO 1 / 2 / 3 DVD IN IN OUT AM FM - Onkyo TX SR501 | Owner Manual - Page 20
sound speakers. Obviously, the positions you choose will depend on the shape of your room and the position of your TV or projector screen. Either way, use this illustration as a guide negative (-) terminal. The TX-SR501/TX-SR501E's positive (+) speaker terminals are color-coded for ease of identifi - Onkyo TX SR501 | Owner Manual - Page 21
subwoofCeOMrP.OINfENyT oVIDuEOr ANTENNA VIDEO 1 / 2 / 3 subwoINofer DVD IN OUT doesn't hYave an AM FM 75 amp built-in, you'll need to use an external ampPB. See the manual suppliedPRwith VIDEO 2 IN your subwoofer for more DIGITAL INPUT REMOTE CONTROL OPTICAL COAXIAL information - Onkyo TX SR501 | Owner Manual - Page 22
you'll need to tune into an AM radio station and adjust the position of the AM antenna to achieve the best possible reception. Keep the antenna as far away as possible from your TX-SR501/TX-SR501E, TV, speaker cables, and power cords. If you cannot achieve good reception with the supplied indoor AM - Onkyo TX SR501 | Owner Manual - Page 23
into the 75Ω socket. Using a TV/FM Antenna Splitter It's best not to use the same antenna for both FM and TV reception, as this can cause interference problems. If circumstances demand it, use a TV/FM antenna splitter, as shown. TV/FM antenna splitter To AV reciever To TV (or VCR) Connecting an - Onkyo TX SR501 | Owner Manual - Page 24
in the OFF position. 3 STANDBY/ON Remote controller Press the [STANDBY/ON] button. The TX-SR501/TX-SR501E comes on, the display lights up, and the STANDBY indicator goes off. To turn off the TX-SR501/TX-SR501E, press the [STANDBY/ON] button. The TX-SR501/TX-SR501E will enter Standby mode. To - Onkyo TX SR501 | Owner Manual - Page 25
subwoofer may produce no sound when you play material in certain surround formats, including 2-channel Dolby Digital, DTS, etc. • The subwoofer mode cannot be set if a pair of headphones are connected, speaker set B is on, or Multich is selected. • The TX-SR501/TX-SR501E remembers the subwoofer mode - Onkyo TX SR501 | Owner Manual - Page 26
sound system. There is no speaker configuration for speaker set B. • Before configuring, you must: -Disconnect any headphones (see page 33) -Turn off speaker set B (see page 32) -Make sure that Multich is off (see page 29) • The TX-SR501/TX-SR501E frequency response in the manuals supplied with your - Onkyo TX SR501 | Owner Manual - Page 27
so that you can hear all speakers equally at the listening position. Note: You cannot use this function while the TX-SR501/ TX-SR501E is muted (see page 33). 1 Press the remote controller's [TEST] button, and turn up the vol- ume so that you can hear the test tone sufficiently. While each - Onkyo TX SR501 | Owner Manual - Page 28
AV components. Remote Controller: See pages 40, 41 for information on using the TX-SR501/ TX-SR501E's remote controller to control your other AV that and force the TX-SR501/TX-SR501E to use the analog input. In addition, you can set the DVD input source to use the multi-channel inputs. 1 Press - Onkyo TX SR501 | Owner Manual - Page 29
. 1) To fix the signal format, use the [AUDIO SELECTOR] button, or the remote controller's [AUDIO SEL] button to select Auto. 2) While "Auto" is being displayed, -channel inputs, you must connect an AV component with individual 5.1-surround analog outputs to the TX-SR501/TX-SR501E's multi-channel - Onkyo TX SR501 | Owner Manual - Page 30
or FM. In this example, the FM band has been selected. 2 MASTER VOLUME Band Frequency To adjust the volume, use the MASTER VOLUME control. release it. If you selected the FM band: The AUTO indicator appears on the display and the TX-SR501/TX-SR501E searches for the next station automatically. - Onkyo TX SR501 | Owner Manual - Page 31
Use the [TUNER] input selector button to select either AM or FM. In this example, the FM band has been selected. 2 PRESET/ADJUST Remote controller Use the [PRESET/ADJUST] [ ] [ ] buttons, or the remote controller's PRESET [ ] [ ] buttons to select the presets. In this example, preset #3 has - Onkyo TX SR501 | Owner Manual - Page 32
for the current input source. When the input source is not AM or FM: Input source & volume Sound format* Turning Speaker Sets On & Off You can turn on and off speaker sets A and B individually. A SPEAKERS B Remote controller To turn on or off speaker set A, use the SPEAKER [A] button, or the - Onkyo TX SR501 | Owner Manual - Page 33
TX-SR501/TX-SR501E (remote controller only) With this function you can temporarily mute the output of the TX-SR501/TX-SR501E. Remote controller Press the remote controller's [MUTING] button. The output is muted and the MUTING indicator flashes on the display, as shown. To unmute the TX-SR501/ TX - Onkyo TX SR501 | Owner Manual - Page 34
sound decoders and DSP programs, the TX-SR501/TX-SR501E can transform your home listening room into a movie theater or concert hall. To get the most from surround sound received. Likewise, the DTS listening modes are available only while a DTS format signal is being received Digital 2-channel Others - Onkyo TX SR501 | Owner Manual - Page 35
with up to 5.1 channels. With this format you can experience the same superb sound that you get at a movie theater or concert hall. Use ES decoding with up to 6.1 channels. Use this mode with DVDs, LDs, or CDs that bear the DTS-ES logo. The TX-SR501/TX-SR501E supports both DTS-ES Discrete 6.1 - Onkyo TX SR501 | Owner Manual - Page 36
2-channel sources identification code for DTS-ES remote controller's [DSP] button works differently to the TX-SR501/TX-SR501E's [DSP] button. • TX-SR501/TX-SR501E [DSP] button:You can select the following Onkyo DSP modes: Orchestra, Unplugged, Studio Mix, TV Logic, and All Ch St. • Remote controller - Onkyo TX SR501 | Owner Manual - Page 37
adjusting the sound, including Supported listening mode" column. See page 34 for information on listening modes. Function Range Default Supported MODE MEMORY FM MODE CLEAR Remote controller Use the [PRESET/ADJUST] buttons on the TX-SR501/ TX-SR501E, or the ADJUST buttons on the remote controller - Onkyo TX SR501 | Owner Manual - Page 38
frequency sounds output parts TX-SR501/TX-SR501E to Standby. ■ Cinema Filter With this function, you can soften the harshness, or brightness sometimes experienced with movie soundtracks, which are typically mixed for reproduction in a movie theater home theaters, adding some width to the center channel - Onkyo TX SR501 | Owner Manual - Page 39
Remote controller You can listen to the source while recording. The TX-SR501/TX-SR501E's VOLUME control has no effect on recording. Recording from Different AV VIDEO ANTENNA VIDEO 1 / 2 / 3 DVD IN IN OUT AM FM 75 Y PB PR DIGITAL INPUT OPTICAL COAXIAL 2 1 REMOTE CONTROL VIDEO - Onkyo TX SR501 | Owner Manual - Page 40
AV Components RC-479S (not North America) Connecting your -compatible Onkyo CD player, DVD player, or cassette recorder to the TX-SR501/TX-SR501E via allows you to control it with the TX-SR501/ TX-SR501E's remote controller. Since you only need to point the remote controller at the TX-SR501/TX - Onkyo TX SR501 | Owner Manual - Page 41
code into the remote controller. Note: • To use the function, you must make an connection and an analog RCA/phono connection between the AV component and your TX-SR501, even if they are connected digitally. Entering the Manufacturer's Code If you're using an Onkyo CD player connected to the TX-SR501 - Onkyo TX SR501 | Owner Manual - Page 42
to enter the manufacturer's code for your AV component into the remote controller, see page 41. 1 Point the remote controller at the TX-SR501 and use the input selector buttons to select an input source for the TX-SR501. 2 Use the remote controller's mode buttons (i.e., [VCR], [TV], [CABLE/SAT], [CD - Onkyo TX SR501 | Owner Manual - Page 43
, 0 OK TV CH UP TV CH DOWN TV VOL UP TV VOL DOWN TV/VCR TV MUTE 4. VCR control buttons Control TV if appropriate TV code has been entered 1. Input Selectors 3. TV control buttons Control VCR if appropriate VCR code has been entered Power on/off Enter numbers Select next received channel Select - Onkyo TX SR501 | Owner Manual - Page 44
Using the Remote Controller RC-518M with Your Other AV Components-Continued Cable mode* You must enter the appropriate manufacturer's code (see page 41). Satellite mode* You must enter the appropriate manufacturer's code (see page 41). 3. 2. CABLE/SAT 3. 2. CABLE/SAT 4. Cable control buttons - Onkyo TX SR501 | Owner Manual - Page 45
Troubleshooting Amp Symptom Can't turn on the TX-SR501/TX-SR501E? The TX-SR501/TX-SR501E shuts down immediately after being turned on? The buttons on the TX-SR501/TX-SR501E and remote controller don't work? There's no sound coming from the speakers? Only the front speakers are working? The center - Onkyo TX SR501 | Owner Manual - Page 46
component. To control an AV component connected via , point the remote controller at the TX-SR501/ TX-SR501E. To control an AV component that's not connected via , point the remote controller at that AV component (pages 40, 42) You've made an connection but not an analog RCA/phono connection. To - Onkyo TX SR501 | Owner Manual - Page 47
(page 23). AM reception is hindered by a high-pitched noise? Interference caused by your TV. Move the AM loop antenna as far away as possible from your TV. Move the TX-SR501/TX-SR501E as far away as possible from your TV. FM reception and stereo separation are poor even though the TUNING and - Onkyo TX SR501 | Owner Manual - Page 48
Vp-p, 75 Ω (PB, PR) TUNER SECTION FM Tuning Range North American models: Other models: Usable Channel A 370 W 370 W REMOTE CONTROL Transmitter: Signal range: Power Sales & Product Planning Div. : 2-1, Nisshin-cho, Neyagawa-shi, OSAKA 572-8540, JAPAN Tel: 072-831-8111 Fax: 072-831-8124 ONKYO
-
 1
1 -
 2
2 -
 3
3 -
 4
4 -
 5
5 -
 6
6 -
 7
7 -
8
-
9
-
10
-
11
-
12
-
13
-
14
-
15
-
16
-
17
-
18
-
19
-
20
-
21
-
22
-
23
-
24
-
25
-
26
-
27
-
28
-
29
-
30
-
31
-
32
-
33
-
34
-
35
-
36
-
37
-
38
-
39
-
40
-
41
-
42
-
43
-
44
-
45
-
46
-
47
-
48
 |
 |
E
n
AV Receiver
TX-SR501
TX-SR501E
Instruction Manual
Thank you for purchasing the Onkyo AV Receiver.
Please read this manual thoroughly before making con-
nections and plugging in the unit.
Following the instructions in this manual will enable you
to obtain optimum performance and listening enjoyment
from your new AV Receiver.
Please retain this manual for future reference.
Contents
Introduction
Important Safeguards
................................................
2
Precautions
................................................................
3
Supplied Accessories
................................................
4
Features
.....................................................................
4
Before Using the TX-SR501/TX-SR501E
...............
5
Controls & Connectors
.............................................
6
Connections
Connecting Your AV Components
.........................
10
Connecting
-compatible AV Components
........
19
Installing Your Speakers
........................................
20
Connecting Antenna
...............................................
22
Setup
Powering Up & Setting Up the TX-SR501/
TX-SR501E
.........................................................
24
Important—First Time Setup
..............................
24
Configuring Speaker Set A
.....................................
26
Operation
Playing Your AV Components
...............................
28
Using the Tuner
......................................................
30
Common Functions
.................................................
32
Using the Listening Modes
.....................................
34
Audio Adjust Functions
..........................................
37
Recording
................................................................
39
Remote Controller
Using the Remote Controller RC-479S with Your
Other AV Components
........................................
40
Using the Remote Controller RC-518M with Your
Other AV Components
........................................
41
Appendix
Troubleshooting
......................................................
45
Specifications
..........................................................
48