Onkyo TX-SV444 Owner Manual - Page 15
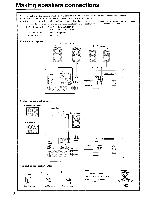
Connecting, power
 |
View all Onkyo TX-SV444 manuals
Add to My Manuals
Save this manual to your list of manuals |
Page 15 highlights
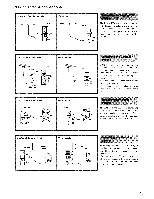
Basic operations POWER/ SYSTEM STAND-BY indicator 3-D BASS MASTER VOLUME L.• ° I SPEAKERS A 7 I Input selectors BASS I BALANCE MULTI-CH INPUT TREBLE 0 0 To AC outlet POWER PT AND BYO)", (U.S. & Canadian models) or SYSTEM • ON • OP, (Other models) Connecting the power Before plugging in the receiver, confirm that all connections have been made properly. Insert the AC power supply cord into the wall outlet. Press the POWER (or SYSTEM) but- ton. Please refer to the "Power button and Stand-by indicator" explanation on the page 16. • • Turning on this receiver's power may cause a momentary power surge, which might interfere with other electrical equipment, such as computers. If so, use a wall outlet on a different circuit. 1 Listening to your favorite source AUX APE, MONII Oft PHONO OP INPUT SELECTOR MAU% TAPE TUNER PHONO CD I VIDEOL VIDEO-2 / abase aaoaal SIULTI-CH INPUT [ 1. Press the desired input selector button or MULTI-CH INPUT button (e.g. PHONO). The appropriate letters (e.g. MONO) appear on the display. Confirm that the TAPE MON. indicator is not lit on the display. If the indicator is lit, press the TAPE (MONITOR) button to turn off the TAPE MON. indicator and press the desired input selector button. Also verify that the audio muting is off. 2 SPEAKERS A 2. Press the SPEAKERS A button. SPEAKERS A indicator lights up. (Refer to the "Speakers selector" on the page 16 for details.) MASTER VOLUME L_ L- L o aaaad sasae ( I OLUME iI i 3. Start the selected input source playing. Follow the operating instructions of that unit. 4. Set the volume to appropriate level using the MASTER VOLUME control or VOLUME A(up)/Y(down) buttons on the remote controller. These controls set the volume of the Front, Center, and Rear (Surround) speakers. 5. Adjust the tone controls. 5 LE BALANCE 15
-
 1
1 -
2
-
3
-
4
-
5
-
6
-
7
-
8
-
9
-
 10
10 -
 11
11 -
 12
12 -
 13
13 -
 14
14 -
 15
15 -
 16
16 -
 17
17 -
 18
18 -
 19
19 -
 20
20 -
21
-
22
-
23
-
24
-
25
-
26
-
27
-
28
 |
 |
