Onkyo TX-SV444 Owner Manual - Page 6
remote, controller
 |
View all Onkyo TX-SV444 manuals
Add to My Manuals
Save this manual to your list of manuals |
Page 6 highlights
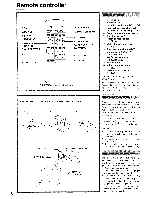
Remote controller 1. SLEEP 2. POWER 3. INPUT SELECTOR 4. DECK-A, DECK-B 5. CH-SELECTOR 6. CD 7, TPQT TrINP POWER SL EP SUP ,POOE MULT.M Tn. n rPUTnSTELECTO7R VE 3- n ' o on 0 0 (±) ±. ) • (±)- Ocr'O- I NARA°. NE CONTROL LEVEL VOLUME I I o LI) O ONKYO HEW, COP.'S LEP 8. SUR. MODE 9. MULTI-CH INPUT 10. TUNER 11. KARAOKE 12. KEY CONTROL 13. MUTING 14. VOLUME 15. LEVEL (TX-SE500's remote controller shown) Remote controller 1. Sleep button [17] 2. Power button [16] 3. Input Selector buttons [15, 21, 24] 4. Tape deck operation buttons [14] 5. Channel Selector button [21, 22] 6. CD player operation buttons [14] 7. Test Tone button [21] 8. Surround Mode button [21, 22, 24] 9. Multi Channel Input button [15, 22] 10. Tuner operation buttons [19] 11. Karaoke mode button [24] (TX-SE500 only) 12. Key Control button [24] (TX-SE500 only) 11. Muting biitt.n [171 14. Volume up/down buttons [15, 21, 24] 15. Level up/down buttons [21, 22, 24] Italic numbers are only for the model TXSE500 features. Note for customers other than U.S.A. and Canada: the remote control cannot be used when the SYSTEM button on the front panel is set to the OFF. Insert the batteries into the remote controller according to the illustration. G0 Remote control sensor STAND-BY indicator 30' TX-SV444 or TX-SE500 approx. 5 m (16 feet) 6 Regarding the batteries Average battery life is about one year, depending upon the frequency of use and the environment (temperature and humidity) in which the remote control is used. Only use batteries of the kind specified in the table below. Type Voltage Size Manganese or Alkaline I .5V AA, R6 (UM-3) or LR6 (AM-3) Warning • Do not leave an expired battery in the case - it may leak or damage the remote controller. • Do not use nickel cadmium (rechargeable) batteries. • Replace both batteries at once; do not use one old battery and one new battery. the remote controller The STAND-BY indicator lights when a signal is received from the remote controller. The following information will help you get optimal use from the remote controller. • Place this receiver away from direct bright light, which can prevent proper operation of the remote controller. • Make sure audio rack doors do not have tinted glass. If this receiver is placed behind such a door, this may prevent proper remote control operation. • Using other remote controllers in the same room as this receiver's remote controller may cause interference.
-
 1
1 -
 2
2 -
 3
3 -
 4
4 -
 5
5 -
 6
6 -
 7
7 -
 8
8 -
 9
9 -
 10
10 -
 11
11 -
 12
12 -
13
-
14
-
15
-
16
-
17
-
18
-
19
-
20
-
21
-
22
-
23
-
24
-
25
-
26
-
27
-
28
 |
 |
