Panasonic CF-19CDBAXVM Service Manual - Page 22
Disassembly/Reassembly
 |
UPC - 092281864785
View all Panasonic CF-19CDBAXVM manuals
Add to My Manuals
Save this manual to your list of manuals |
Page 22 highlights
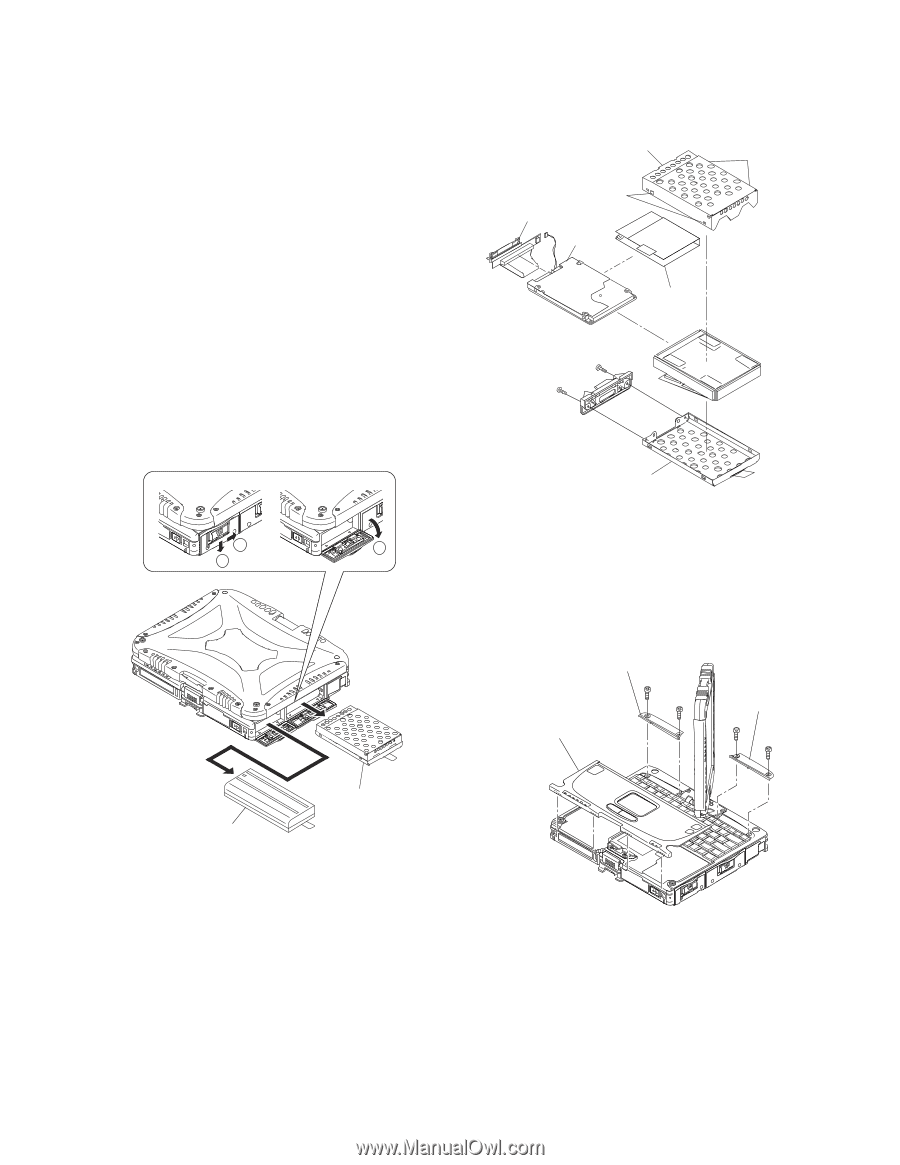
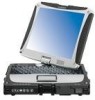
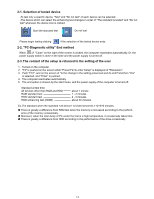
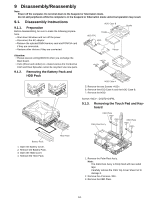
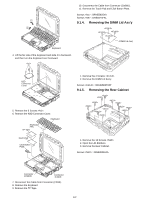
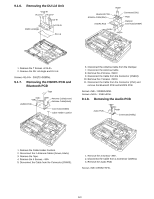
9 Disassembly/Reassembly Note: Power off the computer. Do not shut down to the Suspend or hibernation mode. Do not add peripherals while the computer is in the Suspend or hibernation mode; abnormal operation may result. 9.1. Disassembly Instructions 9.1.1. Preparation Before disassembling, be sure to make the following preparations. • Shut down Windows and turn off the power. • Disconnect the AC adaptor. • Remove the optional DIMM memory card and PCMCIA card if they are connected. • Remove other devices if they are connected. HDD Case B HDD FPC Hooks HDD Hooks Heater Attention: • Please execute writing BIOS ID when you exchange the Main Board. • Parts (Sheet and rubber) etc. related various the Conductive Cloth and Heat Spreader cannot be recycled. Use new parts. 9.1.2. Removing the Battery Pack and HDD Pack HDD Case A 5. Remove the two Screws . 6. Remove the HDD Case A and the HDD Case B. 1 3 7. Remove the HDD 2 Screws : DXQT2+D4FNL 9.1.3. Removing the Touch Pad and Keyboard KBD Plate Palm Rest Ass'y KBD Plate Battery Pack 1. Open the Battery Cover. 2. Remove the Battery Pack. 3. Open the HDD Cover. 4. Remove the HDD Pack. HDD Pack 1. Remove the Palm Rest Ass'y. Note: The Palm Rest Ass'y is firmly fixed with two-sided tape. Carefully remove the Palm Top Cover Sheet not to damage it. 2. Remove the 4 Screws . 3. Remove the KBD Plate. 9-1
-
 1
1 -
2
-
3
-
4
-
5
-
6
-
7
-
8
-
9
-
10
-
11
-
12
-
13
-
14
-
15
-
16
-
 17
17 -
 18
18 -
 19
19 -
 20
20 -
 21
21 -
 22
22 -
 23
23 -
 24
24 -
 25
25 -
 26
26 -
 27
27 -
28
-
29
-
30
-
31
-
32
-
33
-
34
-
35
-
36
-
37
-
38
-
39
-
40
-
41
-
42
-
43
-
44
-
45
-
46
-
47
-
48
-
49
-
50
-
51
-
52
-
53
-
54
-
55
-
56
-
57
-
58
-
59
-
60
-
61
-
62
-
63
-
64
-
65
-
66
-
67
-
68
-
69
-
70
-
71
-
72
-
73
-
74
-
75
-
76
-
77
-
78
-
79
-
80
-
81
-
82
-
83
-
84
 |
 |