Panasonic CF-19CDBAXVM Service Manual - Page 57
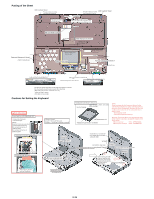
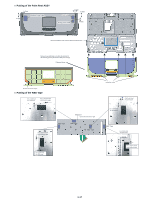
Putting of the Sheet, Cautions for Setting the Keyboard
 |
UPC - 092281864785
View all Panasonic CF-19CDBAXVM manuals
Add to My Manuals
Save this manual to your list of manuals |
Page 57 highlights
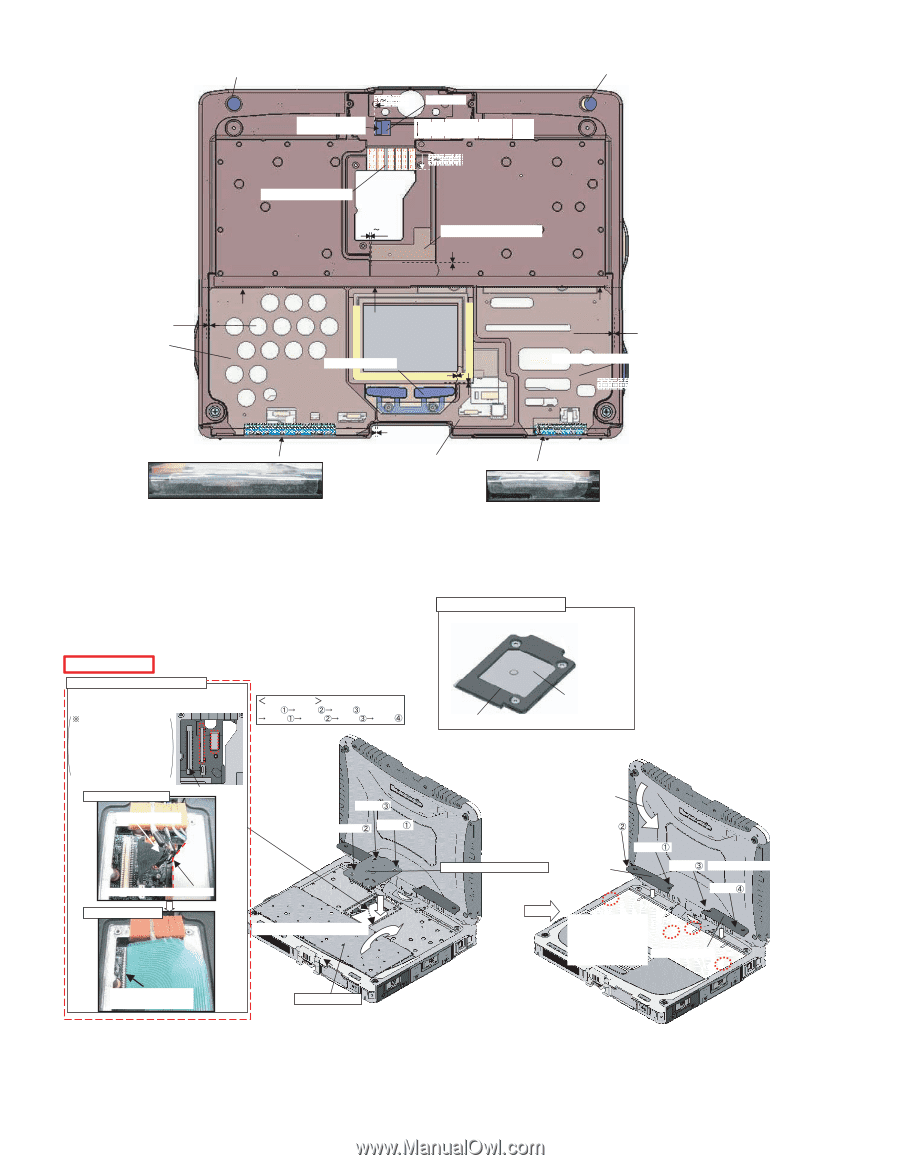
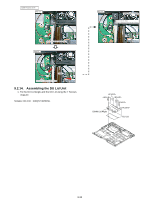
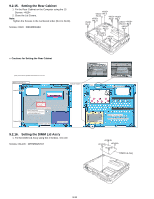
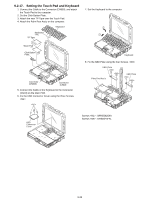
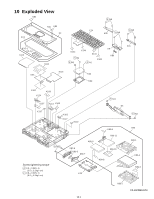
Putting of the Sheet LCD Cushion Sheet Ensure it does not come over the end of the rib. 0 0.5mm Gasket E Ensure it does not come LCD Cushion Sheet over the end of the rib. The paste should be put the left side. Fit to the wall of the end side, and put the surplus to the Cabinet side. 0 0.5mm KB CNT Hole Cushion 0 0.5mm KBD Waterproof Sheet C Match to the circles. 0 to 0.5mm Palmrest Waterproof Sheet L Attach it using the jig Avoid coming over. 0 to 0.5 mm Avoid running over. 0.5 to 1mm Avoid coming over. 0 to 0.5 mm Click Button Plate 0 0.5mm 0 0.5mm Avoid coming over. 0 to 0.5 mm Avoid running over. 0.5 to 1mm Palmrest Waterproof Sheet R Attach it using the jig Fold over the front and attach it. 0.5 1.5mm TP Tape Attach it using the jig Fold over the front and attach it. Avoid running over other sheets. Because the sheets described on this page are waterproof sheets, the whole parts should be put pressure after attaching. (Especially, put pressure around the sheets.) *Apply the load to attach. 30 to 40N (3.0 to 4.0Kgf) Cautions for Setting the Keyboard Safety Working Connect part the LCD CABLE/KBD FFC Connect the Connector to the dotted part. Note: Hold the Connector part when connecting/disconnecting. Do not bend at the foot of stiffening plate. Do not bend at the foot of stiffening plate. Order of fixing Screw Screw Screw Screw Screw Screw Screw Connect the LCD CABLE KBD FFC insert parts Screw Screw Screw Incline to the right. Avoid running over the Top Case Connect the KBD FFC Connect the Keyboard FFC Keyboard Connector Lid Ass'y Use the fixing jig Apply the load to attach. 30 to 40N (3.0 to 4.0 Kgf) KB Connector Lid Keyboard Connector Lid Sheet (Note) Please exchange the KB Connector Lid Ass'y for the reserved that stores the KB cables under the keyboard, when you do the following work. Because KB connector Lid Sheet takes some time for the restoration when it peels off once. - Exchange LCD cable - Remove/Exchange the Keyboard Moreover, if you would like to reuse the removed sheet, please leave it on at least 1 day until the elasticity of the sheet returns. KB Connector Lid : DFHM0406ZA KB Connector Lid Sheet : DFHR3D91ZA Rotate the LCD to make the LCD display face front after setting the KBD. Screw Fix from the Hinge side. KBD Connector LID Ass'y Keyboard Plate(L) Screw Screw Fix from the Hinge side. Screw Before setting the KBD Plate (L) and the KBD Plate (R), press on the positions (four) with the two-sided tapes. 30N(3.0Kgf) Keyboard Plate(R) After inserting the FFC, lock the Connector. Keyboard Ass'y Set using the jig. 9-36
-
 1
1 -
2
-
3
-
4
-
5
-
6
-
7
-
8
-
9
-
10
-
11
-
12
-
13
-
14
-
15
-
16
-
17
-
18
-
19
-
20
-
21
-
22
-
23
-
24
-
25
-
26
-
27
-
28
-
29
-
30
-
31
-
32
-
33
-
34
-
35
-
36
-
37
-
38
-
39
-
40
-
41
-
42
-
43
-
44
-
45
-
46
-
47
-
48
-
49
-
50
-
51
-
 52
52 -
 53
53 -
 54
54 -
 55
55 -
 56
56 -
 57
57 -
 58
58 -
 59
59 -
 60
60 -
 61
61 -
 62
62 -
63
-
64
-
65
-
66
-
67
-
68
-
69
-
70
-
71
-
72
-
73
-
74
-
75
-
76
-
77
-
78
-
79
-
80
-
81
-
82
-
83
-
84
 |
 |