Panasonic CF-19CDBAXVM Service Manual - Page 54
Assembling the DU Lid Unit
 |
UPC - 092281864785
View all Panasonic CF-19CDBAXVM manuals
Add to My Manuals
Save this manual to your list of manuals |
Page 54 highlights
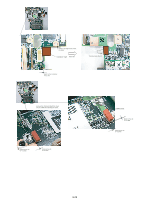
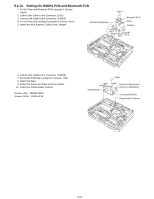
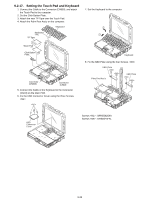
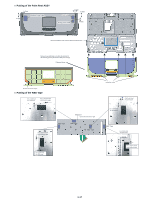
Cable Process 3/3 Step 12 Connect the brown antenna cable. Step 13 Step 14 Cable Holder Cushion Insert it into the boss. (Push it downward from the top of boss.) Cable Connect the additional cable (black). 9.2.14. Assembling the DU Lid Unit 1. Fix the DU Lid Angle and the DU Lid using the 7 Screws. Screws : DXQT2+D25FNL DIMM Lid Angle DU Lid 9-33
-
 1
1 -
2
-
3
-
4
-
5
-
6
-
7
-
8
-
9
-
10
-
11
-
12
-
13
-
14
-
15
-
16
-
17
-
18
-
19
-
20
-
21
-
22
-
23
-
24
-
25
-
26
-
27
-
28
-
29
-
30
-
31
-
32
-
33
-
34
-
35
-
36
-
37
-
38
-
39
-
40
-
41
-
42
-
43
-
44
-
45
-
46
-
47
-
48
-
 49
49 -
 50
50 -
 51
51 -
 52
52 -
 53
53 -
 54
54 -
 55
55 -
 56
56 -
 57
57 -
 58
58 -
 59
59 -
60
-
61
-
62
-
63
-
64
-
65
-
66
-
67
-
68
-
69
-
70
-
71
-
72
-
73
-
74
-
75
-
76
-
77
-
78
-
79
-
80
-
81
-
82
-
83
-
84
 |
 |

9-33
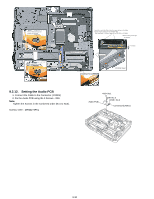
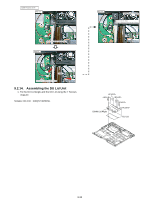
9.2.14.
Assembling the DU Lid Unit
1. Fix the DU Lid Angle and the DU Lid using the 7 Screws.
<K14-9>
Screws <K14-9> : DXQT2+D25FNL
Cable Holder Cushion
Cable
Step 14
Step 12
Step 13
Cable Process 3/3
Connect the brown antenna cable.
Connect the additional cable (black).
Insert it into the boss.
(Push it downward from the top of boss.)
<K14-9>
<K14-9>
DIMM Lid Angle
DU Lid
<K14-9>
<K14-9>
<K14-9>